I generally use Apple iPhoto to create my photo albums to print. I have traveled extensively over the past fifteen years and thought it would be nice to save some of my photo albums in digital format to view on my new iPad mini 3.
You can easily save the books in a suitable compressed pdf file format to load onto your iPad. To do so, bring up your photo album project in iPhoto. View in All Pages format. Then click on the first page of the album while holding down the control key on your keyboard. You should see a list of additional popdown menu options. Select the Save as book option. Give your album a name and safe to your hard drive.
I normally transfer pdfs to my iPad via iTunes file transfer method into GoodReader and then from there I use the "Open in .... " option to put directly into my iBooks on my iPad. That works great and doesn't require syncing via iTunes.
Alternately, you can drag the pdf photo album file into your itunes ibooks and then sync your ipad using iTunes after you select the album and your other books to be synced again.
Once in iBooks you can organize all your photo albums into a category you create - say "My Photo Albums".
Now, you will have a digital copy of your printed photo albums to view on your iPad or iPhone.
I spent one summer making slide shows and albums of old family photos that were stored on DVDs. Looks like now, most computers don't have DVD players and in an effort to have that archive of those family treasures, I am now proceeding with a digital version that can be stored on my old iPad. Rather than selling my old iPad for a few dollars, I have opted to keep it for digital photo books and cookbooks.
I can also use my iPad in remote mode with Apple TV to view these albums on my big screen TV without having to load a DVD into a player.
Tweet
Showing posts with label iPhoto. Show all posts
Showing posts with label iPhoto. Show all posts
Monday, March 16, 2015
Saturday, November 17, 2012
How to Save Photo You Receive in iMessage to iPhoto on Your Laptop
Often I receive a cute video or photo from my family in iMessage on my Mac Book Air. If you want to save it from iMessage directly to iPhoto on your Mac Book Air or computer. You just need to open both iPhoto and iMessage on your computer's desktop. Select the photo or movie in iMessage and then drag and drop it into your iPhoto window.
Tweet
Tweet
Saturday, August 25, 2012
Solution for Transfering Photos from iPad to Computer and Back
When transferring photos between your mobile devices like iPad and iPhone or to your MacBook Air and back, you need to consider the amount of time and bandwidth or data transferred via the cloud. As an alternate solution, one should consider one of the excellent apps available to do this efficiently and seamlessly.
How It Can Be Accomplished with PhotoSync
PhotoSynch is such an app available for the Mac and also the iPhone/iPad devices. PhotoSync allows synching photos in both directions without hassle, using an easy-to-use interface, which allows transfer of all photos or a selection of photos.
* This transfer from device to computer and computer to device can be accomplished via a wireless connection or 3G/LTE. The device to device transfer is available using bluetooth and wifi.
* The number of photos you plan to transfer can be limitless, but I haven't tried that yet.
* You can share photos to other sites such as Facebook, Dropbox, Picasa, and others like Google Drive (the new Google Docs).

* It also has Web Browser viewing capabilities where you can view your photos in a web page from a computer on your same network.
* Transfer is done in the background, allowing iPhone and iPad users to continue with phone calls or games.
* You can select the size to send, which computer to use as your default storage.

* You can setup defaults in the settings of the app for quick transfers and also choose to send to a certain folder or to iPhoto on your computer directly when receiving or sending photos.

Support for Mac and Windows Companion App
The iPad/iPhone app is relatively inexpensive for your iPad/iPhone and comes free for use on your desktop or Mac laptop (Mac OS X10.5 or higher Intel and PPC supported). There is also a Windows PhotoSynch companion app that works for those using a PC as their default computer (Windows XP SP 2 or higher, Windows Vista or higher, Windows 7). Location services needs to be enabled in order to use the app successfully.
For those who don't want to use a cloud server or have limited wifi capability or your internet connection is down this is a great solution as it offers a means to transfer photos and videos between devices and computers using a local network. I give PhotoSync a thumbsup rating of 5 stars for all my fellow travelers and photographers.
Tweet
Wednesday, February 15, 2012
Resurrecting a Mac With a Full Hard Drive
Today, I volunteered to help a new friend who could not use her Mac laptop. She could get the gray Apple icon screen on powering up, but eventually it turned to a blank blue screen with no icons or dock or hard drive image. She mentioned at one point that she had been told by the Apple Genius store that her hard drive was full, and that she needed to hook it up with another Mac in Target Mode to access her hard drive to clean off some of the files.
I tried the option, command, P, R sequence of keys to execute a PRAM boot sequence. This did not help. So with a suggestion from my husband we tried the Safe Boot Mode. To boot a Mac in Safe Mode - power up the computer, after the first tone sound, hold down the Shift key and release once the gray screen and spinning wheel and progress bar appear.
This worked and we were able to see the friend's hard drive, dock and files on the desktop. From that point, I realized that she had been trying to remove some of her photos from iPhoto application to make room on her hard drive. There were a number of things that she did that actually caused the hard drive to fill up. She kept saying that she had multiple copies of each photo in iPhoto and could not seem to get rid of them.
This is the scenario that I believe caused this duplication:
She thought she could drag the photos from iPhoto application to the trash can to get rid of them. She did not realize that the photos were being copied instead of deleted from the iPhoto library. Every time she dragged a photo out to the trash, it was duplicating the photo instead of deleting it. She did this a couple of times, and as she did this, more duplicates of the each of her photos were placed into the trash. She was compounding the hard drive space problem without realizing it.
I deleted the trash can which got rid of the duplicates there, but in exploring her hard drive, realized that she had also possibly dropped these same files she was trying to delete into her home folder and had another two sets of duplicated photos.
Once I found these and selected them and put them into the trash and also emptied the trash, her hard drive space was back. Now, she is able to use her Mac again.
There are several things that can be learned from this:
(1) A file is still on your hard drive, present in your trash can, until you actually empty the trash.
(2) You cannot delete photos from iPhoto by dragging them to the trash. To delete a photo in your iPhoto library, you need to run iPhoto, select the photo or photos to delete, and then hit the Delete key. The photos then are moved into the Trash can in iPhoto application. You must also empty the Trash in iPhoto for these to be totally removed.
Additional notes added 4/2/2012:
(3) Also, note that selecting an album and hitting the delete key does NOT really delete all the photos in the album (as these are really only alias or pointers to the real photos). Remember to delete photos, do so by selecting photos icon from the left hand column and then deleting each photo individually or delete multiples that are selected from the main window on the right.
(4) There are a number of short cuts that you can use to select multiple photos at once to delete. Using cmd A to select all. Dragging the cursor to select multiple photos within the main window. Also adjusting the size of the photos using the "zoom bar" at the lower left of iPhoto will allow you to see more photos at once, thus you can drag select more at once to select for deletion. Selecting one photo while holding down the shift key, you can select other photos by clicking on them and holding the cmd key down. This will allow you to select photos that are not easily in a group. Tweet
Wednesday, December 14, 2011
Duplicating Your Original Photos from iPhoto
Most people who have a Mac automatically drag and drop there photos into iPhoto or have chosen to auto import any photos from their SD cards and cameras directly into the iPhoto application.
If you wish to keep a copy of the originals of your photos and import into other editing or photo management software, then it is best to just make a folder on your hard drive and copy the photos into that folder directly from your camera or photo memory card. To disable the the auto-import option in iPhoto, select the Preferences under the iPhoto menubar. Then select the General tab and click on "no application" in the pop-up options for camera connection opening.


In most cases when people decide later to use other software for editing and managing their photos, they wish to retrieve all their original photos from iPhoto in an efficient and easy manner. iPhoto does store the originals in your iPhoto library which is located on your hard drive. These photos are usually arranged in many folders nested in many other folders that are arranged by corresponding dates for these photos. Trying to duplicate these files and organize them into another folder for using is often cumbersome and confusing and is not obvious to the user where these files are located in the numerous folders on their Mac.
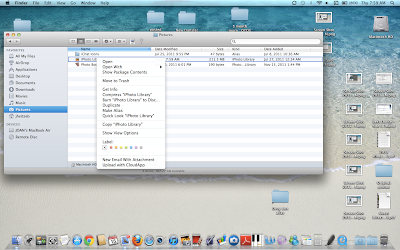
If using iPhoto 11 one can find these original folders located in a folder called Masters. (Note: early versions of iPhoto have a similar folder, possibly named Originals). You can select the Pictures folder in the finder for your username and then control click to reveal package contents. Searching through this hierarchy of folders reveals multiples of folders and files within these folders. Very confusing indeed!


For the latest iPhoto app it is probably easier to just run iPhoto, select all your photos and then use the export option to export all your folders to a new folder on your hard drive. To insure that you will be getting the original photo, be sure to select Maximum quality, Full Size, and original names. This will export all your photos to a new folder, thus duplicating your original photos. This of course means that you will have to resort them into various folders. Or you can select each album that is already sorted in some manner in iPhoto and export photos from each album into their own new folders on your hard drive desktop or where ever you have chosen to store them.


Remember it is best to keep an original folder of all your photos as an archive, working with a duplicate of your files is always wise. That way if your photo editing goes awry, you will have an original file that you can use to edit again. Tweet
If you wish to keep a copy of the originals of your photos and import into other editing or photo management software, then it is best to just make a folder on your hard drive and copy the photos into that folder directly from your camera or photo memory card. To disable the the auto-import option in iPhoto, select the Preferences under the iPhoto menubar. Then select the General tab and click on "no application" in the pop-up options for camera connection opening.


If using iPhoto 11 one can find these original folders located in a folder called Masters. (Note: early versions of iPhoto have a similar folder, possibly named Originals). You can select the Pictures folder in the finder for your username and then control click to reveal package contents. Searching through this hierarchy of folders reveals multiples of folders and files within these folders. Very confusing indeed!


For the latest iPhoto app it is probably easier to just run iPhoto, select all your photos and then use the export option to export all your folders to a new folder on your hard drive. To insure that you will be getting the original photo, be sure to select Maximum quality, Full Size, and original names. This will export all your photos to a new folder, thus duplicating your original photos. This of course means that you will have to resort them into various folders. Or you can select each album that is already sorted in some manner in iPhoto and export photos from each album into their own new folders on your hard drive desktop or where ever you have chosen to store them.


Remember it is best to keep an original folder of all your photos as an archive, working with a duplicate of your files is always wise. That way if your photo editing goes awry, you will have an original file that you can use to edit again. Tweet
Subscribe to:
Posts (Atom)