Computer tip that might come in handy sometime: I have a folder with just my books in it. So I arrange them by name and then view them in list view.
Then I use select All (cmd A) and cmd C to copy them.
I open a Text edit document make sure it is in plain text mode. (Type something then select “make plain text” from the Format menu).
Then paste the copy of list (cmd V) into this text document.
Now I have a nice alphabetical list of my files (or in my case of the books or pdf files I have in the folder).
If you don't put it in plain text mode, then the filenames will also have the folder names included. I just wanted an alphabetic list of the names of files or books that I had.
Tweet
Showing posts with label tips. Show all posts
Showing posts with label tips. Show all posts
Wednesday, March 04, 2015
Sunday, September 14, 2014
Moving Files (epub) from Mac to iPad
In my endless effort to find an app to transfer epub books to and from my Mac to my iPad without hooking up cables or using iTunes sync, I have found a fantastic app called "Flick" that is easy to use and currently free for both.
The Flick app for Mac OS laptops and computers can be found here: Flick app for Mac OS.
The Flick app for iPad/iPhone can be found here: https://itunes.apple.com/us/app/flick./id644265534?mt=8
The website instructions and descripton are given here: http://getflick.io/
Within nano-minutes, I was able to install both apps, tap on an epub book on my Mac laptop, flick it to top of my menu bar, select it on my iPad and open with iBooks.
Have to give this one an A+ rating for ease of use and convenience. There also appears to be an Android and Linux version.
I was able to successfully transfer an mp3 file, epub file, and jpg without a problem. Enjoy! Tweet
Thursday, April 10, 2014
Mac Tip for Getting Arrow Keys to Work with Google Docs Spreadsheet
I use Google Docs a lot to share spreadsheets with other workers. This allows workers to collaborate on the same document from different computers, devices and from different places.
The other day I was trying to quickly review some information on a very large Google Docs spreadsheet and found that my arrow keys were not working to let me quickly move from right to left horizontally through the spreadsheet.
Found out that if you switch the view of the spreadsheet from the spreadsheet view to the list view and back to spreadsheet view that arrow keys became functional again.
Hope this helps someone else who has had this same problem. Tweet
Friday, March 07, 2014
Time to Get Serious about Taking 3D Photos
Now that my production Poppy has arrived, it is time to get serious and take some 3D photos. But what exactly is the best way to shoot bang up 3D photos. Shooting 3D images gives you that feeling that you are right there in the moment, adding a new dimension to your memories and allowing you to get close up and personal with your images.
The following are some tips for first time Poppy 3D photographers:
• Poppy photos should be taken horizontal or in landscape mode, as the resulting images need to be side by side horizontally to view correctly.
• Lighting should come from behind you. Lights in back or over the object to be photographed can result in a sudden burst or flare of light that interrupts your image.
• For the best results and to achieve a dramatic 3D effect, try to shoot your photo with several depths or multiple subjects at different distances in the frame.
• Remember the best 3D effects are those closest to you, rather than objects or subjects farther away. Try standing close to your main subject to achieve the best 3D effect.
• A good time to try out a tripod with your Poppy is in low light conditions. When lighting is low, you need a steadier hand and slower shutter speeds to avoid blurry images.
• Remember to keep your camera horizontal when shooting to avoid a tilted image, which may not be correctable later.
• Remember that when photographing objects that are less than 3 feet away, the background objects should be within a 3X range or no further than 3 times the distance to the foreground object.
Now, you are ready to produce some great 3D images with your Poppy that will amaze and delight your family and friends.
Word is that a new Poppy3d app is on its way that will allow some image improvement for those of us still using iPhone 4 devices. In the meantime, practicing the tips I've outlined will help secure some great composition for those 3D photos.
Thanks Ethan and Joe for a fun new iPhone accessory!

 Tweet
Tweet
The following are some tips for first time Poppy 3D photographers:
• Poppy photos should be taken horizontal or in landscape mode, as the resulting images need to be side by side horizontally to view correctly.
• Lighting should come from behind you. Lights in back or over the object to be photographed can result in a sudden burst or flare of light that interrupts your image.
• For the best results and to achieve a dramatic 3D effect, try to shoot your photo with several depths or multiple subjects at different distances in the frame.
• Remember the best 3D effects are those closest to you, rather than objects or subjects farther away. Try standing close to your main subject to achieve the best 3D effect.
• A good time to try out a tripod with your Poppy is in low light conditions. When lighting is low, you need a steadier hand and slower shutter speeds to avoid blurry images.
• Remember to keep your camera horizontal when shooting to avoid a tilted image, which may not be correctable later.
• Remember that when photographing objects that are less than 3 feet away, the background objects should be within a 3X range or no further than 3 times the distance to the foreground object.
Now, you are ready to produce some great 3D images with your Poppy that will amaze and delight your family and friends.
Word is that a new Poppy3d app is on its way that will allow some image improvement for those of us still using iPhone 4 devices. In the meantime, practicing the tips I've outlined will help secure some great composition for those 3D photos.
Thanks Ethan and Joe for a fun new iPhone accessory!


Sunday, May 26, 2013
Deleting an Image or File While Using Quick View
Today while traveling the fjords of Norway and taking in the scenic views, I decided to spend some time ridding my hard drive of some of the out of focus and duplicate photos from my travels over the past year. It has been time consuming, but just realized a useful way to delete while viewing in the "quick view" mode.
As you may know, you can open a finder window and view all the names of photo files you have stored in a folder. A quick way to view the images without opening them in Preview or iPhoto or other photo app is to click on the name of an image file to highlight it.

Next, tap the space bar to view the image.
 To continue viewing each image down the list, use your down or up arrow keys to move along viewing each one.
Note: As you quick view each one you may run into one you wish to delete. Rather than having to close the image and then drag or control click the file name to move to the trash, you can just use Cmd - Delete and the current image will automatically go to the trash and the next image will be loaded.

This tip should help speed up the elimination of photos quickly.
Tweet
As you may know, you can open a finder window and view all the names of photo files you have stored in a folder. A quick way to view the images without opening them in Preview or iPhoto or other photo app is to click on the name of an image file to highlight it.

Next, tap the space bar to view the image.

Note: As you quick view each one you may run into one you wish to delete. Rather than having to close the image and then drag or control click the file name to move to the trash, you can just use Cmd - Delete and the current image will automatically go to the trash and the next image will be loaded.

This tip should help speed up the elimination of photos quickly.
Tweet
Tuesday, February 12, 2013
How to Clear the Search History in Firefox on Mac
Quick Tip: How to Clear the Search History from Firefox Search Field
Place the cursor in the Search box at the top of your Firefox browser window.
Hold down the control key as you click this field.
A popup option window will appear. Select "Clear Search History"
 Tweet
Tweet
Place the cursor in the Search box at the top of your Firefox browser window.
Hold down the control key as you click this field.
A popup option window will appear. Select "Clear Search History"
Tuesday, November 20, 2012
How to Change Permissions for Folder and Contents
If you have a folder (and all its contents) on your desktop that you wish to change the permissions for read/write for someone else to edit, this can be easily done by following the steps below:
(1) Click on the folder
(2) Using cmd I bring up the Get Info window for that folder
(3) If the folder is locked (indicated by a closed lock in the lower right hand corner of the Get Info Window), unlock it by clicking on it, entering your Apple username and password that you use as an Admin for your computer.
(4) Click on the Sharing & Preferences down arrow to reveal "names" and "priviledges"
(5) Next select the name of the "guest" or "everyone" or person listed in the list of those you share this file with.
(6) Select the appropriate level of priviledge, either read only, write only or read & write
(7) Next select the "gear icon" in the lower left-hand corner and set to "apply to enclosed items"
(8) Lock your folder if you do not wish others to change these permissions for this folder.
That's it!

Tweet
Wednesday, September 19, 2012
How to Get PDFs onto Your iPad into iBooks
PDF is an acronym for "Portable Document File" and is a convenient format used for reading documents on all sorts of devices, regardless of application, device, or operating system you have.
There are many popular readers available to access and read PDFs from your iPad. In fact if a PDF is emailed to you, you can click on it from your Mail app and it will open and you will be able to read it. iBooks on the iPad is another good way to read PDF files and to store them for offline reading. Often times when we are traveling, we don't have convenient access to wifi services, and it is nice to have a way to read our stored PDFs to read whenever we wish.
How Can You Find PDFs
There are many PDFs already on the web. We just need to find them. The quickest way to find a PDF is to use Google Search from your Safari browser on your iPad. For example, if you want to find a reference manual for your iPad, you can google for it.
Type in a phrase like, "iPad 2 manual pdf" Using the additional word "pdf" will help find the file in pdf format.
The search results will appear in a list. The following result appears to be the best option as it is an Apple pdf file. Clicking on this result will bring up the pdf. Now, you can read the resulting pdf directly from your Safari browser; however, it may be something you want to keep as a reference for later. In that case, after the document has fully loaded into the browser page, simply tap twice with your finger on the pdf and an option bar will appear at the top of the page. The option to read/save in iBooks will be one of the options. If you select this one, your PDF file will be saved to your iBooks bookshelf. You will be able to access this document offline at any time.
Other Ways to Transfer a PDF to your iPad
Via Email. You can email a copy of a file by dragging it from your computer desktop to your new email window and send it to yourself. You can then retrieve it from your mail on your iPad and can save it from there. To save, merely open the PDF file while in your mail app by touching the opened file with your finger. Once open, you should notice a small square with curved arrow in the upper corner menu bar. If you tap on this icon you will be given the same option to open in iBooks. If you select this option, your pdf file will be saved in iBooks.
Via another app. Using GoodReader or Dropbox app one can transfer a pdf to their Mac. You merely drag the PDF into the GoodReader of Dropbox app on your Mac or PC. Then open the same app, either GoodReader or Dropbox on you iPad and select the document and option to transfer to iBooks. These methods do not require that you sync with iTunes. Using iTunes to sync books or pdf files is not always convenient.
There is a way to transfer PDFs via iTunes without having to sync
Connect your iPad to your PC or Mac via the cable and run iTunes app on your computer. In the left hand column you will see the name of your iPad under Devices. Select Apps tab at the top in the right hand window. Scroll down until you see the File Sharing section. Select either GoodReader of Dropbox from the list of apps that have file sharing capabilities on your iPad. Drag the PDFs into the list for that app on the right-hand side. They will appear on your iPad retrievable by the app.
Tweet
Friday, August 03, 2012
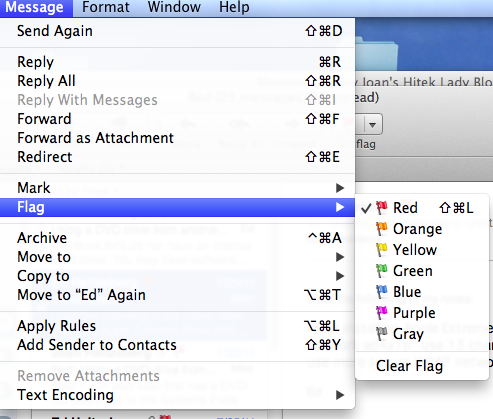
Flagging My Mail Appropriately
One of the features I like the most in Mac's Mail program is the ability to flag my important emails. This is done by selecting the email that I want to flag and then clicking on the Flag option from the Message menu bar option in Mail. From there it is easy to select one of the flags from the popdown menu selections (red, green, blue, ...).

This is a great feature and one can quickly pull up all their flagged email messages by selecting the Flagged mailbox on the left-hand side of the Mail window. However, the indicators using color seem to be rather obscure and hard to remember what color code is assigned to the priorities you might have for flagging a particular message.
To help with this, one can rename these flags given them appropriate names that will make it easier to categorize and retrieve the flagged messages. If you wish to rename the various flags to something more understandable, you can.
First you must have used each of the flags at least one time to mark an existing email. Once this has been done, you will see each of the flags you've utilized listed under the Flagged mailbox on the left-hand side of the Mail window. After clicking on the tiny arrow next to the Flagged mailbox, you will see the list of various flags designated with the names of various colors (red, orange, yellow, green, ...). To rename these, select each one of the flags, then select Mailbox from the menubar at the top and Rename Mailbox. From there you will see the name of the Flag highlighted and you can type in an appropriate flag name like "Important."


Tweet
Sunday, June 17, 2012
Getting Rid of ?? and Icons from Top and Side of Finder Windows
When I open a finder window on my MacBook Air, I see icons and question marks across the top of the finder window and also a stray icon on the left-hand side under my Favorites. I remember using the track pad to try and move a file out of the finder window and also accidentally dropping it in the top bar. Another time I remember dropping a file accidentally into the side bar.
Well, this was driving me crazy. When I tried to delete any of the icons on the top it would just change them to the question mark. When I tried to delete any of the icons on the left-hand side, it would just open the file or app.
Today, I decided to track down a solution. First I asked my husband and he suggested selecting the icon while holding down the control key. I tried this on the icons on the side bar and I was able to see an option to remove. So, I immediately tried the same thing on the icons on the top bar. It didn't work. So, I tried the option key, which didn't work either.
I did find an Apple Support forum when I googled the problem and found that the command key is the one to hold down when you want to remove the icons on the top bar of your finder window. You then drag the icons from the top bar out to your desktop and poof, they disappear.
 Just thought I would post it today for those who may be having the same problem.
Tweet
Just thought I would post it today for those who may be having the same problem.
Tweet
Well, this was driving me crazy. When I tried to delete any of the icons on the top it would just change them to the question mark. When I tried to delete any of the icons on the left-hand side, it would just open the file or app.
Today, I decided to track down a solution. First I asked my husband and he suggested selecting the icon while holding down the control key. I tried this on the icons on the side bar and I was able to see an option to remove. So, I immediately tried the same thing on the icons on the top bar. It didn't work. So, I tried the option key, which didn't work either.
I did find an Apple Support forum when I googled the problem and found that the command key is the one to hold down when you want to remove the icons on the top bar of your finder window. You then drag the icons from the top bar out to your desktop and poof, they disappear.

Wednesday, February 08, 2012
Time Zone Dilemma
Found a great article that is important to read if you are traveling in different timezones. As I travel from timezone to timezone, I have found that my iCal or Mac Calendar app is messing with my appointment times. Somehow, an appointment I set for 9AM ends up at a different time when I switch timezones. For instance, if I set an appointment reminder for an event to attend at 9AM while on the East Coast and I fly a couple of timezones away, I might miss my appointment, as the time in the calendar gets changed.
If you have this problem, be sure to check out this well-written article to understand the settings and way to handle this problem. We don't want to miss any of our appointments! Tweet
If you have this problem, be sure to check out this well-written article to understand the settings and way to handle this problem. We don't want to miss any of our appointments! Tweet
Sunday, October 16, 2011
Yes, Custom Text Tones for Individuals Using iOS 5
iOS 5 has allowed us to select a different text tone for each of our contacts from a list of default tones for use when they message us. But as it always happens, users always want MORE than what is offered.
Since I had already had custom ringtones set up on my iPhone, it was no problem selecting one of these custom tones for the text tone. If you haven't tried setting tones on your iPhone for your family and friends, that is accomplished by going into your Contacts app (Addressbook) and selecting Edit. If you scroll down the items in the edit field, you should come across the field where you select a Text Tone. If you have installed some custom ringtones, they should appear in the list along with the default text tones that Apple offers. Select which one you wish to use as that special text tone and be sure to click the Save and Done buttons to preserve your choices.
I did not see these same custom ringtones on my iPad. I remembered that there was no real reason to add custom ringtones on my iPad 2 originally as I did not have "phone" capability and there was not an option to set different tones or such.
So I just selected some of my custom ringtones in iTunes and synced to my iPad 2. These now show up as options for Text Tones under the Contacts on my iPad. So now I have some pretty funky text tones for incoming messages on my iPad. I also read online that some suggest that these tones need to be 15 seconds or less. Guess it might be annoying to have a long ringtone. Or it might be that anything longer than 15 seconds might not work. I haven't tested that theory yet.
 Tweet
Tweet
Since I had already had custom ringtones set up on my iPhone, it was no problem selecting one of these custom tones for the text tone. If you haven't tried setting tones on your iPhone for your family and friends, that is accomplished by going into your Contacts app (Addressbook) and selecting Edit. If you scroll down the items in the edit field, you should come across the field where you select a Text Tone. If you have installed some custom ringtones, they should appear in the list along with the default text tones that Apple offers. Select which one you wish to use as that special text tone and be sure to click the Save and Done buttons to preserve your choices.
I did not see these same custom ringtones on my iPad. I remembered that there was no real reason to add custom ringtones on my iPad 2 originally as I did not have "phone" capability and there was not an option to set different tones or such.
So I just selected some of my custom ringtones in iTunes and synced to my iPad 2. These now show up as options for Text Tones under the Contacts on my iPad. So now I have some pretty funky text tones for incoming messages on my iPad. I also read online that some suggest that these tones need to be 15 seconds or less. Guess it might be annoying to have a long ringtone. Or it might be that anything longer than 15 seconds might not work. I haven't tested that theory yet.

Subscribe to:
Posts (Atom)