Wednesday, January 26, 2011

What to Do if Virtual PRC doesn't Connect with your Disklavier

Occasionally we have a power failure that effects the Disklavier and how it connects to the Virtual PRC that resides on my Mac desktop.   When I click on the 'prcstart.php' icon on my desktop,  it doesn't want to connect with the Disklavier. 

Here are some suggestions to remedy the situation:

Place the 'prcstart.php' file into your trash can.

Open a finder window.

Click on the DKV##### icon under shared column on left of the finder window.

Double click on the 'DNA' folder on the right-hand side of the finder window.


Click on Virtualprc.html

Follow the steps below for setting up and downloading a new prcstart.php file for your desktop:

After the steps are entered, the following screen should appear on your Mac.   The downloaded prcstart.php file should appear on your desktop.  This is the file that you use to run the Virtual PRC for the disklavier.

Note Added -  Feb 1/2011
If you do NOT see the DKV#### icon in the left-hand column of the finder window, you can try the following steps to access the DNA folder and the VirtualPRC. html file needed to reset the Virtual PRC application for your Mac.

While in the finder, select 'Go' menubar option and click on 'Connect to Server'.   A Connect to Server window will appear on your Mac desktop with textbox for Server Address, Favorite Servers and buttons for Remove, Browse, and Connect. 


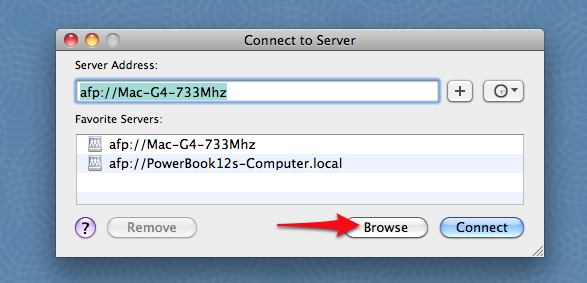
Click on the Browse button and hopefully a list of various servers on your network will appear with names or IP addresses (e.g. 10.0.1.8) or dkv#####.

If you see the dkv##### (id for your Disklavier where ##### are numbers) then you can access the folders by clicking on the down arrow next to the name dkv#####.  You should then see the following folders that are accessible from your Disklavier: DNA, Document, FromToPC, MyPicture, Update.


The DNA folder contains the file VirtualPRC,html for setting up your virtual PRC controller.

The Document folder has a bunch of subfolders and I've never used them, most are license stuff and don't need to be bothered.

The FromToPC folder is where you can drag and drop midi files to move back and forth from your PC to your piano.

The MyPicture folder has sample pictures that are used for the tablet if you have one. These jpg files are displayed in various screens on the tablet controller that some persons purchased with their Disklavier piano. I have used my own personal family photos that display on my tablet by replacing these sample jpg files. (Replacement photos must have the names mysample01.jpg ... mysample11.jpg)

The Update folder has update files for the PRC and tablet and should not be bothered.

Hopefully this will explain the files and folders that you should see on your Mac that are accessible from your Mac that reside on your Disklavier.

If you have a PC, then I suspect there is also a way to access or browse the servers that are accessible on your wifi network in a similar manner.

Sunday, January 23, 2011

Posting to Blogger using IPad and PhotoBucket App for iPad

This is a test of posting directly to Blogger by signing into Blogger site with Safari on iPad and typing into the text field.

In order to type in the text field of the Blogger post, you must select the HTML tab.

To post a photo here in this blog post required that i have the URL of a photo that was already stored on a photo site such as PhotoBucket.

Holding down the home and upper right hand buttons on my iPad I took the screen print of the window that appears when one selects the picture icon in the post editor of Blogger. This screen print was saved to my album on my iPad. I then used the PhotoBucket app for iPad to select that photo and upload to PhotoBucket. From that same app I was able to obtain the URL for that photo located on PhotoBucket.

I then selected the image icon from the Blogger HTML tab choices and pasted the URL for the photo into the box on the right-side. I then clicked on Upload and the HTML code for that image appeared in my post text box.

Previewing the post I was able to see the photo I wanted seen in my blog. I was able to edit my post directly in Safari using the HTML tab and links to photos from Photobucket app for iPad.


Note: I did find that when I published the photo the size exceeded my margins and I had to adjust the photo HTML size code by one-third.

I have not tried any specific apps for iPad that might be easier to use for non- techies, but understand that there maybe one that would work.

I was also successful in tagging the post with appropriate categories, editing the post from my iPad and also adding HTML codes for bolding text.

PS. I did this all while in bed enjoying the playoff football game. :-) now that is what I call multitasking.

Saturday, January 22, 2011

The Many Avenues to Controlling My Mark IV Disklavier

My Mark IV Disklavier,  a real, concert-quality piano that can also play itself is accessed by a physical Pocket Remote Controller (PRC-100), a wireless remote with dedicated buttons and a full-color LCD touch screen or by the Tablet Remote Controller.  Tablet Remote Controller (TRC-100), a 10.4-inch, portable, color, touch-screen control panel is the ultimate luxury item, the TRC provides song control features, play list management, and portable viewing of Karaoke song file lyrics, all with customizable visual environments and graphics.  Both remote controllers use the 802.11b wireless specification to communicate with the piano from anywhere in the home, whether or not there is any line of sight.

In addition to these physical devices, Yamaha introduced the Virtual PRC interface which allows total control from a networked computer.  The Virtual PRC interface was introduced in one of the latest versions of the system software for the Mark IV.   I use an Apple Airport Express connected via ethernet cable to the underside of the Mark IV to connect the Virtual PRC interface to my Mac home network.

I also use an excellent software package written by Kevin Goroway called dkvBrowser.    This software can be found at dkvBrowser Sourceforge.   DkvBrowser is an application that can be used instead of the PDA (PRC-100) or Tablet or Virtual PRC-100 that is normally supplied with a Yamaha Disklavier Mark IV.   It can be downloaded at sourceforge.net.  There are Mac and PC versions built and ready to run, but it can run on any platform that supports Java and can access the Disklavier either wired or wirelessly.  It is licensed under GNU General Public License and offered as donation ware.  DkvBrowser offers multiple features, too numerous to mention here, but outlined on the sourceforge site.   The biggest features are the ease of transferring midis to your piano via your computer, as well as ease of editing the names of albums and song titles.  


In addition to these physical and virtual devices to control my piano, there is also an app, Yamaha Disklavier Controller App, for iPhone, iPod Touch, iPad in the Apple App Store.


I have discussed many of the attributes of the Yamaha Disklavier Controller app and its operation on previous blogs.  I assisted Kevin Goroway in testing his software dkvBrowser with my Mac and Mark IV, as well as documenting his software and providing a downloadable manual in PDF form on the dkvBrowser Sourceforge site.   Yamaha has provided documentation for the Virtual PRC, PRC-100 and Tablet Controller on their site.   There are also two forums online that provide answers and discussions at the dkvBrowser Yahoo Group and Disklavier Yahoo Group forums.  If you own one of the Disklavier pianos, you will find it worthwhile to join these groups and participate with the members who add to discussions and help others with questions.  I will continue to post blogs on occasion, to offer detailed solutions or comments on the Disklavier and its many devices as related to Mac computers and apps.


UPDATE 2/19/2021:  The DKVBrowser discussion groups are now being conducted at Google Groups.  You can search by "DKVBrowser" to find a place to join for current information. 

The DKVBrowser software written by Kevin Goroway has been revised to meet the needs of users for their Disklavier Mark IV pianos recently.  The software had not worked on my latest Mac laptops due to system updates that were not supported by DKVBrowser.  The software had recently not worked on the latest Windows computers due to changes in system and other updates.  At some point the underlying architecture of DKVBrowser (Eclipse RCP) became unsupported/incompatible.

A new version is currently being tested by members who are part of the Google Group who post info about DKVBrowser and Disklavier.   

I was successful in loading the new DKVBrowser 3.0.2 onto a Mac laptop running High Sierra and one running Catalina.  I have been testing the Mac version of this software and find that it is running successfully for most functions.  It is nice to have the DKVBrowser to run playlists, play tunes at scheduled times and to have all the easy editing techniques and features that Kevin has shared with us.  I certainly hope many will consider the Donate button to show appreciation for his generosity and talents in keeping a means to play our beloved Disklavier Mark IV.


Tuesday, January 18, 2011

Accessing Special Symbols & Characters on Your Mac

There are many sources and websites on-line that display tables of key combinations to use for typing special symbols and characters on a Mac keyboard.  I find it difficult  at times to locate the file that contains the table of these magic keystroke combinations.

So whenever, I need to use a special character in a document typed with my Mac keyboard,   I access the character Keyboard Viewer.  The Keyboard Viewer can be found amongst the menubar icons in the upper right hand-side of the menubar.


If you do not see the Keyboard Viewer icon, you need to enable it.
You can do this by:
  • Selecting Systems Preferences under the Apple Menu.  
  • Select the Language & Text icon and the Input Sources tab from the Language & Text window. 
  • Make sure the option in the left-hand column of the window Keyboard & Character Viewer is enabled. Enable Show input menu in menubar by checking the box.


You can then hold down various keys on your Mac keyboard.  Try holding down the shift key, option and command keys individually to see what symbols are produced on the keyboard.


You will see more characters, when you hold down a combination of shift and option or command keys.  All the characters that are available will be viewable on the keyboard viewer and you will then be able to ascertain the correct keys to hold down to get the symbol of your choice.

Hope you find this tip helpful.

Sunday, January 16, 2011

Testing Stealth Mode for Wifi Network on Mac

Note: A solution for my vunerable wifi network connected to Disklavier piano without password protection.

Sometimes it is necessary to have an insecure wifi network to connect to other devices in your home. This leaves your network for your computers vunerable for others to use as a free wifi hotspot in your neighborhood. I have been testing the 'stealth mode' option available on my Mac as a means to run my wifi network, but make it 'invisible' to others nearby.

It seems to be working. My wifi network is NOT showing up as an option on my iPhone or iPad. However, I am able to connect to this so called invisible or stealth network as I know the exact name that I have assigned to that network. I merely go into the system preferences on my iPhone or iPad and select wifi network and 'Other' and type in the exact name of the network to connect.

Here are the steps to setting up or creating a closed network:

To set up your wifi network on your Mac to 'invisible' or stealth mode it is necessary to run the application called 'Airport Utility'.

Select the network from the left hand column that you wish to put into stealth mode or to make invisible to others. Select 'Manual Setup'.


Select the 'Wireless' tab and click on 'Wireless Network Options'


A dialog box will appear, click on 'Create a closed network' and 'Done'


Select 'Update' to save changes.

At this point I also rebooted my Mac to make sure that all the changes took effect, not sure if that was necessary. When I checked my iPhone and iPad the network was NOT visible. I selected Other and typed in the exact name and was able to connect without a problem.

Next notify the members of your family that you have made some changes to the network, so that they don't panic when they are unable to connect via wifi using their iphones, ipads and computers in your home.