If you want to remove someone from the auto-fill option in Mail app, you can delete them from your address book or contact list; however, there is another solution that might work that let's you keep the contact info just in case you need it later.
If you remove the email address of the person from your contacts or address book, then this eliminates them as an auto-fill in mail.
But you may want to keep their email in the notes section of the address book, just in case you need to have that email info at a later time. Use edit option to copy their email and paste in notes section on their card info in Address book and then select the - to remove it from emails.
You may also want to make sure their email is not also listed somewhere in the Previous Recipients' list in the Mail app.
To remove a name from the previous recipient's list,
Select "Window" from the menu bar.
Select "Previous Recipients" from the pull down options.
A list of names that you have typed in or chosen before will appear in a popup window.
You can remove any by selecting the name and then clicking on the "Remove from List" button in lower corner.
Tweet
Showing posts with label Mail. Show all posts
Showing posts with label Mail. Show all posts
Thursday, March 27, 2014
Friday, March 07, 2014
How to Change Mac Mail Subject Line
Trying to find an email can be a undaunting task if the email doesn't have a good subject. Have you ever wished that you could edit the subject for emails that come into your IN box. There doesn't appear to be a way to do so in the Mac Mail app.
Well, here is a tip to help you do just that.
Select the email that you want to change subject. This can be an email in your Inbox or some other folder (mailbox you have created for storing and organizing your emails).
Note: The date and time of email will be changed. You may want to put a reference to the date/time in subject or content as a note if needed for some reason.
Drag that email message into your Draft folder.
Double click on the email on the left side column. A window will open that displays the email you have selected.
Make changes to the subject for that email.
Click on the red close button in upper left-corner of email.
Email will be saved with new edited subject.
Now, you can move that email back to your Inbox or other folder (i.e. mailbox).

Tweet
Wednesday, October 02, 2013
Mailboxes, On My Mac and iCloud Sections of Mac Mail App
A mailbox is like a folder. You create mailboxes to organize emails. For example, a mailbox named "Work" might contain all your emails that you receive that are related to work.
Mailboxes are created in the Mail app program on your computer. When they are created you give them a name and a location. Mailboxes can be located to a section on your computer: On My Mac section or iCloud section.
You can also create sub mailboxes that can be placed inside other mailboxes. For example, you might have a mailbox named "My Stuff" and inside that mailbox, you might want to create sub mailboxes named "Bills", "Orders", "Miscellaneous."
Mailboxes or folders created and stored in the On My Mac section of the computer's Mail app program are only seen from the computer's Mail app. i.e., You cannot see them on your iPad or iPhone.
Mailboxes or folders that are created for location in the iCloud section are saved on Apple's cloud server. If you have also selected (in Systems Preferences>iCloud) the option to sync mail with iCloud, then the email messages are sent to ALL your devices including your laptop, iPads, iPhones, etc. These messages can also be retrieved using a web browser like Safari, Firefox or Chrome. You type iCloud.com in your browser address box (url) and log into your personal iCloud account with your Apple ID name and password. You will be able to see your email on the web page.
If you move an email message inside a mailbox or the entire mailbox from the On My Mac section of the Mail app program on your computer to the iCloud section, it is "moved" to the iCloud, but is no longer located in the On My Mac section. Remember that in moving a mailbox from one section to another - the message or mailbox is deleted from the place it is moved from and added to the section moved to. In addition, the email message(s) or entire mailbox has to be literally sent to the iCloud again - which can use a considerable amount of bandwidth upload/download if there are a lot of messages and attachments. So this is best done when you are connected to wifi where you are not worried about using a lot of bandwidth or upload/download data transfer.
If you move an email message from iCloud section to the On My Mac section, the move is made to your local computer, but also removed from the iCloud.
There is also a copy option. The method for "moving" and "copying" messages from a mailbox the On My Mac section to a mailbox in the iCloud section can be done by holding down the control key and clicking on the email message(s) to be "moved" or "copied" to another mailbox that you have created in the iCloud section. Copying email message(s) rather than moving allows you to keep the messages in each section.
To move an entire mailbox from one to the other, you merely drag the mailbox from the On My Mac section or iCloud section of the Mail app to the other section.
Those who do not want their email messages stored in the cloud can create mailboxes or save messages only in the On My Mac section; however, they will not be able to find that email on their other devices like iPhones or iPads.
Apple allows a certain amount of storage in the iCloud, and one way to alleviate some of the storage in iCloud is to move the email messages (deleting them from iCloud section at the same time) to On My Mac section of your Mail app program on your computer.
If you store all your emails in the iCloud section of the mail app, you will need to be connected to wifi to retrieve those messages on your iPad or iPhone.
You should be able to see the email messages stored in the iCloud section mailboxes from your laptop even if you are not connected to wifi.
Tweet
Monday, September 30, 2013
Get Rid of Gmail ALL folder
Without a doubt organizing and keeping emails can be a can of worms. Gmail accounts store all our incoming mail by archiving it in an ALL folder on our Apple devices and in a similar folder in our Mail app on our Mac computers. In essence, the mail we want to keep and the mail we don't want to keep gets stored in this folder whether we want it or not.
Since I'm trying to organize and minimize my mail on all my devices, I have decided to find a way to get rid of some unnecessary folders stored in the mail apps and programs I use on my devices and my laptop.
There is a way to control what folders are visible in Gmail account(s) that are setup as IMAP accounts for use with Apple Mail.
To turn off the visibility of the Gmail All Mail folder in Apple Mail on your computer, perform the following steps:
Step 1: Log into your Gmail account using your Browser (Safari, Firefox, Chrome, ... whatever you use).
Step 2: Click on the "gear icon" located on the far right-handside of the browser window and click on the Settings option from the pop-down choices.

Step 3: Select the Labels tab.

UNCHECK the box to the right - "Show in IMAP" for the ALL MAIL folder.
Not only will this remove the superfluous folder from your Mail app, it will also keep Mail from downloading every single message twice.
I choose to have my Spam folder unchecked as well.
You can also keep Gmail from archiving all your messages on your mobile devices (iPad, iPhone, etc.) and allow you to delete messages from your the devices.
After setting up your Gmail account on your iPhone, select the Settings icon. Select Mail, Contacts, Calendars. Then select (youraccount@gmail.com) and change the Archive Messages setting to OFF.
Now when you delete Gmail messages on your iOS devices (iPads, iPhones, etc) they will be permanently deleted and not archived.
Tweet
Tuesday, August 06, 2013
Distribution lists or Groups for your Mac Mail App
Often we send out emails to all members of our family. It is convenient to use a distribution list or group that is automatically filled in the To, CC or BCC field in the message window of the Mail app.
Creating a group in your "Contacts" or address book on your Mac can be accomplished by several methods:
Method 1:
Step 1: Click on Contacts icon in your tool bar.
Step 2: Select New Group option under the File menu along the menu bar
Step 3: Select the "untitled group" title and type in the name for your group that will be easy to remember when you get ready to do your mass or group mailings.
Step 4: Next click on All Contacts, scroll through your list and select members for your group. You can use Command key to select multiple names.
Step 5: After you have selected those members you want in your group or distribution list, then click on one of the highlighted areas of one of the members and drag all of them into the left-hand side of the window to drop them into their group.
Method 2:
Step 1: Click on Contacts icon in your tool bar.
Step 2: Click on "All Contacts" on the left-hand side of window to view all the names of contacts you have in your address book. Scroll through your list on the right-hand side and select members for your group. You can use Command key to select multiple names.
Step 3: Go up to the File menu and click on "New Group from Selection" opton. All the members names should appear in the list on the right-hand side. Enter a name for your group.
You can now send emails to all members of a group by simply typing the name of the group in the "To:" "CC" or "BCC" field of an email message. The Mail app will then fill in a list of the email addresses of its members.
When Mail does this, by default the primary email address for each contacts in the group will be used. The primary email address for a contact defaults to the first one listed on that member's contact page. If someone in your group has multiple email addresses, then the first one listed will be used. If you wish to use an alternate email address for this member, you can change this by using the Edit Distribution List under the Edit menu.
If a member has multiple email addresses they will appear and you can select the preferred email to assign to that person in your distribution list. If the member just has one email address, no change options are offered.
If you want to use distribution lists on your iPad or iPhone, then refer to an earlier blog that I posted for an app to assist with that problem (see link below):
http://grannyjoans.blogspot.com/2011/05/sending-group-emails-via-iphone-mail.html
Tweet
Friday, August 03, 2012
Flagging My Mail Appropriately
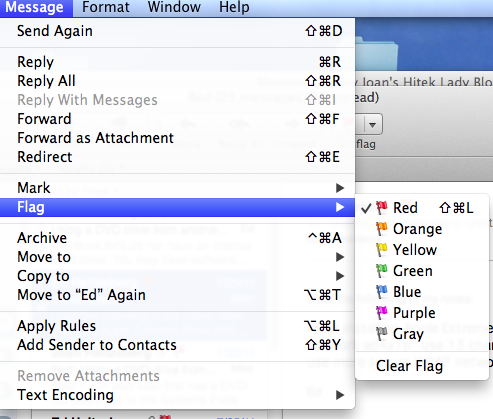
One of the features I like the most in Mac's Mail program is the ability to flag my important emails. This is done by selecting the email that I want to flag and then clicking on the Flag option from the Message menu bar option in Mail. From there it is easy to select one of the flags from the popdown menu selections (red, green, blue, ...).

This is a great feature and one can quickly pull up all their flagged email messages by selecting the Flagged mailbox on the left-hand side of the Mail window. However, the indicators using color seem to be rather obscure and hard to remember what color code is assigned to the priorities you might have for flagging a particular message.
To help with this, one can rename these flags given them appropriate names that will make it easier to categorize and retrieve the flagged messages. If you wish to rename the various flags to something more understandable, you can.
First you must have used each of the flags at least one time to mark an existing email. Once this has been done, you will see each of the flags you've utilized listed under the Flagged mailbox on the left-hand side of the Mail window. After clicking on the tiny arrow next to the Flagged mailbox, you will see the list of various flags designated with the names of various colors (red, orange, yellow, green, ...). To rename these, select each one of the flags, then select Mailbox from the menubar at the top and Rename Mailbox. From there you will see the name of the Flag highlighted and you can type in an appropriate flag name like "Important."


Tweet
Subscribe to:
Posts (Atom)