Showing posts with label camera. Show all posts

Wednesday, March 26, 2014

Wiggle gifs a great way to view some cool 3D photos.

Been enjoying my Poppy 3D camera, an iPhone accessory that allows me to take 3D photos and videos.  The latest Poppy 3D app for the camera allows users to make cool wiggle gifs, so others can view their 3D photos in an unusual way without using the Poppy.  

Poppy3D.com is a creative community for 3D photography.
Check out my Poppy GIF -

Another one of my Poppy GIFs -


Tuesday, January 31, 2012

Using Prospective to Capture the Moment


While visiting a sugar cane museum in Port Louis, on the island of Mauritius in the Indian Ocean, I learned a good photo tip.  At the museum there was the Beau Plan's historical chimney-stack, constructed in 1895 by A. Felix, an architect that stood 33 meters (over 100 feet) tall.


I wanted to take a photo of this very tall tower or smoke stack.   This presented a problem - how best to obtain this type of photo.  Normally buildings are so tall that one can't really get the entire building in the photo by looking up and snapping the photo.   Normally, one would step back to try and get an angle on the object that would work while photographing.  The area by the smoke stack was not conducive to backing up, as we were inside an enclosure which surrounded the tower.  So I attempted to just look up and snap the photo which did not work.

Then, I noticed that there was a mirror slanted along the wall of the enclosure that was tilted in such a way as to reflect the tower onto the mirror.  Cleverly, I decided to take a photo of the tower using the mirror.  My first attempt was not successful, as I failed to realize that I would be in the photo.  I ended up with the photo shown below (a self-portrait):


 Stepping further away from the mirror I was able to capture only the tower.  The results below:


Still not satisfied, I stepped to the side and took the best shot by angling the camera from a completely different prospective. See best photo below:


A valuable lesson in photography is to look up, look down and change your position to get the prospective you need on the object you are photographing.  You never know what you might see or capture.


Wednesday, December 14, 2011

Duplicating Your Original Photos from iPhoto

Most people who have a Mac automatically drag and drop there photos into iPhoto or have chosen to auto import any photos from their SD cards and cameras directly into the iPhoto application. 

If you wish to keep a copy of the originals of your photos and import into other editing or photo management software, then it is best to just make a folder on your hard drive and copy the photos into that folder directly from your camera or photo memory card.   To disable the the auto-import option  in iPhoto,  select the Preferences under the iPhoto menubar.  Then select the General tab and click on "no application" in the pop-up options for camera connection opening.


In most cases when people decide later to use other software for editing and managing their photos, they wish to retrieve all their original photos from iPhoto in an efficient and easy manner.  iPhoto does store the originals in your iPhoto library which is located on your hard drive.  These photos are usually arranged in many folders nested in many other folders that are arranged by corresponding dates for these photos.  Trying to duplicate these files and organize them into another folder for using is often cumbersome and confusing and is not obvious to the user where these files are located in the numerous folders on their Mac.

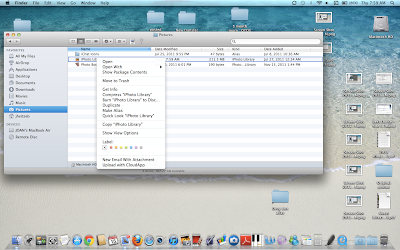
If using iPhoto 11 one can find these original folders located in a folder called Masters.  (Note: early versions of iPhoto have a similar folder, possibly named Originals).  You can select the Pictures folder in the finder for your username and then control click to reveal package contents.  Searching through this hierarchy of folders reveals multiples of folders and files within these folders.  Very confusing indeed!


For the latest iPhoto app it is probably easier to just run iPhoto, select all your photos and then use the export option to export all your folders to a new folder on your hard drive.  To insure that you will be getting the original photo, be sure to select Maximum quality, Full Size, and original names.  This will export all your photos to a new folder, thus duplicating your original photos.  This of course means that you will have to resort them into various folders.  Or you can select each album that is already sorted in some manner in iPhoto and export photos from each album into their own new folders on your hard drive desktop or where ever you have chosen to store them.


Remember it is best to keep an original folder of all your photos as an archive, working with a duplicate of your files is always wise.  That way if your photo editing goes awry, you will have an original file that you can use to edit again.

Friday, May 06, 2011

Collage Creator - App for Your Mac

I've been exploring the FREE apps in the Mac App Store the last few days.  I ran across an app, Collage Creator,  that could be useful.  It is certainly fun and easy to use. 

You add photos to the collage window by selecting the Pictures tab and then clicking on the + sign.  This allows you to add photos by opening files on your Mac by using a file selection browser type window. Or you can merely place them in the picture panel on the left-hand side  by using the drag and drop method.  They appear in the collage window on the right-hand side.

You can move them around in the panel by clicking and dragging.  You can  resize or change the angle of orientation using the curved arrow button.  You can position them in front or behind other photos by clicking on Move Up and Move Down buttons.  There are built in buttons to Shuffle and Re-mix the photos that you have in the collage window.  You can also go to Settings Tab to bring up options for setting another photo as a background or using a transparent background.  You can set the Border Width and Color for the photos and add Shadows for those borders.  The layout can be Portrait or Landscape and can vary in size.  There are options for the type of collage arrangement using Grid, Mosaic, Pile or Center Frame modes.


Overall, I give this app a 5 Star Rating and suggest that you check it out for an easy way to create collages of your photos.

Saturday, April 30, 2011

A StarTrek Transporting of Photos/Videos using PhotoSync App

Some iPad 2 users are looking for ways to transfer their videos captured with their iPhones to iMovie app loaded on their new iPad 2.  One solution is to sync the video to iTunes from their iPhone and then resync to their iPad 2.  Another solution requires the purchase of the camera connection cable.  With the cable one can connect the iPhone to the iPad and transfer the videos directly. 

I decided to try out using an app called PhotoSync as it is advertised to wirelessly transfer photos and videos between the two devices, as well as your computer.

The user can easily transfer from the devices to their computer over Wi-Fi.   You can download selected videos and photos to and from your Mac using the FREE companion PhotoSync app available for Mac OSX . (A Windows Companion is also available for Windows XP SP2 or higher).   I am always amazed at how these wireless transfers seem to be magic and feel as though I have witnessed a StarTrek transporting.   PhotoSync preserves the Exif data, GPS data and file data for photos and videos, as well as support for RAW images and photos/videos. 


Using PhotoSync with Bluetooth or WiFi if available, one can also transfer photos and videos directly from device to device.  I was able to transfer video and photos from iPad to iPad and iPhone to iPad and iPad to iPhone in a snap.  The transfer rate is 2.5MB/sec depending on your network and device.  Also supports DropBox and Flickr accounts and transfer to iPhoto and Aperture.

If you are looking for an easy and fast way to transfer instantly to your devices and computer without using iTunes or cables, I highly recommend getting the PhotoSync app from the iTunes App Store.  You only need purchase once and use for all your devices.  Click here to access PhotoSync website

Tuesday, March 22, 2011

Making a Movie with iPad 2 and iMovie App

One of the features of the iPad 2 that is not available on the original iPad is the camera mode, which allows you to take video clips or photos. With these video clips and photos you and iMovie app available in the iTunes App store, you can edit and share these video clips with others.

My granddaughters were here for a visit yesterday and I thought I might try out the new iPad 2 video taking features. Of course, I am not one to read instructions and usually find it more fun to explore apps and devices by the trial and error method. So I took out the new iPad 2 and clicked on the camera icon, moving the icon button on the right hand side of the screen to the video position. I then clicked on the record button in the center of the app to start recording. I realized early on in the recording that holding the iPad 2 in the landscape mode that I was not getting the full range of the action of my granddaughter performing her gymnastic maneuvers. So I rotated the camera to the portrait mode to finish recording her acrobatic and jump rope maneuvers.

When I played back the recorded video, I soon realized that I had part in portrait mode and part in landscape mode, which did not look right. As I had purchased the new iMovie app and had not tried it out yet, I was elated to realize that somehow Apple had realized that many of us novice camera operators would make this mistake. It wasn't obvious to me how to edit out goofs (delete, split and rotate clips). I tried all the obvious icon buttons in the iMovie app, tapping the clips, etc.

I noticed the "i" on the left side of the iMovie app screen and was pleasantly surprised to see all the things I wished to do with this first video production to make it tolerable for viewing and sharing with others. The app has a nice help built in, one of the things that Apple has always been great at providing for us novice or beginners.

Within a few minutes I was splitting, deleting and rotating clip sections, and adding theme music and sharing with youtube.

Here is a sample of the video. The quality of the video is pretty good as well. I find that when I use the iPad 2 to take a photo or video and the lighting is good the clip is good, when the lighting is poor the video or photo is grainy.

Friday, March 18, 2011

Testing iPad 2 Audio and Camera Photo Post to Cinchcast.com


I was given the option to take a photo with the rear or the front facing cameras. This was a photo using the rear camera that was posted on cinchcast.com

If you haven't tried cinchcast.com it is a site that allows audio posting, via your computer or phone or iphone/ipad or android apps.