Showing posts with label Mac. Show all posts

Thursday, December 15, 2022

How to Reset DKVBrowser FromTo PC folder on a Mac running Ventura 13.1

After updating my Mac to the latest system Ventura 13.1 - It did not appear that I could see my FromTo folder or DKV###### network for the Disklavier.


Here are the steps to access the To/From PC using a Mac with the new system:


1:  Open a finder window


2:  Click on Network, under locations on the lefthand sidebar.


3:  Goto the menubar and select the “Go” Menu and the “Connect to Server” option in the pulldown menu


4:  Type in smb://dkv###### that corresponds to your piano


Select Guest and hit return.


The FromTo PC option should also be selected.  Once selected, you will see any files or folders that you have stored on your piano in the FromTo folder in the finder directory. You can drag midi files from your Mac directory to that area. Once they are transferred to the folder on your piano, use Refresh PC option in DKVBrowser to see the files on your piano's FromTo folder.


Wednesday, August 28, 2019

Playing Midis via Bluetooth from my Mac to my Disklavier Mark IV

 I connected the mi1v2 Bluetooth midi device to my Disklavier Mark IV this evening.


I purchased the Bluetooth midi device from Amazon at
https://www.amazon.com/Wireless-MIDI-Interface-mi-1-Rev-3/dp/B01D61QK6W/ref=asc_df_B01D61QK6W/?tag=hyprod-20&linkCode=df0&hvadid=312118595187&hvpos=1o1&hvnetw=g&hvrand=14263083875715554474&hvpone=&hvptwo=&hvqmt=&hvdev=c&hvdvcmdl=&hvlocint=&hvlocphy=9029598&hvtargid=pla-570048501731&psc=1

 Description of device:
Wireless technology    Bluetooth Low Energy
Bluetooth LE MIDI Profile    Apple Bluetooth LE MIDI (iOS 9)
Connectors    1 x MIDI IN (5pin-DIN)
1 x MIDI OUT (5pin-DIN)
Switch、Indicator    1 x Hall element Switch
1 x Magnet
1 x white LED
Power Supply    From MIDI Out 3.3V-5.0V
Compatible iOS devices    iPad (3rd, 4th), iPad Air2, iPad mini, iPad mini 2, iPad mini 3,
iPhone(4s,5,5s, 6, 6plus, 6s, 6splus) iPod touch (5th, 6th)
Compatible OS    iOS8, iOS9, OSX (Yosemite, El Captain)
Firmware Update    On the air by using Piano Jukebox
iOS Apps for mi.1    mi.1 connect : bridges mi.1 and Core MIDI music apps
Piano JukeBox : Simple SMF player, firmware updater
Power consumption    7 mW (when MIDI OUT is 3.3 V)
25 mW (when MIDI OUT is 5 V)
Steps:
  • Turn Piano off.
  • Connected mi1vi2 Bluetooth devices input/output pins to I/O center at front of piano when piano off.  There are arrows on the device to aid in connecting properly.
  • Then turned piano on and made sure piano still worked.
  • Used instructions from http://quicco.co.jp/products/
  • Updated the device using Piano Jukebox app on iPhone  (be sure to get this app for your iPhone to use for update…
Firmware update
Updating the firmware is recommended to ensure that the mi.1 can be used in the most optimal condition. To do this, please download the dedicated iPhone/iPad application "Piano Jukebox" (free) from the App Store.
1. Launch the Piano Jukebox app
2. Tap the wheel icon and select 'Firmware Update'
3. Turn on the MIDI instrument to which the mi.1 is plugged, then tap the 'OK' button
4. Tap the 'Upload' button when it becomes available (blue) †
5. Keep the MIDI instrument turned on while updating the firmware
6. When the firmware has uploaded successfully, a message will be shown .
How to connect to iPhone/iPad
The connection between mi.1 and the iOS is made by Bluetooth Low Energy MIDI. The connection is managed in the “Bluetooth Midi Devices” List which the Piano Jukebox or some other MIDI apps have.
Preparation: Turn on the device to which the mi.1 is connected
1. Launch the Piano Jukebox app
2. Tap the mi.1 icon in the menu bar
3. Tap the “Not Connected” next to the mi.1 in the list.
4. You can now use the Piano Jukebox and other MIDI apps, such as GarageBand, on your iPhone

How to connect to Mac
1.For the connection between Mac, go to Application/Utilities folder and open Audio MIDI Setup.
2. Launch the "Audio MIDI Setup" tool
3. From the titlebar menu, select Window > Show MIDI Studio
4. Double-Click the Bluetooth Icon
5. Click the "Connect" button
6. If the button changes to "Disconnect", the mi.1 has connected successfully
7. MIDI apps can now recognise the mi.1 Bluetooth as a MIDI device.

Next I needed to decide on the best option for playing midis on my Macbook Pro.  I decided to purchase MidiYodi which works with this Bluetooth device, set up using Audio Midi Setup on Mac laptop.  This is a pretty good midi player for my current Macbook Pro running High Sierra  10.13.6.  I decided on this midi player because of the reasonable cost, the extensive online manual and the ability to create and save playlists.  It also has some editing capabilities.  MidiYodi can be found at:  https://www.canato.se/midiyodi/


Other Midi software that I tried out that worked with this Bluetooth device connected to my Disklavier Mark IV included:
Midikit is trial only, would need to purchase the version for 11.99 - good for editing titles and channels. No playlist capability.  Make sure connected to device by: looking under Midikit menubar select Midi Settings. Click on Midi port.  And the mi 1 bluetooth device should show up
Midiswing worked and needed to make sure to select output: Bluetooth (Quicco Sound Corp.) 2
Sweet Midi which has playlist capability. $29.95 USD

Most of these played midis using the Bluetooth device  but lacked playlist capabilities. In order to get some of these to work, I had to go to preferences or audio setup or midi settings in the individual apps and make sure that Bluetooth was selected.


** Update:  After hooking up Bluetooth, I noticed the only channel that was playing was Channel 1.  Needed to access Setup>Midi on my Mark IV PRC remote to set the channels for piano playback.  
 

Tuesday, April 03, 2018

Transferring Midis to Disklavier using FromToPC folder

When the latest edition of DKVBrowser for Mac failed to function on my MacBook Pro, I was heartbroken. It still runs on an older Mac that I have kept around here for editing purposes.  One of the nice features of DKVBrowser was the ability to transfer new midi files I downloaded from the internet to my Mac to the piano using wifi connection.

Even though I can't use the DKVBrowser on my MacBook Pro running Sierra 10.13.4 — I have figured out the steps to still transfer midis from my Mac to my piano via wifi.

This will be a great help as most laptops and newer computers don't have floppy drives or  CD drives.  I tried using a thumb drive which failed -- I believe due to being formatted as a Mac thumb drive. Maybe if I had a PC formatted thumb drive my Mark IV Disklavier would have recognized it.  I was spoiled using DKVBrowser to easily move midis to my piano via wifi.  So here are the steps to do so without DKVBrowser application. 


UPDATE:  Make sure your piano is ON ... out of standby.  Just turn on piano and play a song. Then stop song. 


On MacBook Pro, use the Go menu in the menu bar of finder.  Select Connect to Server from pop down submenu  and then from the upper right hand side of window select the pop down arrow and click on DKV#####


Click on Connect.

A popup window requesting name and password to server appears.
Fill in and click on connect.  (Note:  you may not need a password.)
Select FromToPCYou can use Guest to sign in - that works too!


The FromToPC  icon should appear on the Mac desktop.
Drag and drop any midi files that you wish to transfer to your piano into the icon.

Next, you will need to refresh this FromToPC directory using the piano's PRC remote, before the files will show up in the FromToPC directory on your piano's PRC remote screen.

Select the  FromToPC directory from the PRC
Select the root directory which is  a "/"

Select the Function button below and use "Refresh" option.
Which should  reload all the new midi files that you transferred via wifi so that they appear in the directory of the PRC remote screen.
You can now play them on your piano using PRC remote.

You can also run the Disklavier Controller app on your iPhone and can see the midis in the FromToPC directory on the app and play them.


You should also eject the FromToPC icon from your Mac’s desktop when finished.

Additional Note: Today, I was able to upload midis using my iPhone and app called "GoodReader" to my Mark IV Disklavier.  I save midis I find using iPhone Browser to my GoodReader app using the share icon.  GoodReader has an option to connect to servers.  Then I setup my piano server in GoodReader.  I select add server using SMB type server and adding the dkv###### address and add to my GoodReader app.   I then upload the midis saved in GoodReader to my piano's hard drive FromToPC directory.   

Monday, March 16, 2015

How to Copy Your Music from a Shared Library to Another Library


I store a copy of all my music CD's on my main Mac desktop to listen to in my office.  When I am home and using another computer or my laptop in another part of the house, it is easy to share my iTunes music library and listen to songs.   This gives me more room on my laptop for other files - mainly photographs and documents I am currently working on.  This morning, I decided I needed to transfer some of my music from my main Mac computer to my laptop so that I could listen to it while traveling.  My laptop is also the computer I use to sync my new iphone 6 plus and ipad mini 3 (which also need some music).

Itunes makes it easy to share music and to also copy music from one machine to another.  To copy your library contents you must authorize your iTunes account on the other computer.  To discourage users from sharing their library with lots of people, you are limited to sharing your library with five people.

If you haven't done so, authorize your computer by clicking on that option under the Store menu in iTunes.

Make sure both machines are set up for sharing music files.  Select Home Sharing under the File menu in iTunes and enter the apple id and password on both machines.

Next, click on the Home Sharing tab underneath the Sharing section in iTunes source list to view the shared library.   (Both computers should be using the same wifi network).

You have access to both libraries - your's and the other computer's.  You can select a song from either library and play it or copy it to your other library.

Merely, select the song or album you wish to copy from the other computer via wifi and select the Import button in the lower right hand corner of the iTunes window and your music selection will be copied to your library.


Wednesday, March 04, 2015

How to Make a Quick List of Files Contained in a Folder

Computer tip that might come in handy sometime:  I have a folder with just my books in it.  So I arrange them by name and then view them in list view.

Then I use select All (cmd A) and  cmd C to copy them.
 I open a Text edit document make sure it is in plain text mode.  (Type something then select “make plain text” from the Format menu).

Then paste the copy of list (cmd V) into this text document.

Now I have a nice alphabetical list of my files (or in my case of the books or pdf files I have in the folder).

If you don't put it in plain text mode, then the filenames will also have the folder names included.  I just wanted an alphabetic list of the names of files or books that I had.


Friday, March 07, 2014

How to Change Mac Mail Subject Line

Trying to find an email can be a undaunting task if the email doesn't have a good subject. Have you ever wished that you could edit the subject for emails that come into your IN box. There doesn't appear to be a way to do so in the Mac Mail app.

Well, here is a tip to help you do just that.


Select the email that you want to change subject. This can be an email in your Inbox or some other folder (mailbox you have created for storing and organizing your emails).

Note: The date and time of email will be changed. You may want to put a reference to the date/time in subject or content as a note if needed for some reason.

Drag that email message into your Draft folder.

Double click on the email on the left side column. A window will open that displays the email you have selected.

Make changes to the subject for that email.

Click on the red close button in upper left-corner of email.

Email will be saved with new edited subject.

Now, you can move that email back to your Inbox or other folder (i.e. mailbox).


Monday, September 30, 2013

Get Rid of Gmail ALL folder

Without a doubt organizing and keeping emails can be a can of worms. Gmail accounts store all our incoming mail by archiving it in an ALL folder on our Apple devices and in a similar folder in our Mail app on our Mac computers. In essence, the mail we want to keep and the mail we don't want to keep gets stored in this folder whether we want it or not.

Since I'm trying to organize and minimize my mail on all my devices, I have decided to find a way to get rid of some unnecessary folders stored in the mail apps and programs I use on my devices and my laptop.


There is a way to control what folders are visible in Gmail account(s) that are setup as IMAP accounts for use with Apple Mail.


To turn off the visibility of the Gmail All Mail folder in Apple Mail on your computer, perform the following steps:

Step 1: Log into your Gmail account using your Browser (Safari, Firefox, Chrome, ... whatever you use).

Step 2: Click on the "gear icon" located on the far right-handside of the browser window and click on the Settings option from the pop-down choices.


Step 3: Select the Labels tab.


UNCHECK the box to the right - "Show in IMAP" for the ALL MAIL folder.


Not only will this remove the superfluous folder from your Mail app, it will also keep Mail from downloading every single message twice.

I choose to have my Spam folder unchecked as well.

You can also keep Gmail from archiving all your messages on your mobile devices (iPad, iPhone, etc.) and allow you to delete messages from your the devices.


After setting up your Gmail account on your iPhone, select the Settings icon. Select Mail, Contacts, Calendars. Then select (youraccount@gmail.com) and change the Archive Messages setting to OFF.

Now when you delete Gmail messages on your iOS devices (iPads, iPhones, etc) they will be permanently deleted and not archived.

Sunday, May 26, 2013

Deleting an Image or File While Using Quick View

Today while traveling the fjords of Norway and taking in the scenic views, I decided to spend some time ridding my hard drive of some of the out of focus and duplicate photos from my travels over the past year.  It has been time consuming, but just realized a useful way to delete while viewing in the "quick view" mode.

As you may know, you can open a finder window and view all the names of photo files you have stored in a folder.  A quick way to view the images without opening them in Preview or iPhoto or other photo app is to click on the name of an image file to highlight it. 


Next, tap the space bar to view the image.

To continue viewing each image down the list, use your down or up arrow keys to move along viewing each one. 

Note: As you quick view each one you may run into one you wish to delete.  Rather than having to close the image and then drag or control click the file name to move to the trash, you can just use Cmd - Delete and the current image will automatically go to the trash and the next image will be loaded.


This tip should help speed up the elimination of photos quickly.


Sunday, December 09, 2012

Fix for Blackbackground Image in Preview for Firefox on Mac

Occasionally, when downloading a .pdf file to Preview while using Firefox browser on Mac, I get a document that has black backgrounds, similar to the one below:


To fix this problem, I selected the Preferences under the Firefox menubar


Select the Applications tab and scrolling down to Preview.app Document (image/jp2).  A pop-down menu will appear.  Normally the selection is Use Preview (default).  Instead of leaving this as the selected option, click on Use Other.  This will bring up a selection of applications on your Mac, Select the Preview application.  This will now be the default for viewing your documents and should read "Use Preview" instead of "Use Preview (default)."


Now try downloading the same document again.  Whoola!  problem should be resolved.

Edit:  The method described above quit working for me for all pdf files.  Ended up removing all pdf plug-ins and adobe reader plug-ins and reinstalling PDF Viewer 0.6.39 from scratch.  Now my files are viewable from online rather than downloading automatically and opening in Preview.

To remove all previous plug-ins may require that you access Library>Internet Plug-In and look for specific addons that are old and may be causing problems and send to the trash.


Tuesday, November 20, 2012

How to Change Permissions for Folder and Contents

If you have a folder (and all its contents) on your desktop that you wish to change the permissions for read/write for someone else to edit, this can be easily done by following the steps below:

(1) Click on the folder

(2) Using cmd I bring up the Get Info window for that folder

(3) If the folder is locked (indicated by a closed lock in the lower right hand corner of the Get Info Window), unlock it by clicking on it, entering your Apple username and password that you use as an Admin for your computer.

(4) Click on the Sharing & Preferences down arrow to reveal "names" and "priviledges"

(5) Next select the name of the "guest" or "everyone" or person listed in the list of those you share this file with.

(6) Select the appropriate level of priviledge, either read only, write only or read & write

(7) Next select the "gear icon" in the lower left-hand corner and set to "apply to enclosed items"

(8) Lock your folder if you do not wish others to change these permissions for this folder.

That's it!


Sunday, October 28, 2012

How To's for Apple TV - Viewing Photos from iPad or Laptop

How to Setup Your iPad and/or Mac Computer or Laptop to View Your Photos on Your Apple TV


Connect the Apple TV to your wireless network, by following the next steps:

  1. Connect your Apple TV box to your HDTV input connection on the back of your TV via a HDTV cable.
  2. Using the remote (that came with the Apple TV). Aim at the white light on the black box, make sure it is un-obstructed view.  Select Menu
  3. Use the right arrow on the remote's dial to move to Settings.
  4. Press the middle of dial to select WiFi Set Up.
  5. Then using the down arrow, select the Network Configure WiFi from the list of options.
  6. Select the name of your wireless network and press the middle of the dial to select it.
  7. If you don't see the name of the wireless network, select Other and then using arrow key, select Submit and enter password if needed.  Select Menu to go back to the screen saver.

Now for the iPad2 Setup -- for viewing photos from your camera roll and albums stored on your iPad, you will need to do the following:


  1. Select the Settings icon from the iPad2.
  2. Then select WiFi.  Make sure your device is connected to the same network.
  3. To activate Apple TV on your iPad, Tap on the home button twice and swipe towards the right.  You should see the iPod orange icon and the controls for the music player and sound controls.  Look closely and you will see the Apple TV logo which is a box with black up arrow, next to the player controls.
  4. When you click on this icon, you will be able to switch to and from your iPad, your network, and also the Apple TV and other devices.  Select Apple TV.
  5. Now press the home button once, and select the Photos icon from your iPad.  You should be able to select or make sure that the Apple TV is selected from this app.  By clicking on an album and photos you should see these on your display connected to the Apple TV black box.  You can operate a slideshow, swipe photos and such from your iPad.  These will be mirrored (by using Airplay) onto your display.
NOTE: When you have finished viewing your photos on your Apple TV from your iPad, you will need to switch back to your network to resume using the iPad device with your other apps that require wifi.  However,  when connected via Apple TV you can actually play your music through your TV speakers, along with mirror any of the apps or games from your iPad to the Apple TV.
NOTE:  iPad 1 users will find AirPlay playback will be limited to certain system apps such as Photos, Music, Videos, Safari (for embedded videos), YouTube and FaceTime, along with a few other third-party apps.

You can listen to music and watch movies and videos from your iPad and other output devices. Your content is stored on your iPad, which you use to drive playback to any of the other screens or speakers in your house. The advantage is that you could start watching a movie at home using AirPlay streaming to your HDTV and then when you need to leave the room, you can switch the display back to your iPad and watch it from there. This also works for your music.
Another example -- you can output the Scrabble board from your iPad using Airplay to an HDTV, and then use the free Scrabble Tile Rack on other iOS devices for a local multiplayer Scrabble game.


To connect your Laptop to Apple TV you will have to follow these steps:

For those users NOT running Mountain Lion System software on their laptop or Mac computer. 
  1. Run iTunes application on your computer, turn on Home Sharing under the Advanced Menu option. You will have to enter your Apple ID and password.
  2. Using the Menu button on your remote that operates your Apple TV, select Computers tab and you will be able to select the Name of your shared library. 
  3. You should be able to share or listen to  your iTunes music library or run Photos application on your computer and run a slideshow or view photos from the computer that are now displayed on the TV connected to the Apple TV box.
NOTE: As long as you leave Home Sharing on your computers, then they should be accessible under the Computer Tab of Apple TV.  Your computer does not have to be on to access this option and the photos to be displayed on your TV via the Apple TV box.  Movies and videos that you wish to watch must be stored in your iTunes library on your computer in order to play on your Apple TV. These must be playing on your computer and then they are played on your Apple TV if the Apple TV is selected from the Airplay drop down menu.

If you have Mountain Lion System and a computer with the right processor, it is much simpler to use the Airplay option available with that system to view your photos and mirror your computers screen.


  1.  If your Mac supports Airplay Mirroring, an Airplay Mirroring menu appears in the menu bar when an Apple TV is on the same network.  Turn on the Apple TV options in the pop-down airplay menu.   Note: Airplay must be turned on via Systems Preferences&Displays
    From this systems preference, you can also set the mirroring resolution to be the matched to the computer's screen or the Apple TV's screen. 
  2.  Once this option is enabled, you should be able to run any app or program to mirror what you see on your computer.

Wednesday, September 19, 2012

How to Get PDFs onto Your iPad into iBooks

PDF is an acronym for "Portable Document File" and is a convenient format used for reading documents on all sorts of devices, regardless of application, device, or operating system you have.

There are many popular readers available to access and read PDFs from your iPad.  In fact if a PDF is emailed to you, you can click on it from your Mail app and it will open and you will be able to read it.  iBooks on the iPad is another good way to read PDF files and to store them for offline reading.  Often times when we are traveling, we don't have convenient access to wifi services, and it is nice to have a way to read our stored PDFs to read whenever we wish.

How Can You Find PDFs

There are many PDFs already on the web. We just need to find them.  The quickest way to find a PDF is to use Google Search from your Safari browser on your iPad.  For example, if you want to find a reference manual for your iPad, you can google for it.

Type in a phrase like, "iPad 2 manual pdf"  Using the additional word "pdf" will help find the file in pdf format. 

The search results will appear in a list.  The following result appears to be the best option as it is an Apple pdf file.  Clicking on this result will bring up the pdf.  Now, you can read the resulting pdf directly from your Safari browser; however, it may be something you want to keep as a reference for later.  In that case, after the document has fully loaded into the browser page, simply tap twice with your finger on the pdf and an option  bar will appear at the top of the page.  The option to read/save in iBooks will be one of the options.  If you select this one, your PDF file will be saved to your iBooks bookshelf.  You will be able to access this document offline at any time. 


Other Ways to Transfer a PDF to your iPad

Via Email. You can email a copy of a file by dragging it from your computer desktop to your new email window and send it to yourself.  You can then retrieve it from your mail on your iPad and can save it from there.  To save, merely open the PDF file while in your mail app by touching the opened file with your finger.  Once open, you should notice a small square with curved arrow in the upper corner menu bar.  If you tap on this icon you will be given the same option to open in iBooks.  If you select this option, your pdf file will be saved in iBooks.

Via another app.  Using GoodReader or Dropbox app one can transfer a pdf to their Mac.  You merely drag the PDF into the GoodReader of Dropbox app on your Mac or PC.  Then open the same app, either GoodReader or Dropbox on you iPad and select the document and option to transfer to iBooks. These methods do not require that you sync with iTunes.  Using iTunes to sync books or pdf files is not always convenient.

There is a way to transfer PDFs via iTunes without having to sync

Connect your iPad to your PC or Mac via the cable and run iTunes app on your computer. In the left hand column you will see the name of your iPad under Devices. Select Apps tab at the top in the right hand window.  Scroll down until you see the File Sharing section. Select either GoodReader of Dropbox from the list of apps that have file sharing capabilities on your iPad.  Drag the PDFs into the list for that app on the right-hand side.  They will appear on your iPad retrievable by the app.

Wednesday, February 15, 2012

Resurrecting a Mac With a Full Hard Drive

Today, I volunteered to help a new friend who could not use her Mac laptop.  She could get the gray Apple icon screen on powering up, but eventually it turned to a blank blue screen with no icons or dock or hard drive image.  She mentioned at one point that she had been told by the Apple Genius store that her hard drive was full, and that she needed to hook it up with another Mac in Target Mode to access her hard drive to clean off some of the files.

I tried the option, command, P, R sequence of keys to execute a PRAM boot sequence.  This did not help. So with a suggestion from my husband we tried the Safe Boot Mode.  To boot a Mac in Safe Mode - power up the computer, after the first tone sound, hold down the Shift key and release once the gray screen and spinning wheel and progress bar appear. 

This worked and we were able to see the friend's hard drive, dock and files on the desktop.  From that point, I realized that she had been trying to remove some of her photos from iPhoto application to make room on her hard drive.  There were a number of things that she did that actually caused the hard drive to fill up.  She kept saying that she had multiple copies of each photo in iPhoto and could not seem to get rid of them.

This is the scenario that I believe caused this duplication:
She thought she could drag the photos from iPhoto application to the trash can to get rid of them.  She did not realize that the photos were being copied instead of deleted from the iPhoto library.  Every time she dragged a photo out to the trash, it was duplicating the photo instead of deleting it.  She did this a couple of times, and as she did this, more duplicates of the each of her photos were placed into the trash.  She was compounding the hard drive space problem without realizing it.

I deleted the trash can which got rid of the duplicates there, but in exploring her hard drive, realized that she had also possibly dropped these same files she was trying to delete into her home folder and had another two sets of duplicated photos.

Once I found these and selected them and put them into the trash and also emptied the trash, her hard drive space was back.  Now, she is able to use her Mac again.

There are several things that can be learned from this:
(1)  A file is still on your hard drive, present in your trash can, until you actually empty the trash.
(2)  You cannot delete photos from iPhoto by dragging them to the trash.  To delete a photo in your iPhoto library, you need to run iPhoto, select the photo or photos to delete, and then hit the Delete key.   The photos then are moved into the Trash can in iPhoto application.  You must also empty the Trash in iPhoto for these to be totally removed.

Additional notes added 4/2/2012:
(3)  Also, note that selecting an album and hitting the delete key does NOT really delete all the photos in the album (as these are really only alias or pointers to the real photos).  Remember to delete photos, do so by selecting photos icon from the left hand column and then deleting each photo individually or delete multiples that are selected from the main window on the right.  
(4)  There are a number of short cuts that you can use to select multiple photos at once to delete.  Using cmd A to select all.  Dragging the cursor to select multiple photos within the main window.  Also adjusting the size of the photos using the "zoom bar" at the lower left of iPhoto will allow you to see more photos at once, thus you can drag select more at once to select for deletion.  Selecting one photo while holding down the shift key, you can select other photos by clicking on them and holding the cmd key down.  This will allow you to select photos that are not easily in a group.

Wednesday, July 20, 2011

DKVBrowser Hiccup with Lion System

I updated my Mac with the new Lion System today and have experienced a few problems with some of my applications.  My Office programs like Excel, Word and Adobe Acrobat Standard no longer work.  I also had a few hiccups with some of the other applications like FaceTime and Mail.  Both of these are working fine, after installing the latest updates and rebooting my computer after a few forced quits.

I decided that I needed to test out controlling my Yamaha Disklavier Pianos, using DKVBrowser application. I clicked on DKVBrowser and received a message to the effect that I needed to update my java script.  I clicked on the button to start the download and install.  That seemed to work fine, but the DKVBrowser screen came up saying the connection failed.  It could not locate the correct IP address which may have be reset not due to Lion, but to a power outage this morning.  Anyway, entering the DKV###### into the IP Address box was accepted and everything working fine as usual now.

Always great when I can turn on my piano and pick a great song and listen to the music all from my downstairs office.

I have tried twice to run the virtual remote software from Yamaha on my Mac, but am receiving a message and error log. I will check it out and it report on it later.  Need to check my notes to see the procedure.

Sunday, June 26, 2011

Will You Be Walking on Cloud 9?


I remember back to third grade when I was first introduced to cloud terminology.  Even though this has been many many years ago, I still remember the words Cumulus, Altostratus and Cumulonimbus and Cirrus.  Each of the terms brings to mind a picture of a type of cloud like a puffy cloud, a thin or wispy cloud or a rain cloud.   The terminology can also relate to the cloud's position in the sky.    Alto referring to those clouds in the middle of the sky at an altitude of 6000+ to 20000 feet, a Cirrus cloud that lies above 18,000+ feet, or a Stratus or Stratocumulus cloud that is located below 6,000 feet.

Today, I ponder all the new cloud terminology in hopes that it can be visually represented and as easy to learn.   Since the hottest topic today seems to be cloud computing, it might be good to review the terminology around this newest phenomena.  So here goes, my interpretation:

A cloud or residing in the cloud is a term used for a place to store your stuff like documents, photos, music, and so on.  This is a concept that most MobileMe users understand, at least those that have used the iDisk from Apple in the past few years.

Cloud Computing is the ability to use combined applications and services provided by data centers in the cloud.  For example: those who use a service like Google mail or Yahoo mail online are already using cloud computing.  You are using a mail application from the service provider either Google or Yahoo.  Ideally, A large corporation or individual that uses these services, does so without having to employee a special IT group to maintain the application or worry about storage.  Another advantage is that the mail is accessible from anywhere and anytime, as long as you can access the cloud or the internet.

I definitely remember the time my son informed me that this phenomenon was coming, that was at least 20 years ago.  It is here and has been for awhile.  Most of us have already experienced the cloud and cloud computing in some form already.

Many questions will be hashed about and analyzed.   Will it simplify the way we access, store and handle our data?  Will we have a means to backup data, access data and save data securely? Will we be able to manipulate this data using shared applications based in the clouds?  Will these applications be maintained and upgraded seamlessly without any of us worrying about taking care of these things ourselves?   What will be the costs for services, costs for maintaining, reliability and security issues, and how will we access and share data with others?  If we all move to the cloud, will the immense amount of data (e.g. Big Data Theory) be unlimited and infinite?

The final question to ponder -   Have you made your moving plans yet?  Many of us will be looking for the right cloud to meet our needs.  Those of us who have iWeb sites and MobileMe Galleries will need to move our stuff in a year's time to a secure cloud.  Where and what Cloud have you decided to use?  Will you be walking on Cloud 9?

Credits:  Photo taken by my husband, from an airplane over South Africa.

Saturday, June 11, 2011

Over 200 New iOS 5 Features - From A to W

Highlights for iOS 5 Features 
(Note:  iOS 5 is compatible with:  iPhone 3GS, iPhone 4, iPod Touch (3rd & 4th generation), iPad and iPad 2)

•  Accessibility
    Works with specialized hardware for hearing, vision, cognitive disabilities
    Vibrate and LED flash mode for notification of calls
    Improved VoiceOver customization

•  Airplay Mirroring for iPad 2
    Support video mirroring, wirelessly, securely to HDTV via Apple TV
    See what is on iPad 2 on Big Screen TV
    Supports portrait, landscape and zoom in and out of photos

•  Calendar
    Year View, Week View
    Tap to add event, Drag to adjust time and duration of event
    View attachments in Calendar app
    Share calendars with others
    Sync via iCloud across all devices

•  Camera Editing & Storage Features
    Open camera from lock screen
    Grid lines, pinch-to-zoom, single tap focus, exposure lock
    Use volume button to snap a photo
    With auto-stream enabled, downloads to other devices via iCloud

•  Game Center   
    Allows profile picture
    Overall achievement scores displayed
    Friend recommendations
    Explore new games

•  iMessage Service
    Text message via wifi or 3G from your devices: ipad, ipod touch or iphone
    Group messaging
    Send text, photo, video, locations and contact   
    Secure encription
    Unlimited messages
    Switch between devices during conversation

•  Mail - Inbox
    Formatting: Bold, iTalic, Underline, indenting
    Flag important messages
    Rearrange names in address fields
    Add and delete MailBox folders
    Search body of email text
    Free email account on iCloud, synced auto to all devices.

•  Multitasking Gestures for iPad
    4 or 5 finger gestures
    Swipe up to reveal multitasking bar
    Pinch to return to Home screen
    Swipe Left or Right to switch between apps

•  Newstand Shelf
    A place to put all magazine and newspaper subscriptions
    Auto updates and delivers and notifies you when new issue available

•  Notification Center
    Supports new email, texts, friend requests in one place (selectively)
    Swipe down to get to the notification center
    Includes stock ticker and weather

•  PC Free
    No longer have to own a computer to use iPad, iPhone or iPod touch
    Activate and set up wirelessly
    Backup to iCloud, download free updates to your device directly

•  Photos & Editing and Storage Features
    Built-in common photo editing:  remove red-eye, crop, rotate, enhance
    Push photos to iCloud and all devices

•  Reminders or To Do’s
    To do list with due dates and locations
    Sends alert or reminder at certain time or when near a particular place
    Automatically updated - works with iCal, Outlook, iCloud for all your devices   

•  Safari Improvements
    Tabbed browsing - multiple pages & switching easier
    Keep list of articles in Reader built-in to allow add-free reading experience
    Reader List available on all other devices

•  Twitter Integration
    Tweet from devices, Safari, Photos, Camera, YouTube & Maps apps
    Interfaces with contacts, auto gets friends @reply name
    Adds location

•  Wifi Sync
    Auto syncing when device is charging across all your devices

Friday, May 20, 2011

Guest Post - How to Use Quicktime's Screen Recording Feature

This morning I received an email from my husband.  He had explored a feature accessible in the Mac Quicktime application.  He shared how to use this feature.  I am posting it here as a Guest Post to share with everyone.

QuickTime Player will record the screen video and mouse movements along with your voice:

Select New Screen Recording from the QuickTime Player menu:


What is not exactly obvious are the following two items:

#1 Before starting the recording you need to select the little triangle (allows user to select their microphone from the pull-down menu located on the recorder)


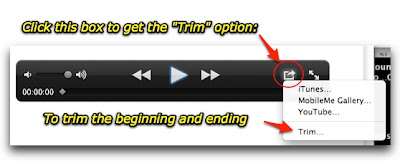
#2  After the video is recorded you get this screen at the bottom:  (The user can edit or trim the recording and also send the finished project to their MobileMe Gallery, iTunes, or YouTube account)


That's it:

Attached is a 1 minute instructional video I just made. It is only 5 MB so it should be small enough to email. The QuickTime app also allows directly posting to YouTube as well.

P.S. It helps to have a mostly one-color background. The same video was 4x to 8x larger when I was showing my messy desktop. Having a mostly white background cut the size down considerably.


Friday, May 06, 2011

Collage Creator - App for Your Mac

I've been exploring the FREE apps in the Mac App Store the last few days.  I ran across an app, Collage Creator,  that could be useful.  It is certainly fun and easy to use. 

You add photos to the collage window by selecting the Pictures tab and then clicking on the + sign.  This allows you to add photos by opening files on your Mac by using a file selection browser type window. Or you can merely place them in the picture panel on the left-hand side  by using the drag and drop method.  They appear in the collage window on the right-hand side.

You can move them around in the panel by clicking and dragging.  You can  resize or change the angle of orientation using the curved arrow button.  You can position them in front or behind other photos by clicking on Move Up and Move Down buttons.  There are built in buttons to Shuffle and Re-mix the photos that you have in the collage window.  You can also go to Settings Tab to bring up options for setting another photo as a background or using a transparent background.  You can set the Border Width and Color for the photos and add Shadows for those borders.  The layout can be Portrait or Landscape and can vary in size.  There are options for the type of collage arrangement using Grid, Mosaic, Pile or Center Frame modes.


Overall, I give this app a 5 Star Rating and suggest that you check it out for an easy way to create collages of your photos.

Wednesday, April 27, 2011

Rebuild Mailbox Tip for the Day

When using the Mail application on my Mac, I have had the occasional annoying Draft email message that remains in the Draft mailbox folder. 

Normally, I check my Sent mailbox folder to make sure the email has been sent successfully.  Then, I delete the email from the Drafts mailbox folder.  Today I discovered that if you use the Rebuild option in the menu bar under the Mailbox option, you can fix the Drafts mailbox problem.
 

Sunday, March 27, 2011

How To CLIP OUT Sections of Video Using QuickTime Player 7

When editing video using QuickTime Player 7 it is fairly easy to do so at the beginning and ending of the video using Trim Selection from the Edit menu.

One merely moves the IN and OUT selectors under the down arrow above the video clip display line.  Set the IN or left marker to the place where you wish to begin the movie and the right or OUT marker to where you wish to end the movie.   The area that is shaded is the area is the resulting movie after trimming the excess at the beginning and ending of the clip, by selecting TRIM SELECTION from the EDIT menu.

If you wish to keep the beginning of a video and the ending, but wish to take out a section in the middle this may appear to be confusing.  You will have to utilize making a NEW PLAYER and basically PASTE sections of the original video into this NEW PLAYER in the order that you wish to view it.

Load in your video that you wish to edit and select the first section that you wish to copy.  Remember to place the IN and OUT markers on that section that you wish to KEEP (i.e. the shaded area in the video display bar).


Select COPY from the EDIT menu to copy Section 1 or shaded area.
Select NEW PLAYER from the FILE menu to create a blank video player, where you will insert the clips that you copy from the original video, in the order that you wish to compile them.

Select PASTE from the EDIT menu and place the first section of video into the NEW PLAYER.   

Select the next section (i.e. SECTION 2) from the original video and COPY and then PASTE to new video player by inserting and the END or OUT marker to place the video clips in the sequence you wish to compile for viewing. 
The original movie clip will remain unaltered as long as you do not save the new video clip over it.  When you are satisfied with the new video then select SAVE AS under the FILE menu giving the edited video a new name.