In my endless effort to find an app to transfer epub books to and from my Mac to my iPad without hooking up cables or using iTunes sync, I have found a fantastic app called "Flick" that is easy to use and currently free for both.
The Flick app for Mac OS laptops and computers can be found here: Flick app for Mac OS.
The Flick app for iPad/iPhone can be found here: https://itunes.apple.com/us/app/flick./id644265534?mt=8
The website instructions and descripton are given here: http://getflick.io/
Within nano-minutes, I was able to install both apps, tap on an epub book on my Mac laptop, flick it to top of my menu bar, select it on my iPad and open with iBooks.
Have to give this one an A+ rating for ease of use and convenience. There also appears to be an Android and Linux version.
I was able to successfully transfer an mp3 file, epub file, and jpg without a problem. Enjoy!
Tweet
Showing posts with label Mac Application. Show all posts
Showing posts with label Mac Application. Show all posts
Sunday, September 14, 2014
Thursday, March 27, 2014
If you want to remove someone from the auto-fill option in Mail app
If you want to remove someone from the auto-fill option in Mail app, you can delete them from your address book or contact list; however, there is another solution that might work that let's you keep the contact info just in case you need it later.
If you remove the email address of the person from your contacts or address book, then this eliminates them as an auto-fill in mail.
But you may want to keep their email in the notes section of the address book, just in case you need to have that email info at a later time. Use edit option to copy their email and paste in notes section on their card info in Address book and then select the - to remove it from emails.
You may also want to make sure their email is not also listed somewhere in the Previous Recipients' list in the Mail app.
To remove a name from the previous recipient's list,
Select "Window" from the menu bar.
Select "Previous Recipients" from the pull down options.
A list of names that you have typed in or chosen before will appear in a popup window.
You can remove any by selecting the name and then clicking on the "Remove from List" button in lower corner.
Tweet
Friday, March 07, 2014
How to Change Mac Mail Subject Line
Trying to find an email can be a undaunting task if the email doesn't have a good subject. Have you ever wished that you could edit the subject for emails that come into your IN box. There doesn't appear to be a way to do so in the Mac Mail app.
Well, here is a tip to help you do just that.
Select the email that you want to change subject. This can be an email in your Inbox or some other folder (mailbox you have created for storing and organizing your emails).
Note: The date and time of email will be changed. You may want to put a reference to the date/time in subject or content as a note if needed for some reason.
Drag that email message into your Draft folder.
Double click on the email on the left side column. A window will open that displays the email you have selected.
Make changes to the subject for that email.
Click on the red close button in upper left-corner of email.
Email will be saved with new edited subject.
Now, you can move that email back to your Inbox or other folder (i.e. mailbox).

Tweet
Wednesday, October 02, 2013
Mailboxes, On My Mac and iCloud Sections of Mac Mail App
A mailbox is like a folder. You create mailboxes to organize emails. For example, a mailbox named "Work" might contain all your emails that you receive that are related to work.
Mailboxes are created in the Mail app program on your computer. When they are created you give them a name and a location. Mailboxes can be located to a section on your computer: On My Mac section or iCloud section.
You can also create sub mailboxes that can be placed inside other mailboxes. For example, you might have a mailbox named "My Stuff" and inside that mailbox, you might want to create sub mailboxes named "Bills", "Orders", "Miscellaneous."
Mailboxes or folders created and stored in the On My Mac section of the computer's Mail app program are only seen from the computer's Mail app. i.e., You cannot see them on your iPad or iPhone.
Mailboxes or folders that are created for location in the iCloud section are saved on Apple's cloud server. If you have also selected (in Systems Preferences>iCloud) the option to sync mail with iCloud, then the email messages are sent to ALL your devices including your laptop, iPads, iPhones, etc. These messages can also be retrieved using a web browser like Safari, Firefox or Chrome. You type iCloud.com in your browser address box (url) and log into your personal iCloud account with your Apple ID name and password. You will be able to see your email on the web page.
If you move an email message inside a mailbox or the entire mailbox from the On My Mac section of the Mail app program on your computer to the iCloud section, it is "moved" to the iCloud, but is no longer located in the On My Mac section. Remember that in moving a mailbox from one section to another - the message or mailbox is deleted from the place it is moved from and added to the section moved to. In addition, the email message(s) or entire mailbox has to be literally sent to the iCloud again - which can use a considerable amount of bandwidth upload/download if there are a lot of messages and attachments. So this is best done when you are connected to wifi where you are not worried about using a lot of bandwidth or upload/download data transfer.
If you move an email message from iCloud section to the On My Mac section, the move is made to your local computer, but also removed from the iCloud.
There is also a copy option. The method for "moving" and "copying" messages from a mailbox the On My Mac section to a mailbox in the iCloud section can be done by holding down the control key and clicking on the email message(s) to be "moved" or "copied" to another mailbox that you have created in the iCloud section. Copying email message(s) rather than moving allows you to keep the messages in each section.
To move an entire mailbox from one to the other, you merely drag the mailbox from the On My Mac section or iCloud section of the Mail app to the other section.
Those who do not want their email messages stored in the cloud can create mailboxes or save messages only in the On My Mac section; however, they will not be able to find that email on their other devices like iPhones or iPads.
Apple allows a certain amount of storage in the iCloud, and one way to alleviate some of the storage in iCloud is to move the email messages (deleting them from iCloud section at the same time) to On My Mac section of your Mail app program on your computer.
If you store all your emails in the iCloud section of the mail app, you will need to be connected to wifi to retrieve those messages on your iPad or iPhone.
You should be able to see the email messages stored in the iCloud section mailboxes from your laptop even if you are not connected to wifi.
Tweet
Monday, September 30, 2013
Get Rid of Gmail ALL folder
Without a doubt organizing and keeping emails can be a can of worms. Gmail accounts store all our incoming mail by archiving it in an ALL folder on our Apple devices and in a similar folder in our Mail app on our Mac computers. In essence, the mail we want to keep and the mail we don't want to keep gets stored in this folder whether we want it or not.
Since I'm trying to organize and minimize my mail on all my devices, I have decided to find a way to get rid of some unnecessary folders stored in the mail apps and programs I use on my devices and my laptop.
There is a way to control what folders are visible in Gmail account(s) that are setup as IMAP accounts for use with Apple Mail.
To turn off the visibility of the Gmail All Mail folder in Apple Mail on your computer, perform the following steps:
Step 1: Log into your Gmail account using your Browser (Safari, Firefox, Chrome, ... whatever you use).
Step 2: Click on the "gear icon" located on the far right-handside of the browser window and click on the Settings option from the pop-down choices.

Step 3: Select the Labels tab.

UNCHECK the box to the right - "Show in IMAP" for the ALL MAIL folder.
Not only will this remove the superfluous folder from your Mail app, it will also keep Mail from downloading every single message twice.
I choose to have my Spam folder unchecked as well.
You can also keep Gmail from archiving all your messages on your mobile devices (iPad, iPhone, etc.) and allow you to delete messages from your the devices.
After setting up your Gmail account on your iPhone, select the Settings icon. Select Mail, Contacts, Calendars. Then select (youraccount@gmail.com) and change the Archive Messages setting to OFF.
Now when you delete Gmail messages on your iOS devices (iPads, iPhones, etc) they will be permanently deleted and not archived.
Tweet
Thursday, September 20, 2012
Reducing Size of PDFs in Mountain Lion
I am often limited by bandwidth in uploading and downloading files while traveling. So, I decided to find a way to reduce the size of some of the pdfs that I would like to upload to my iBooks or to send via email to others. Today's discussion will illustrate how this can be accomplished using ColorSync Utility and/or Preview. This method will reduce most pdf files by about 40% depending on your custom settings that you create. This method assumes that the user has installed Mountain Lion System on their Mac. However, some of the details may be similar for Lion and may allow others to find a means to do so on earlier Mac systems.
Using ColorSync Utility
There is a way to reduce the size of a pdf using an app on your Mac called ColorSync Utility
You can find this app by running Launchpad on the dock and then find the Utility Folder or by using the Finder search for ColorSync Utility app.

 Run ColorSync Utility
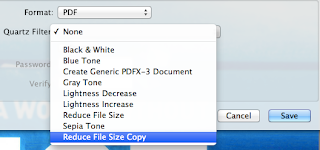
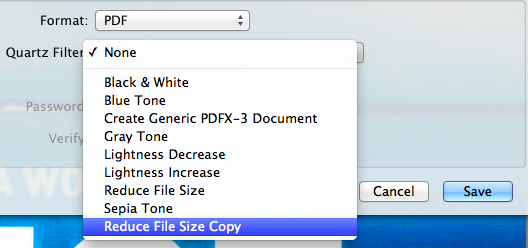
After running the app, you will need to duplicate the Reduce File Size Filter.
At the bottom of the opening window click on the Filter pull down menu. On my machine, I choose Live Update from Filter Inspector (I'm using Mountain Lion and I'm not sure what the option is for Lion System). This brings up the Filters Window as shown below.
Selecting Reduce File Size --- from the list on the left and moving over to the down arrow on the far right of this selection click on Duplicate Filter. This adds the new filter called Reduce Filter Size Copy to the list on the left hand side.

Now clicking on the arrow next to Reduce File Size Copy, you will see the following options: Image Sampling and Image Compression. You will need to change the settings in the Image Sampling (click on down arrow) to reveal the following:


Now using Save As option - give it a new name and save to your Desktop. When comparing the size of the files, you should find a reduction in the pdf file size.
Now, if you prefer to use Preview to reduce your files or to export or resave in reduced form, you will need to add this filter manually to your library folder, so that it will appear as an option when using Preview.
Just copy your filter from
/Users/YourName/Library/Filters/
to
and the customized profile will be added to your Preview options.
To find this /Users/YourName/Library/Filters folder and your custom filter:
Bring up a Finder window, then hold down Cmd shift G and type in the path name above into the text box that appears on the screen with your username in place of YourName in the path.
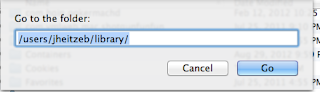
Using the Cmd shift G again, type in /Library/PDF Services/ in the text box. Now drag the duplicate file that is on your desktop into that folder. You may be asked to Authenticate the move, and you will need to type in your Administrator's password.
Now when you run Preview your custom option will be available for saving using the Quartz Filter - Reduce File Size Copy.
 Tweet
Tweet
Using ColorSync Utility
There is a way to reduce the size of a pdf using an app on your Mac called ColorSync Utility
You can find this app by running Launchpad on the dock and then find the Utility Folder or by using the Finder search for ColorSync Utility app.
After running the app, you will need to duplicate the Reduce File Size Filter.
At the bottom of the opening window click on the Filter pull down menu. On my machine, I choose Live Update from Filter Inspector (I'm using Mountain Lion and I'm not sure what the option is for Lion System). This brings up the Filters Window as shown below.
Selecting Reduce File Size --- from the list on the left and moving over to the down arrow on the far right of this selection click on Duplicate Filter. This adds the new filter called Reduce Filter Size Copy to the list on the left hand side.

Now clicking on the arrow next to Reduce File Size Copy, you will see the following options: Image Sampling and Image Compression. You will need to change the settings in the Image Sampling (click on down arrow) to reveal the following:

Delete all the values in the boxes and change the Resolution to 100 and leave at High Quality.

Now Open a pdf file or a copy of your pdf to test.
Select from the Filter at the bottom of the screen on left: The newly created filter called Reduce File Size Copy.
Hit the Apply button and wait a few seconds or minutes (depending the size of the pdf that you are working with)
Now using Save As option - give it a new name and save to your Desktop. When comparing the size of the files, you should find a reduction in the pdf file size.
Moving the Custom Filter to Use with Preview
To add this same filter to Preview as an option, you will need to:
Just copy your filter from
to
/Library/PDF Services/
and the customized profile will be added to your Preview options.
To find this /Users/YourName/Library/Filters folder and your custom filter:
Bring up a Finder window, then hold down Cmd shift G and type in the path name above into the text box that appears on the screen with your username in place of YourName in the path.

Using the Cmd shift G again, type in /Library/PDF Services/ in the text box. Now drag the duplicate file that is on your desktop into that folder. You may be asked to Authenticate the move, and you will need to type in your Administrator's password.
Now when you run Preview your custom option will be available for saving using the Quartz Filter - Reduce File Size Copy.
 Tweet
Tweet
Friday, August 03, 2012
Flagging My Mail Appropriately
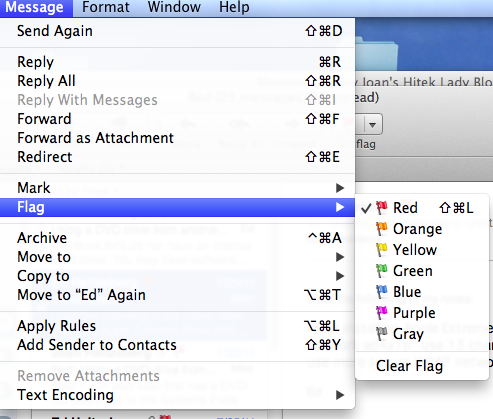
One of the features I like the most in Mac's Mail program is the ability to flag my important emails. This is done by selecting the email that I want to flag and then clicking on the Flag option from the Message menu bar option in Mail. From there it is easy to select one of the flags from the popdown menu selections (red, green, blue, ...).

This is a great feature and one can quickly pull up all their flagged email messages by selecting the Flagged mailbox on the left-hand side of the Mail window. However, the indicators using color seem to be rather obscure and hard to remember what color code is assigned to the priorities you might have for flagging a particular message.
To help with this, one can rename these flags given them appropriate names that will make it easier to categorize and retrieve the flagged messages. If you wish to rename the various flags to something more understandable, you can.
First you must have used each of the flags at least one time to mark an existing email. Once this has been done, you will see each of the flags you've utilized listed under the Flagged mailbox on the left-hand side of the Mail window. After clicking on the tiny arrow next to the Flagged mailbox, you will see the list of various flags designated with the names of various colors (red, orange, yellow, green, ...). To rename these, select each one of the flags, then select Mailbox from the menubar at the top and Rename Mailbox. From there you will see the name of the Flag highlighted and you can type in an appropriate flag name like "Important."


Tweet
Friday, May 20, 2011
Guest Post - How to Use Quicktime's Screen Recording Feature
This morning I received an email from my husband. He had explored a feature accessible in the Mac Quicktime application. He shared how to use this feature. I am posting it here as a Guest Post to share with everyone.
QuickTime Player will record the screen video and mouse movements along with your voice:
Select New Screen Recording from the QuickTime Player menu:


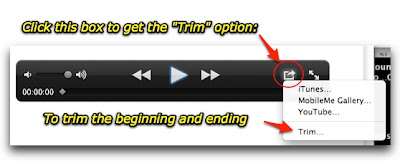
#2 After the video is recorded you get this screen at the bottom: (The user can edit or trim the recording and also send the finished project to their MobileMe Gallery, iTunes, or YouTube account)
That's it:
Attached is a 1 minute instructional video I just made. It is only 5 MB so it should be small enough to email. The QuickTime app also allows directly posting to YouTube as well.
P.S. It helps to have a mostly one-color background. The same video was 4x to 8x larger when I was showing my messy desktop. Having a mostly white background cut the size down considerably.
Tweet
QuickTime Player will record the screen video and mouse movements along with your voice:
Select New Screen Recording from the QuickTime Player menu:
What is not exactly obvious are the following two items:
#1 Before starting the recording you need to select the little triangle: (allows user to select their microphone from the pull-down menu located on the recorder)
#1 Before starting the recording you need to select the little triangle: (allows user to select their microphone from the pull-down menu located on the recorder)

#2 After the video is recorded you get this screen at the bottom: (The user can edit or trim the recording and also send the finished project to their MobileMe Gallery, iTunes, or YouTube account)

That's it:
Attached is a 1 minute instructional video I just made. It is only 5 MB so it should be small enough to email. The QuickTime app also allows directly posting to YouTube as well.
P.S. It helps to have a mostly one-color background. The same video was 4x to 8x larger when I was showing my messy desktop. Having a mostly white background cut the size down considerably.
Friday, May 06, 2011
Collage Creator - App for Your Mac
I've been exploring the FREE apps in the Mac App Store the last few days. I ran across an app, Collage Creator, that could be useful. It is certainly fun and easy to use.
You add photos to the collage window by selecting the Pictures tab and then clicking on the + sign. This allows you to add photos by opening files on your Mac by using a file selection browser type window. Or you can merely place them in the picture panel on the left-hand side by using the drag and drop method. They appear in the collage window on the right-hand side.
You can move them around in the panel by clicking and dragging. You can resize or change the angle of orientation using the curved arrow button. You can position them in front or behind other photos by clicking on Move Up and Move Down buttons. There are built in buttons to Shuffle and Re-mix the photos that you have in the collage window. You can also go to Settings Tab to bring up options for setting another photo as a background or using a transparent background. You can set the Border Width and Color for the photos and add Shadows for those borders. The layout can be Portrait or Landscape and can vary in size. There are options for the type of collage arrangement using Grid, Mosaic, Pile or Center Frame modes.


Overall, I give this app a 5 Star Rating and suggest that you check it out for an easy way to create collages of your photos. Tweet
Saturday, April 30, 2011
A StarTrek Transporting of Photos/Videos using PhotoSync App
Some iPad 2 users are looking for ways to transfer their videos captured with their iPhones to iMovie app loaded on their new iPad 2. One solution is to sync the video to iTunes from their iPhone and then resync to their iPad 2. Another solution requires the purchase of the camera connection cable. With the cable one can connect the iPhone to the iPad and transfer the videos directly.
I decided to try out using an app called PhotoSync as it is advertised to wirelessly transfer photos and videos between the two devices, as well as your computer.
The user can easily transfer from the devices to their computer over Wi-Fi. You can download selected videos and photos to and from your Mac using the FREE companion PhotoSync app available for Mac OSX . (A Windows Companion is also available for Windows XP SP2 or higher). I am always amazed at how these wireless transfers seem to be magic and feel as though I have witnessed a StarTrek transporting. PhotoSync preserves the Exif data, GPS data and file data for photos and videos, as well as support for RAW images and photos/videos.


Using PhotoSync with Bluetooth or WiFi if available, one can also transfer photos and videos directly from device to device. I was able to transfer video and photos from iPad to iPad and iPhone to iPad and iPad to iPhone in a snap. The transfer rate is 2.5MB/sec depending on your network and device. Also supports DropBox and Flickr accounts and transfer to iPhoto and Aperture.
If you are looking for an easy and fast way to transfer instantly to your devices and computer without using iTunes or cables, I highly recommend getting the PhotoSync app from the iTunes App Store. You only need purchase once and use for all your devices. Click here to access PhotoSync website Tweet
Wednesday, April 27, 2011
Rebuild Mailbox Tip for the Day
When using the Mail application on my Mac, I have had the occasional annoying Draft email message that remains in the Draft mailbox folder.
Normally, I check my Sent mailbox folder to make sure the email has been sent successfully. Then, I delete the email from the Drafts mailbox folder. Today I discovered that if you use the Rebuild option in the menu bar under the Mailbox option, you can fix the Drafts mailbox problem.
 Tweet
Tweet
Normally, I check my Sent mailbox folder to make sure the email has been sent successfully. Then, I delete the email from the Drafts mailbox folder. Today I discovered that if you use the Rebuild option in the menu bar under the Mailbox option, you can fix the Drafts mailbox problem.

Wednesday, March 30, 2011
Using the USB Memory Stick Connection on Land Rover LR4 2011
How to: Create, Clean Hidden Files, and Organize
Music for USB Memory Stick Connected to
Land Rover LR4 2011
The Land Rover LR4 (2011 model) has a connector for a USB memory stick. We planned on using one of the 16 GB sticks we ordered online to store some of our iTunes music library or mp3’s. My husband loaded on some of his music in the form of mp3’s by dragging and dropping them into the USB stick mounted to his Mac. Here are some of the things he encountered:
(1) The USB stick needs to be FAT or FAT32 format (requirements from Land Rover). And most memory sticks sold are already FAT32 formatted.
(2) The mp3 songs placed in the Root Directory did not appear on the Land Rover display.
(3) The songs did appear okay, if placed within a folder in the Root Directory (i.e., in a folder on the first level of the directory). He proceeded to make several folders with varying number of mp3’s in each folder.

(4) He found that he could organize the mp3’s in nested folders by Genre, Artist, Album, Songs - the Land Rover was able to access the files in the nested folders. The Land Rover display allows you to browse in each nested folder. So arranging in nested folders gives a little more organization in helping to find and play groups of songs.
Suggestion: You might want to have the top level folder be a genre folder, called "Country" which contains various Country Artists in folders named: Alan Jackson, George Strait, Reba McEntire and within each Artist Folder you would put their various Album Folders and inside the Album Folders you would have the songs for each album. When songs are played they are played from the inner most folders to the outer most folders with all songs in one album folder in alphabetical order for all the songs, then all the albums, then all the artists, then the genres.


Suggestion: If you wish to make playlists - you could create a folder called for example: My Playlists. Inside this folder you could have for example: My Favorite Playlist (where you had songs from multiple albums, artists and genres organized in the folder) or one called Christmas Playlist (that contained Christmas music from various albums and artists) and additional folders for each type of playlist you wanted to have available.
Note: If you have a specific order you want to hear the songs and don't want them played in alphabetical order, append track number at the beginning of each song to keep them in the track order you wish (i.e. 01 songname, 02 songname, 03 songname)
(5) When the mp3 files are copied from a Mac to the USB memory stick additional files show up in the folders one for each mp3 song file and these additional files do not play on the Land Rover audio player. These extraneous files appear at the top of the LR4’s displayed list of songs with a “._” preceding each song name, as in this display example below:

._03 Per Amore <-- extraneous file which appears on the Land Rover display song list.

03 Per Amore <-- this is how the all the song titles should appear on the Land Rover display, i.e. without the "._".
When "03 Per Amore" was selected the song plays as it should. But when "._03 Per Amore" was accidentally selected, the entire sound system hangs for about 20 or 30 seconds which is, of course, very annoying.
I researched what could be done to eliminate or strip these extraneous files from the folders on the USB Stick. I came across a freeware program called “ Hidden Cleaner’. The application Hidden Cleaner is a simple drag and drop utility that cleans and ejects USB devices like MP3 players, USB sticks. It deletes the hidden files OS X creates like .DS_Store, etc.
My husband loaded Hidden Cleaner application onto his Mac. Connected the USB memory stick to the Mac. The USB memory stick icon appears on the hard drive and he dragged and dropped the USB memory stick icon on top or into the Hidden Cleaner application. The USB memory stick icon is automatically unmounted from the computer display, once the extraneous files are eliminated. He disconnected the USB memory stick from the Mac, inserted it into the Land Rover LR4 connection in the center console. All the extraneous files were no longer visible on the Land Rover display and the music folders appeared on the screen in alphabetical folder order. He could select folders, browse inside of the folders and nested folders and see the list of songs within the folders to play.
Results: It worked!
Note: This should work equally well with the other Land Rover models (Range Rover Sport, etc) that have the USB port as well.
Technical Note from husband: When transferring (i.e. copying) Macintosh files to a Windows formatted drive (USB thumb drive with FAT32 format in this case), the Mac also transfers meta data just in case it is needed. This meta data is in the form of an additional very small file for each file transferred. Most computers systems that do not need the meta data simply ignore the meta data files which are easily recognized (e.g. by the period and underscore as the first two letters in the filename). But, since the Land Rover’s system is not ignoring these extraneous meta data files they need to be removed. This additional small amount of “meta” data might contain, for example, the size of a picture or document when it was last closed by the user so that when it is opened the next time it can be the same size it was when it was last closed. It might also contain other data such as the color of a folder’s background.
Tweet
Sunday, March 27, 2011
How To CLIP OUT Sections of Video Using QuickTime Player 7
When editing video using QuickTime Player 7 it is fairly easy to do so at the beginning and ending of the video using Trim Selection from the Edit menu.
One merely moves the IN and OUT selectors under the down arrow above the video clip display line. Set the IN or left marker to the place where you wish to begin the movie and the right or OUT marker to where you wish to end the movie. The area that is shaded is the area is the resulting movie after trimming the excess at the beginning and ending of the clip, by selecting TRIM SELECTION from the EDIT menu.

 If you wish to keep the beginning of a video and the ending, but wish to take out a section in the middle this may appear to be confusing. You will have to utilize making a NEW PLAYER and basically PASTE sections of the original video into this NEW PLAYER in the order that you wish to view it.
Load in your video that you wish to edit and select the first section that you wish to copy. Remember to place the IN and OUT markers on that section that you wish to KEEP (i.e. the shaded area in the video display bar).

Select COPY from the EDIT menu to copy Section 1 or shaded area.
 Select NEW PLAYER from the FILE menu to create a blank video player, where you will insert the clips that you copy from the original video, in the order that you wish to compile them.


Tweet
One merely moves the IN and OUT selectors under the down arrow above the video clip display line. Set the IN or left marker to the place where you wish to begin the movie and the right or OUT marker to where you wish to end the movie. The area that is shaded is the area is the resulting movie after trimming the excess at the beginning and ending of the clip, by selecting TRIM SELECTION from the EDIT menu.


Load in your video that you wish to edit and select the first section that you wish to copy. Remember to place the IN and OUT markers on that section that you wish to KEEP (i.e. the shaded area in the video display bar).


Select PASTE from the EDIT menu and place the first section of video into the NEW PLAYER.


Select the next section (i.e. SECTION 2) from the original video and COPY and then PASTE to new video player by inserting and the END or OUT marker to place the video clips in the sequence you wish to compile for viewing.

The original movie clip will remain unaltered as long as you do not save the new video clip over it. When you are satisfied with the new video then select SAVE AS under the FILE menu giving the edited video a new name.


Tweet
Friday, March 25, 2011
What is This American Flag Icon in My Dock on My Mac?
Awhile back I decided to put a folder of Applications into my Dock on my Mac to enable accessing applications from one spot. To add a folder to the Dock you drag the folder’s icon from an open Finder window into a position on the right-hand side of the dashed line of the Dock. You can move it to a new position by dragging it sideways. The adjacent items will move to make room for the folder.

You can then click on the Applications folder in the Dock to reveal the myriad of applications and folders you wish to access that are neatly stored in one place.

After several months I noticed that the icon on that Applications folder had somehow turned into an American Flag icon. I tried to ignore this, hoping that my Mac had NOT been hijacked by some alien virus. Knowing that Mac's don't easily get virus, if at all, I decided to take a moment this morning to clean up some of the many other icons that had been placed in my Dock.

Checking the Applications folder revealed that the first item in the folder (arranged alphabetically) was an educational application named 50 States and Capitals that had an American Flag icon. This was my first clue. When I removed that application from the Application folder, the icon on the Dock, changed to the Address Book icon.

I decided to create a second folder called Extra Programs. As I often download applications that I wish to try out and possibly find useful, my Dock seems to accumulate a multitude of applications that at the time intrigued me, but are seldom used. I decided to find the original applications for these Alias application icons located in my Dock and to put the originals in this newly created folder. Using the Finder window to search for the originals, went smoothly and I dragged them from the Finder window to the new folder. Then I moved the Extra Programs folder into the Dock and noticed that the icon for that folder became the same as the first application (alphabetical) in that folder - the American Flag icon. I had placed the 50 States and Capitals application into this Extra Programs folder.

I decided to view the options for the folder by clicking on the folder as I also held down the control key on the keyboard. I noticed when I used the control click when selecting the Extra Programs folder that Stack in the drop down menu was selected for the Display As option. This was my second clue.

I then selected Folder as a choice for the Display As option and this fixed my American Flag icon problem. Now my Dock displays a folder icon for the Applications and Extra Programs folders.
 Tweet
Tweet
You can then click on the Applications folder in the Dock to reveal the myriad of applications and folders you wish to access that are neatly stored in one place.

After several months I noticed that the icon on that Applications folder had somehow turned into an American Flag icon. I tried to ignore this, hoping that my Mac had NOT been hijacked by some alien virus. Knowing that Mac's don't easily get virus, if at all, I decided to take a moment this morning to clean up some of the many other icons that had been placed in my Dock.

Checking the Applications folder revealed that the first item in the folder (arranged alphabetically) was an educational application named 50 States and Capitals that had an American Flag icon. This was my first clue. When I removed that application from the Application folder, the icon on the Dock, changed to the Address Book icon.
I decided to create a second folder called Extra Programs. As I often download applications that I wish to try out and possibly find useful, my Dock seems to accumulate a multitude of applications that at the time intrigued me, but are seldom used. I decided to find the original applications for these Alias application icons located in my Dock and to put the originals in this newly created folder. Using the Finder window to search for the originals, went smoothly and I dragged them from the Finder window to the new folder. Then I moved the Extra Programs folder into the Dock and noticed that the icon for that folder became the same as the first application (alphabetical) in that folder - the American Flag icon. I had placed the 50 States and Capitals application into this Extra Programs folder.

Reminder - Solutions to problems are often found in preferences or options for the items or applications that you are trying to fix.
I decided to view the options for the folder by clicking on the folder as I also held down the control key on the keyboard. I noticed when I used the control click when selecting the Extra Programs folder that Stack in the drop down menu was selected for the Display As option. This was my second clue.

I then selected Folder as a choice for the Display As option and this fixed my American Flag icon problem. Now my Dock displays a folder icon for the Applications and Extra Programs folders.
Saturday, February 26, 2011
Restoring the Clicking Sound for Volume Keys on My Mac
Oddly, sometime in the past I set a preference somewhere on my Mac, that effected the normal clicking sound that occurs when you use the two volume control buttons on the top row of the Mac keyboard. Last night I noticed the missing clicks and decided to put the click sound back.

Alas, trying to find the place to restore the click sounds led me to exploring the Systems Preferences. I explored various settings in the keyboard settings and could not find a solution. This morning I checked the Sound Preferences, specifically the Sound Effects Tab and found my solution:
I had to check the box that indicates: Play feedback when volume is changed.

Tweet
Subscribe to:
Posts (Atom)