Noticed that my iPod (5th generation Late 2006)—also known as iPod with video or Fifth Generation iPod was not listing my artists nor albums in alphabetical order.
To fix this problem:
Connected iPod to computer
Launched iTunes
Selected iPod icon at top of iTunes Window
Selected Summary Tab
Selected Restore iPod
This basically reset my iPod to factory settings.
Clicked on Songs from left-hand side of iTunes window
Selected View from menu bar.
Selected Sort by > Artist
Synced entire music library to iPod
Tweet
Showing posts with label iTunes. Show all posts
Showing posts with label iTunes. Show all posts
Monday, July 08, 2019
Monday, March 16, 2015
Digital Photo Albums for My New iPad Mini 3
I generally use Apple iPhoto to create my photo albums to print. I have traveled extensively over the past fifteen years and thought it would be nice to save some of my photo albums in digital format to view on my new iPad mini 3.
You can easily save the books in a suitable compressed pdf file format to load onto your iPad. To do so, bring up your photo album project in iPhoto. View in All Pages format. Then click on the first page of the album while holding down the control key on your keyboard. You should see a list of additional popdown menu options. Select the Save as book option. Give your album a name and safe to your hard drive.
I normally transfer pdfs to my iPad via iTunes file transfer method into GoodReader and then from there I use the "Open in .... " option to put directly into my iBooks on my iPad. That works great and doesn't require syncing via iTunes.
Alternately, you can drag the pdf photo album file into your itunes ibooks and then sync your ipad using iTunes after you select the album and your other books to be synced again.
Once in iBooks you can organize all your photo albums into a category you create - say "My Photo Albums".
Now, you will have a digital copy of your printed photo albums to view on your iPad or iPhone.
I spent one summer making slide shows and albums of old family photos that were stored on DVDs. Looks like now, most computers don't have DVD players and in an effort to have that archive of those family treasures, I am now proceeding with a digital version that can be stored on my old iPad. Rather than selling my old iPad for a few dollars, I have opted to keep it for digital photo books and cookbooks.
I can also use my iPad in remote mode with Apple TV to view these albums on my big screen TV without having to load a DVD into a player.
Tweet
How to Copy Your Music from a Shared Library to Another Library
I store a copy of all my music CD's on my main Mac desktop to listen to in my office. When I am home and using another computer or my laptop in another part of the house, it is easy to share my iTunes music library and listen to songs. This gives me more room on my laptop for other files - mainly photographs and documents I am currently working on. This morning, I decided I needed to transfer some of my music from my main Mac computer to my laptop so that I could listen to it while traveling. My laptop is also the computer I use to sync my new iphone 6 plus and ipad mini 3 (which also need some music).
Itunes makes it easy to share music and to also copy music from one machine to another. To copy your library contents you must authorize your iTunes account on the other computer. To discourage users from sharing their library with lots of people, you are limited to sharing your library with five people.
If you haven't done so, authorize your computer by clicking on that option under the Store menu in iTunes.
Make sure both machines are set up for sharing music files. Select Home Sharing under the File menu in iTunes and enter the apple id and password on both machines.
Next, click on the Home Sharing tab underneath the Sharing section in iTunes source list to view the shared library. (Both computers should be using the same wifi network).
You have access to both libraries - your's and the other computer's. You can select a song from either library and play it or copy it to your other library.
Merely, select the song or album you wish to copy from the other computer via wifi and select the Import button in the lower right hand corner of the iTunes window and your music selection will be copied to your library.
Tweet
Thursday, July 28, 2011
Updating ALL apps in iTunes Solution
For several weeks now, I have been noticing that I have not been able to update ALL the apps (200+) in my iTunes for my Mac. I was consistently receiving a message that the connection with the store was not working or timing out and to try back later. Finally today, I noticed someone on the Yahoo iPhone forum was also experiencing this problem. So, as I often do, I sought out the solution. I have been able normally just to pick each app individually and update in that manner, but that can be time consuming when you have 200+ apps.
As I had installed Lion recently, I thought maybe this was the culprit, but didn't want to blame the new system for something without thoroughly testing some ideas. So, as I scoured the preferences in iTunes, I noticed under the advanced settings an option to Reset the iTunes Store Cache. So I thought what can I lose, so I clicked on the Reset Cache button next to this option. IT WORKED. My apps are being updated ALL at once.
 So if you are having trouble updating ALL your apps at once in the iTunes store, you might try this solution. Be sure to let me know if it worked for you or if you have an alternate solution you wish to share. Happy updating to you.
Tweet
So if you are having trouble updating ALL your apps at once in the iTunes store, you might try this solution. Be sure to let me know if it worked for you or if you have an alternate solution you wish to share. Happy updating to you.
Tweet
As I had installed Lion recently, I thought maybe this was the culprit, but didn't want to blame the new system for something without thoroughly testing some ideas. So, as I scoured the preferences in iTunes, I noticed under the advanced settings an option to Reset the iTunes Store Cache. So I thought what can I lose, so I clicked on the Reset Cache button next to this option. IT WORKED. My apps are being updated ALL at once.

Saturday, April 30, 2011
A StarTrek Transporting of Photos/Videos using PhotoSync App
Some iPad 2 users are looking for ways to transfer their videos captured with their iPhones to iMovie app loaded on their new iPad 2. One solution is to sync the video to iTunes from their iPhone and then resync to their iPad 2. Another solution requires the purchase of the camera connection cable. With the cable one can connect the iPhone to the iPad and transfer the videos directly.
I decided to try out using an app called PhotoSync as it is advertised to wirelessly transfer photos and videos between the two devices, as well as your computer.
The user can easily transfer from the devices to their computer over Wi-Fi. You can download selected videos and photos to and from your Mac using the FREE companion PhotoSync app available for Mac OSX . (A Windows Companion is also available for Windows XP SP2 or higher). I am always amazed at how these wireless transfers seem to be magic and feel as though I have witnessed a StarTrek transporting. PhotoSync preserves the Exif data, GPS data and file data for photos and videos, as well as support for RAW images and photos/videos.


Using PhotoSync with Bluetooth or WiFi if available, one can also transfer photos and videos directly from device to device. I was able to transfer video and photos from iPad to iPad and iPhone to iPad and iPad to iPhone in a snap. The transfer rate is 2.5MB/sec depending on your network and device. Also supports DropBox and Flickr accounts and transfer to iPhoto and Aperture.
If you are looking for an easy and fast way to transfer instantly to your devices and computer without using iTunes or cables, I highly recommend getting the PhotoSync app from the iTunes App Store. You only need purchase once and use for all your devices. Click here to access PhotoSync website Tweet
Thursday, March 24, 2011
How To Report A Problem With An App or Request Refund
Sometimes we make mistakes in purchasing the wrong app by purchasing the iPhone app instead of the iPad app and wish we could remedy the situation. Well normally Apple doesn't refund money for purchased apps, but there is a means to at least report a problem to Apple and possibly receive a refund if the reason is substantial.
If you have received a receipt for the purchase of the app via email, you can click on the Report a Problem link within the email to take you to your iTunes Store Account.

Alternately, if you do not have that receipt you can click on the iTunes Store in iTunes, click on the home icon to take you to the home page of the iTunes Store. Here you will click on the link 'Account', on the right side under Quick Links.
 This will bring up your Account Info, where you will then click on Purchase History.
 A list of apps that you have purchased will appear on the screen and scroll down to bottom of the page and click on Report Problem link.
 The list of apps purchased will now appear with Report Problem to the right hand side of each one, find the app that needs to be returned or reported and click on that selected app. A screen will appear where you can then enter the reason or report the problem to Apple.
 Tweet
Tweet
If you have received a receipt for the purchase of the app via email, you can click on the Report a Problem link within the email to take you to your iTunes Store Account.

Alternately, if you do not have that receipt you can click on the iTunes Store in iTunes, click on the home icon to take you to the home page of the iTunes Store. Here you will click on the link 'Account', on the right side under Quick Links.


Wednesday, March 09, 2011
Is It Possible to Use Remote to Control My Videos to My Home Theater Screen?
I've been trying the homesharing feature playing music on my iPad and iPhones that is stored on my husband's Mac. This is a new feature added by updating my iPhone and iPad to version iOS 4.3 available today. Works great!
I was checking out some of the latest features and clicked on my 'Remote' app that controls my iTunes music library from my iPhone. I noticed that I was able to also control and play a video stored on my Mac by using the Remote app from my iPhone. Now this is an interesting feature and am not sure if this has always been there or if it has been added in this latest iOS 4.3.
I have an ethernet cable that runs from my Mac to my home theater, allowing me to view my Mac screen on my large home theater projection screen. I basically use this to play Netflix instant movies to my home projector screen. It was one of the ways one could view Netflix instant movies without purchasing another device such as an Apple TV or using a WI or PS3 or blueray disk player.
Now I am thinking that I can also view videos stored in my iTunes library using the Remote App as my controller. That will be something I need to try out. In the past I have had to control what was playing by walking over to my Mac and controlling the videos from the Mac itself. Is it possible that I can now use my iPhone to control this task via my Remote App?
 Tweet
Tweet
I was checking out some of the latest features and clicked on my 'Remote' app that controls my iTunes music library from my iPhone. I noticed that I was able to also control and play a video stored on my Mac by using the Remote app from my iPhone. Now this is an interesting feature and am not sure if this has always been there or if it has been added in this latest iOS 4.3.
I have an ethernet cable that runs from my Mac to my home theater, allowing me to view my Mac screen on my large home theater projection screen. I basically use this to play Netflix instant movies to my home projector screen. It was one of the ways one could view Netflix instant movies without purchasing another device such as an Apple TV or using a WI or PS3 or blueray disk player.
Now I am thinking that I can also view videos stored in my iTunes library using the Remote App as my controller. That will be something I need to try out. In the past I have had to control what was playing by walking over to my Mac and controlling the videos from the Mac itself. Is it possible that I can now use my iPhone to control this task via my Remote App?

Wednesday, November 24, 2010
Airplay and Pandora
Like most people I enjoy the Pandora radio
Today, I was wondering if the Pandora app could utilize the new Airplay
Log into your Pandora app on your mobile device. Select your favorite music channel and then start playing the channel.

After selecting the music channel to play, the player will be displayed on your mobile device. Notice the small blue up arrow icon in the lower right hand corner of the player. This is the access to your remote speakers that you can utilize via Airplay. Click on this arrow to display the speaker choices.

As you can see, in the illustration below: I have the option to listen to Pandora music through my iPhone speakers

Many of the musical or audio apps on your mobile devices can be played via this method. Just hook up some speakers to Airport Express base stations
Music soothes the soul.
NOTE: The iPad version of Pandora doesn't seem to have the up arrow icon on its player. However, you can start playing a channel in Pandora on the iPad and then using multitasking capabilities of iOS 4.2, switch to your iPod player
musicalTouch - Airplay Connection from my iPad to Speakers in Disklavier

I've been exploring the Airplay
musicalTouch provides 5 instrumental voices for the user to play on the virtual keyboard: piano
Some of the other features that are implemented in this app include the ability to overlay the key notes on the keys to facilitate learning and teaching tunes. But the best feature, was the newly implemented ability to be able to multitask and utilize Airplay. I was amazed at the ability to record and play my newly created tune remotely through the speakers on my Disklavier piano in the living room upstairs. The quality of the piano audio sample voice was so good, that it sounded like the piano was actually being played rather than just coming through the speakers.
Check this app out at: http://www.chriskhoury.com/home/applications/applications.html
Chris Khoury has an interesting app that might be of interest to some of you budding musicians out there. Now if only this app could somehow implement the midi functions and send those to my Disklavier and really play those keys. Tweet
Wednesday, September 01, 2010
Exploring iTunes 10 with Ping
Just finished installing the latest update to iTunes 10 , which now connects users to Music artists and new friends who share like music interests in Ping, a new social media group.
To join the Ping group, select start up and fill in your profile information with musical likes and get connected to others who have similar interest and to suggested artists from Ping. Follow them in a Facebook type layout where you can leave comments and discussions about your favorite songs, music, genre or artists. You can opt in or out of the Ping world, by selections made in your iTunes account settings.
Also included in iTunes 10 is a new column view with pictures as illustrated below:

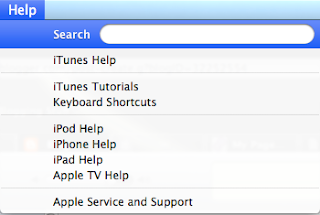
The 'Help' menu offers 'iTunes Tutorials ' which will quickly help any new iTunes user via short and illustrative videos that explain the main features of iTunes including: following Music and People with Ping, Exploring your iTunes Library, Importing CD's, ... The 'Help' menu also has helps for Apple TV
 , iPod
 Help, iPhone
 Help, iPad
 Help, and others.

You are now able to rent TV programs some in HD for 99 cents from the iTunes store. You can view these on your iPod Touch, iPhone, computer or Apple TV (2nd generation). You have 30 days to watch and episode and 48 hours from the time you push 'play'. You can view the episode as many times as you wish during that 48 hour period.
HD rentals are available for iPhone 4 or iPod Touch (generation 4) or computer. However, if you download a rented TV show on your iPhone 4, or iPod touch (4th generation): It is not transferable to any other device or computer. You can download it to your computer, but once it is transferred to another device it will disappear from your computer's iTunes library.
iOS4.1 is required to run on iPhone 4 or iPod Touch and iTunes 10 is required for renting on your computer. Currently these TV rentals are only available in US.
The option to share iPhotos, via iTunes is accessed under the Advanced Menu option. Click on Choose Photos to Share and then select the photos from another window that is displayed. These photos can be shared with a second generation Apple TV using Home Sharing.


Another feature that I wanted to point out to users of iTunes (even for previous iTunes 9), if you wish to sync a pdf file from iTunes to your iPhone, iPad or iPod Touch. Click on the 'Books' tab on the left hand side of iTunes Window. You can drag the pdf from your desktop into the 'Books' section displayed on the right hand side. These will be viewable with iBooks app.
Tweet
To join the Ping group, select start up and fill in your profile information with musical likes and get connected to others who have similar interest and to suggested artists from Ping. Follow them in a Facebook type layout where you can leave comments and discussions about your favorite songs, music, genre or artists. You can opt in or out of the Ping world, by selections made in your iTunes account settings.
Also included in iTunes 10 is a new column view with pictures as illustrated below:

The 'Help' menu offers 'iTunes Tutorials


You are now able to rent TV programs some in HD for 99 cents from the iTunes store. You can view these on your iPod Touch, iPhone, computer or Apple TV (2nd generation). You have 30 days to watch and episode and 48 hours from the time you push 'play'. You can view the episode as many times as you wish during that 48 hour period.
HD rentals are available for iPhone 4 or iPod Touch (generation 4) or computer. However, if you download a rented TV show on your iPhone 4, or iPod touch (4th generation): It is not transferable to any other device or computer. You can download it to your computer, but once it is transferred to another device it will disappear from your computer's iTunes library.
iOS4.1 is required to run on iPhone 4 or iPod Touch and iTunes 10 is required for renting on your computer. Currently these TV rentals are only available in US.
The option to share iPhotos, via iTunes is accessed under the Advanced Menu option. Click on Choose Photos to Share and then select the photos from another window that is displayed. These photos can be shared with a second generation Apple TV using Home Sharing.


Another feature that I wanted to point out to users of iTunes (even for previous iTunes 9), if you wish to sync a pdf file from iTunes to your iPhone, iPad or iPod Touch. Click on the 'Books' tab on the left hand side of iTunes Window. You can drag the pdf from your desktop into the 'Books' section displayed on the right hand side. These will be viewable with iBooks app.
Tweet
Sunday, September 27, 2009
Note: Using Apps from two Apple Store ID's
I recently set up homesharing on all my computers on my local network. This allowed me to share music, podcasts, and even apps for iphone on all the machines. I explained how this could be achieved in a previous blog, using two different Apple store accounts and three different computers running different Mac OS X and iTunes 9.
In the process of homesharing, I decided to copy an app that my husband purchased on his iphone using his Apple store account, to my iTunes library and applications tab. This was successful.
We both upgraded our iPhones to the new 3GS versions over the past few days. I activated my iPhone 3GS loading all my current info from my first generation iPhone backup.
Once, I had set up my new iPhone with the information from the previous iPhone, I decided to download a new app. I noticed that I had an update notice for a current app on my iPhone. That app was the one that I had copied from my husband's iTunes application tab to my applications tab that I use to update and sync with my iPhone. When I selected to update this app on the new 3GS iPhone, it requested the password for my husband's account. Once I entered the password the application became updated and available for me to use on my iPhone.
I can now share the applications that my husband purchased on my iPhone. Interesting ... Tweet
Monday, September 21, 2009
iPhone Users Control Party Mix
How to: Use iTunes DJ and Remote App on iPhone
iTunes has a feature called ‘iTunes DJ’, which allows a user to create and run a playlist on a computer on a local network. Other network users can connect to the network, choose songs to be played and to vote on selections to be played. I have my network setup using an Airport Express, so that I can play my iTunes through speakers in my living room and on my outside deck. We can use iTunes DJ, to pre-select a party playlist and allow our guests with iPhones and Remote app to control the playlist.
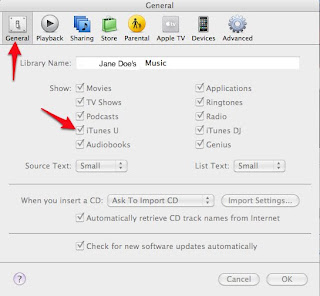
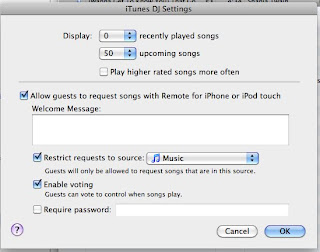
To use the iTunes DJ, make sure that you have checked ‘iTunes DJ’, in the iTunes Preferences, General Tab options.
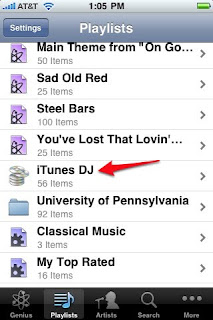
Select ‘iTunes DJ’ to randomly generate list from Music library or playlists in your library. ‘iTunes DJ’ is located under ‘Playlists’ on the left-hand side of the iTunes Window.
Select ’Source’ pop-down menu in the lower left-side of the playlist window to select to generate the iTunes DJ playlist from the entire Music library or from the playlists or Genius Mixes or Playlists.
Then select ‘Settings’ in the lower right hand corner of the list window. Options to display can be selected for ‘number of songs recently played’ and ‘upcoming songs’, as well as option ‘play higher rated songs more often’. Guest can be allowed to ‘request songs with Remote for iPhone or iPod Touch’ , a greeting message can be entered and voting can be enabled to give guests control over when songs play. Password can be entered.
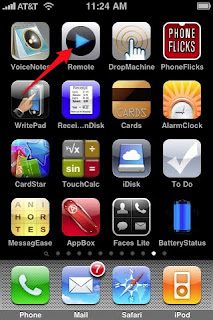
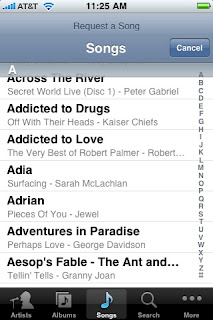
Guests can access voting and requesting of songs from their iPhone or iPod Touch, ‘Remote’ app. First they launch the ‘Remote’ app, then select the ‘iTunes DJ’ option from the remote app settings menu. The name of the playlist and description should appear and this is selected.
The current playing song will appear on the device. A dialog button on the remote, will allow the user to ‘Request a Song’.
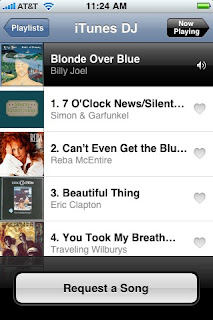
The user can then select a song that he wishes to add to the playlist, from the list of the songs given.
The upper left-most arrow will allow the user to view the current playlist and may tap on the ‘heart’ next to the song to vote for, as the votes increase the songs with more votes move up the playlist.
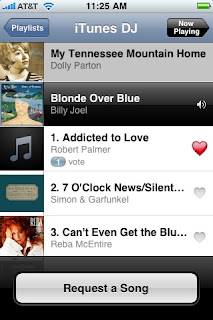
If voting is not enabled, the songs that are requested are added to the list as requested. Tweet
iTunes
To use the iTunes DJ, make sure that you have checked ‘iTunes DJ’, in the iTunes Preferences, General Tab options.

Select ‘iTunes DJ’ to randomly generate list from Music library or playlists in your library. ‘iTunes DJ’ is located under ‘Playlists’ on the left-hand side of the iTunes Window.

Select ’Source’ pop-down menu in the lower left-side of the playlist window to select to generate the iTunes DJ playlist from the entire Music library or from the playlists or Genius Mixes or Playlists.

Then select ‘Settings’ in the lower right hand corner of the list window. Options to display can be selected for ‘number of songs recently played’ and ‘upcoming songs’, as well as option ‘play higher rated songs more often’. Guest can be allowed to ‘request songs with Remote for iPhone or iPod Touch’ , a greeting message can be entered and voting can be enabled to give guests control over when songs play. Password can be entered.

Guests can access voting and requesting of songs from their iPhone or iPod Touch, ‘Remote’ app. First they launch the ‘Remote’ app, then select the ‘iTunes DJ’ option from the remote app settings menu. The name of the playlist and description should appear and this is selected.


The current playing song will appear on the device. A dialog button on the remote, will allow the user to ‘Request a Song’.

The user can then select a song that he wishes to add to the playlist, from the list of the songs given.

The upper left-most arrow will allow the user to view the current playlist and may tap on the ‘heart’ next to the song to vote for, as the votes increase the songs with more votes move up the playlist.

If voting is not enabled, the songs that are requested are added to the list as requested. Tweet
Friday, September 18, 2009
Resurrection of Old iPod
I was a little concerned that my old first generation iPod might be obsolete and not able to connect with iTunes 9 and Snow Leopard.
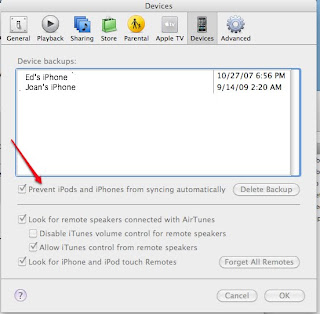
To test my theory, I first ran iTunes 9 and under the 'Preferences, Devices', I made sure that I checked ‘Prevent iPods and iPhones from syncing automatically’. So that if for some strange reason, iTunes decided to wipe out my iPod, I would retain a playable amount of music, currently on the device.
I connected the iPod to my computer running Snow Leopard and iTunes 9, using the firewire connection cable that came with the iPod, the same cable that attaches to the charging plug. I was elated to see the iPod show up in the left-hand column of the screen. During the time that it was seeking to recognize the iPod, I noticed a ‘Don’t disconnect’ icon and message to not disconnect on the ipod screen.
Eventually, a dialog box appeared in iTunes alerting me to the fact that I needed to update my iPod to 1.5. I gave my consent and allowed iTunes to download and update. Another message appeared saying that I must disconnect and replug in my device to be recognized and it was!
The iPod device showed up under DEVICES, on the left-hand side of the iTunes window, just as my iPhone has done. And to my surprise, a new interface similar to my iPhone’s appeared on the right-hand side, when I highlighted the ipod under DEVICES on left. All the information about my iPod: Name, capacity, software version, serial number, format was there, as well as, the tabs for selecting music, podcasts, iTunes U, and my Contacts. A button for restoring and checking for updates for iPod software was available as well as Options for syncing manually, enabling disk use (for storing files), syncing only checked songs and open iTunes when the iPod was connected.
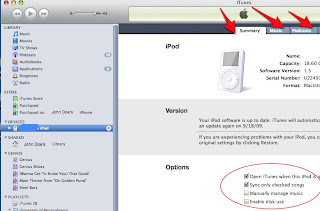
There was a convenient capacity bar along the bottom that also showed how much audio, other and free space was available on my iPod. I held down the ‘option’ key while clicking on the GB of Audio (graphically represented in blue) and presto magic, the number of songs, the number of days of music was revealed.
So I proceeded to view the options in each of the tabs across the top. Under the Music tab, I was given options to sync entire music library, or selected playlists, artists and genres or automatically feel free space with songs (allowing iTunes to choose from my music library).
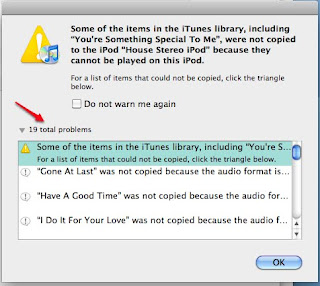
I proceeded to select new music choices for my iPod, as we had listened to this same music on road trips for nearly 5+ years or more. It was also time to update the old contacts. In syncing, I received 19 total problems. I suspect these were related to purchases and now I will have to figure out how to authorize these songs to my iPod. Well, that is another day’s project.
I am seeing that the syncing is going fast and that I am now able to sync much in the same manner as my iphone, and I like that! As Martha would say, it’s a good thing.
Knowing that I couldn’t sleep not knowing why these files did not copy, I had to research this and add to this post. Looks like the songs that were not copied were a group that were using the Apple Lossless Audio Format. There wasn’t any protection, so if I convert these to mp3, these can be added to the iPod. Case solved. Tweet
To test my theory, I first ran iTunes 9 and under the 'Preferences, Devices', I made sure that I checked ‘Prevent iPods and iPhones from syncing automatically’. So that if for some strange reason, iTunes decided to wipe out my iPod, I would retain a playable amount of music, currently on the device.

I connected the iPod to my computer running Snow Leopard and iTunes 9, using the firewire connection cable that came with the iPod, the same cable that attaches to the charging plug. I was elated to see the iPod show up in the left-hand column of the screen. During the time that it was seeking to recognize the iPod, I noticed a ‘Don’t disconnect’ icon and message to not disconnect on the ipod screen.
Eventually, a dialog box appeared in iTunes alerting me to the fact that I needed to update my iPod to 1.5. I gave my consent and allowed iTunes to download and update. Another message appeared saying that I must disconnect and replug in my device to be recognized and it was!
The iPod device showed up under DEVICES, on the left-hand side of the iTunes window, just as my iPhone has done. And to my surprise, a new interface similar to my iPhone’s appeared on the right-hand side, when I highlighted the ipod under DEVICES on left. All the information about my iPod: Name, capacity, software version, serial number, format was there, as well as, the tabs for selecting music, podcasts, iTunes U, and my Contacts. A button for restoring and checking for updates for iPod software was available as well as Options for syncing manually, enabling disk use (for storing files), syncing only checked songs and open iTunes when the iPod was connected.

There was a convenient capacity bar along the bottom that also showed how much audio, other and free space was available on my iPod. I held down the ‘option’ key while clicking on the GB of Audio (graphically represented in blue) and presto magic, the number of songs, the number of days of music was revealed.
So I proceeded to view the options in each of the tabs across the top. Under the Music tab, I was given options to sync entire music library, or selected playlists, artists and genres or automatically feel free space with songs (allowing iTunes to choose from my music library).
I proceeded to select new music choices for my iPod, as we had listened to this same music on road trips for nearly 5+ years or more. It was also time to update the old contacts. In syncing, I received 19 total problems. I suspect these were related to purchases and now I will have to figure out how to authorize these songs to my iPod. Well, that is another day’s project.

I am seeing that the syncing is going fast and that I am now able to sync much in the same manner as my iphone, and I like that! As Martha would say, it’s a good thing.
Knowing that I couldn’t sleep not knowing why these files did not copy, I had to research this and add to this post. Looks like the songs that were not copied were a group that were using the Apple Lossless Audio Format. There wasn’t any protection, so if I convert these to mp3, these can be added to the iPod. Case solved. Tweet
Wednesday, September 16, 2009
Home Sharing - the Missing Playlist Copy Debate
The Missing Playlist Copy Debate
After setting up Home Sharing on my network, I was able to copy songs, podcasts, movies, TV programs, audiobooks, iPhone apps, etc from my husbands computer to my computer and vice versa.
One of the things that you can’t copy is playlists. This is understandable as a playlist, is a file that contains the location of the songs in that list, not the actual songs. So a reference to a location on his machine would not be workable, unless his machine was on and running when I wished to play that list.
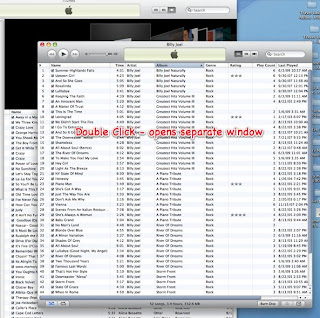
If you wish to transfer a playlist to your computer, there is a round about way to do so. With home sharing on, you can double-click the name of the playlist from home shared computer B, so that a new window opens, showing the songs that are in that playlist.
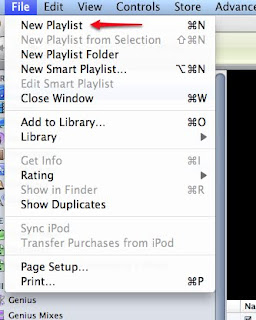
Create a new playlist on your computer A, giving it a similar playlist name. Use 'File', 'New Playlist' or cmd N.
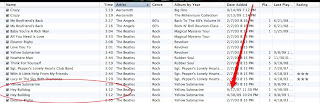
Select All the songs in the playlist located on the Computer B and drag and drop them into the newly created playlist on Computer A.
This will create the same playlist essentially on your Computer A and also add the songs into your Computer A library, needed to play that playlist.
The one thing that is a problem is that if you already have those songs on your computer A or some of them, the process of dragging and dropping the same songs from Computer B may result in duplicates in your Computer A music library.
If you decide to run the ‘Show Duplicates’ from the ‘File’ menu in iTunes and then delete a duplicate file, you may run the risk of deleting the actually song file that correlates with the playlist. I suppose you could make sure you delete the song file that wasn’t added last or on the day you created the playlist. But then the file that you delete might also be used in one of your own playlists.

There is another option that allows you to export a playlist from a library and import it into another. Would this also have the same problem with finding the corresponding song file and location?
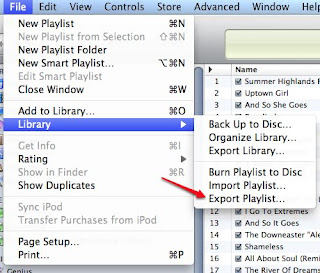
I can see why the option to import playlists might be unwieldy and why Apple did NOT include this as an option in the Home Sharing that they have provided us.
The playlist option was used extensively when the first iphone software came on the scene, to give us the option to sync partial music versus our entire music library. Now that Version 3.1 for the iPhone and iTunes 9 allow us so many more options for syncing by artist, genre … the need for a playlist to sync to our iphone isn’t necessarily bothersome for me. I have really enjoyed the option of using Genius to create some playlists for me. Tweet
After setting up Home Sharing on my network, I was able to copy songs, podcasts, movies, TV programs, audiobooks, iPhone apps, etc from my husbands computer to my computer and vice versa.
One of the things that you can’t copy is playlists. This is understandable as a playlist, is a file that contains the location of the songs in that list, not the actual songs. So a reference to a location on his machine would not be workable, unless his machine was on and running when I wished to play that list.
If you wish to transfer a playlist to your computer, there is a round about way to do so. With home sharing on, you can double-click the name of the playlist from home shared computer B, so that a new window opens, showing the songs that are in that playlist.

Create a new playlist on your computer A, giving it a similar playlist name. Use 'File', 'New Playlist' or cmd N.

Select All the songs in the playlist located on the Computer B and drag and drop them into the newly created playlist on Computer A.
This will create the same playlist essentially on your Computer A and also add the songs into your Computer A library, needed to play that playlist.
The one thing that is a problem is that if you already have those songs on your computer A or some of them, the process of dragging and dropping the same songs from Computer B may result in duplicates in your Computer A music library.
If you decide to run the ‘Show Duplicates’ from the ‘File’ menu in iTunes and then delete a duplicate file, you may run the risk of deleting the actually song file that correlates with the playlist. I suppose you could make sure you delete the song file that wasn’t added last or on the day you created the playlist. But then the file that you delete might also be used in one of your own playlists.


There is another option that allows you to export a playlist from a library and import it into another. Would this also have the same problem with finding the corresponding song file and location?

I can see why the option to import playlists might be unwieldy and why Apple did NOT include this as an option in the Home Sharing that they have provided us.
The playlist option was used extensively when the first iphone software came on the scene, to give us the option to sync partial music versus our entire music library. Now that Version 3.1 for the iPhone and iTunes 9 allow us so many more options for syncing by artist, genre … the need for a playlist to sync to our iphone isn’t necessarily bothersome for me. I have really enjoyed the option of using Genius to create some playlists for me. Tweet
Subscribe to:
Posts (Atom)