I use Google Docs a lot to share spreadsheets with other workers. This allows workers to collaborate on the same document from different computers, devices and from different places.
The other day I was trying to quickly review some information on a very large Google Docs spreadsheet and found that my arrow keys were not working to let me quickly move from right to left horizontally through the spreadsheet.
Found out that if you switch the view of the spreadsheet from the spreadsheet view to the list view and back to spreadsheet view that arrow keys became functional again.
Hope this helps someone else who has had this same problem.
Tweet
Showing posts with label Trick or Tip. Show all posts
Showing posts with label Trick or Tip. Show all posts
Thursday, April 10, 2014
Friday, March 07, 2014
How to Change Mac Mail Subject Line
Trying to find an email can be a undaunting task if the email doesn't have a good subject. Have you ever wished that you could edit the subject for emails that come into your IN box. There doesn't appear to be a way to do so in the Mac Mail app.
Well, here is a tip to help you do just that.
Select the email that you want to change subject. This can be an email in your Inbox or some other folder (mailbox you have created for storing and organizing your emails).
Note: The date and time of email will be changed. You may want to put a reference to the date/time in subject or content as a note if needed for some reason.
Drag that email message into your Draft folder.
Double click on the email on the left side column. A window will open that displays the email you have selected.
Make changes to the subject for that email.
Click on the red close button in upper left-corner of email.
Email will be saved with new edited subject.
Now, you can move that email back to your Inbox or other folder (i.e. mailbox).

Tweet
Thursday, November 21, 2013
Logging into the App Store Frustration
I have been having a problem logging into the App Store on my MacBook Air to perform updates. The problem started after my husband had logged onto my account and downloaded and app that he wanted to use on my machine.
I may have updated some of my apps while still logged into the App Store under his Apple ID. Anyway, I tried logging out of his account and back into my account and that is when the problem started. Basically, when I typed my Apple ID and password into the sign in page, the spinning wheel appeared and remained.
I called Applecare the first time this happened and when the technician suggested I log in and out - it worked fine. Go figure that. So, things went along merrily, until the other day when I decided to check for updates again. My husband's ID came up - I logged out of that account and then tried to log into my account. "Spinning Wheel" again.
Tried various things, nothing seemed to work. Then I tried the following:
I selected the "Quick Links" section under Top Charts and then clicking "Account". I logged into that form without problem. I then returned to the Updates screen and all the updates started loading and installing. Go figure. Vaguely this was the same sequence that the technician suggested. My other attempts (if memory serves me correctly) was to go to "sign in" first.
I will report back here, should I get a spinning wheel again and verify that this works a second time or not.
Tweet
Wednesday, October 02, 2013
Mailboxes, On My Mac and iCloud Sections of Mac Mail App
A mailbox is like a folder. You create mailboxes to organize emails. For example, a mailbox named "Work" might contain all your emails that you receive that are related to work.
Mailboxes are created in the Mail app program on your computer. When they are created you give them a name and a location. Mailboxes can be located to a section on your computer: On My Mac section or iCloud section.
You can also create sub mailboxes that can be placed inside other mailboxes. For example, you might have a mailbox named "My Stuff" and inside that mailbox, you might want to create sub mailboxes named "Bills", "Orders", "Miscellaneous."
Mailboxes or folders created and stored in the On My Mac section of the computer's Mail app program are only seen from the computer's Mail app. i.e., You cannot see them on your iPad or iPhone.
Mailboxes or folders that are created for location in the iCloud section are saved on Apple's cloud server. If you have also selected (in Systems Preferences>iCloud) the option to sync mail with iCloud, then the email messages are sent to ALL your devices including your laptop, iPads, iPhones, etc. These messages can also be retrieved using a web browser like Safari, Firefox or Chrome. You type iCloud.com in your browser address box (url) and log into your personal iCloud account with your Apple ID name and password. You will be able to see your email on the web page.
If you move an email message inside a mailbox or the entire mailbox from the On My Mac section of the Mail app program on your computer to the iCloud section, it is "moved" to the iCloud, but is no longer located in the On My Mac section. Remember that in moving a mailbox from one section to another - the message or mailbox is deleted from the place it is moved from and added to the section moved to. In addition, the email message(s) or entire mailbox has to be literally sent to the iCloud again - which can use a considerable amount of bandwidth upload/download if there are a lot of messages and attachments. So this is best done when you are connected to wifi where you are not worried about using a lot of bandwidth or upload/download data transfer.
If you move an email message from iCloud section to the On My Mac section, the move is made to your local computer, but also removed from the iCloud.
There is also a copy option. The method for "moving" and "copying" messages from a mailbox the On My Mac section to a mailbox in the iCloud section can be done by holding down the control key and clicking on the email message(s) to be "moved" or "copied" to another mailbox that you have created in the iCloud section. Copying email message(s) rather than moving allows you to keep the messages in each section.
To move an entire mailbox from one to the other, you merely drag the mailbox from the On My Mac section or iCloud section of the Mail app to the other section.
Those who do not want their email messages stored in the cloud can create mailboxes or save messages only in the On My Mac section; however, they will not be able to find that email on their other devices like iPhones or iPads.
Apple allows a certain amount of storage in the iCloud, and one way to alleviate some of the storage in iCloud is to move the email messages (deleting them from iCloud section at the same time) to On My Mac section of your Mail app program on your computer.
If you store all your emails in the iCloud section of the mail app, you will need to be connected to wifi to retrieve those messages on your iPad or iPhone.
You should be able to see the email messages stored in the iCloud section mailboxes from your laptop even if you are not connected to wifi.
Tweet
Thursday, September 20, 2012
Reducing Size of PDFs in Mountain Lion
I am often limited by bandwidth in uploading and downloading files while traveling. So, I decided to find a way to reduce the size of some of the pdfs that I would like to upload to my iBooks or to send via email to others. Today's discussion will illustrate how this can be accomplished using ColorSync Utility and/or Preview. This method will reduce most pdf files by about 40% depending on your custom settings that you create. This method assumes that the user has installed Mountain Lion System on their Mac. However, some of the details may be similar for Lion and may allow others to find a means to do so on earlier Mac systems.
Using ColorSync Utility
There is a way to reduce the size of a pdf using an app on your Mac called ColorSync Utility
You can find this app by running Launchpad on the dock and then find the Utility Folder or by using the Finder search for ColorSync Utility app.

 Run ColorSync Utility
After running the app, you will need to duplicate the Reduce File Size Filter.
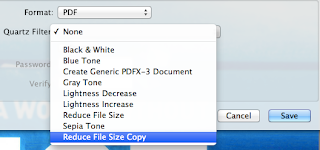
At the bottom of the opening window click on the Filter pull down menu. On my machine, I choose Live Update from Filter Inspector (I'm using Mountain Lion and I'm not sure what the option is for Lion System). This brings up the Filters Window as shown below.
Selecting Reduce File Size --- from the list on the left and moving over to the down arrow on the far right of this selection click on Duplicate Filter. This adds the new filter called Reduce Filter Size Copy to the list on the left hand side.

Now clicking on the arrow next to Reduce File Size Copy, you will see the following options: Image Sampling and Image Compression. You will need to change the settings in the Image Sampling (click on down arrow) to reveal the following:


Now using Save As option - give it a new name and save to your Desktop. When comparing the size of the files, you should find a reduction in the pdf file size.
Now, if you prefer to use Preview to reduce your files or to export or resave in reduced form, you will need to add this filter manually to your library folder, so that it will appear as an option when using Preview.
Just copy your filter from
/Users/YourName/Library/Filters/
to
and the customized profile will be added to your Preview options.
To find this /Users/YourName/Library/Filters folder and your custom filter:
Bring up a Finder window, then hold down Cmd shift G and type in the path name above into the text box that appears on the screen with your username in place of YourName in the path.
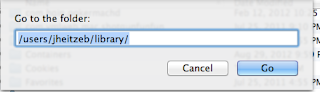
Using the Cmd shift G again, type in /Library/PDF Services/ in the text box. Now drag the duplicate file that is on your desktop into that folder. You may be asked to Authenticate the move, and you will need to type in your Administrator's password.
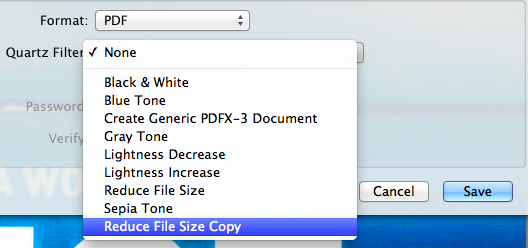
Now when you run Preview your custom option will be available for saving using the Quartz Filter - Reduce File Size Copy.
 Tweet
Tweet
Using ColorSync Utility
There is a way to reduce the size of a pdf using an app on your Mac called ColorSync Utility
You can find this app by running Launchpad on the dock and then find the Utility Folder or by using the Finder search for ColorSync Utility app.
After running the app, you will need to duplicate the Reduce File Size Filter.
At the bottom of the opening window click on the Filter pull down menu. On my machine, I choose Live Update from Filter Inspector (I'm using Mountain Lion and I'm not sure what the option is for Lion System). This brings up the Filters Window as shown below.
Selecting Reduce File Size --- from the list on the left and moving over to the down arrow on the far right of this selection click on Duplicate Filter. This adds the new filter called Reduce Filter Size Copy to the list on the left hand side.

Now clicking on the arrow next to Reduce File Size Copy, you will see the following options: Image Sampling and Image Compression. You will need to change the settings in the Image Sampling (click on down arrow) to reveal the following:

Delete all the values in the boxes and change the Resolution to 100 and leave at High Quality.

Now Open a pdf file or a copy of your pdf to test.
Select from the Filter at the bottom of the screen on left: The newly created filter called Reduce File Size Copy.
Hit the Apply button and wait a few seconds or minutes (depending the size of the pdf that you are working with)
Now using Save As option - give it a new name and save to your Desktop. When comparing the size of the files, you should find a reduction in the pdf file size.
Moving the Custom Filter to Use with Preview
To add this same filter to Preview as an option, you will need to:
Just copy your filter from
to
/Library/PDF Services/
and the customized profile will be added to your Preview options.
To find this /Users/YourName/Library/Filters folder and your custom filter:
Bring up a Finder window, then hold down Cmd shift G and type in the path name above into the text box that appears on the screen with your username in place of YourName in the path.

Using the Cmd shift G again, type in /Library/PDF Services/ in the text box. Now drag the duplicate file that is on your desktop into that folder. You may be asked to Authenticate the move, and you will need to type in your Administrator's password.
Now when you run Preview your custom option will be available for saving using the Quartz Filter - Reduce File Size Copy.
 Tweet
Tweet
Wednesday, September 19, 2012
How to Get PDFs onto Your iPad into iBooks
PDF is an acronym for "Portable Document File" and is a convenient format used for reading documents on all sorts of devices, regardless of application, device, or operating system you have.
There are many popular readers available to access and read PDFs from your iPad. In fact if a PDF is emailed to you, you can click on it from your Mail app and it will open and you will be able to read it. iBooks on the iPad is another good way to read PDF files and to store them for offline reading. Often times when we are traveling, we don't have convenient access to wifi services, and it is nice to have a way to read our stored PDFs to read whenever we wish.
How Can You Find PDFs
There are many PDFs already on the web. We just need to find them. The quickest way to find a PDF is to use Google Search from your Safari browser on your iPad. For example, if you want to find a reference manual for your iPad, you can google for it.
Type in a phrase like, "iPad 2 manual pdf" Using the additional word "pdf" will help find the file in pdf format.
The search results will appear in a list. The following result appears to be the best option as it is an Apple pdf file. Clicking on this result will bring up the pdf. Now, you can read the resulting pdf directly from your Safari browser; however, it may be something you want to keep as a reference for later. In that case, after the document has fully loaded into the browser page, simply tap twice with your finger on the pdf and an option bar will appear at the top of the page. The option to read/save in iBooks will be one of the options. If you select this one, your PDF file will be saved to your iBooks bookshelf. You will be able to access this document offline at any time.
Other Ways to Transfer a PDF to your iPad
Via Email. You can email a copy of a file by dragging it from your computer desktop to your new email window and send it to yourself. You can then retrieve it from your mail on your iPad and can save it from there. To save, merely open the PDF file while in your mail app by touching the opened file with your finger. Once open, you should notice a small square with curved arrow in the upper corner menu bar. If you tap on this icon you will be given the same option to open in iBooks. If you select this option, your pdf file will be saved in iBooks.
Via another app. Using GoodReader or Dropbox app one can transfer a pdf to their Mac. You merely drag the PDF into the GoodReader of Dropbox app on your Mac or PC. Then open the same app, either GoodReader or Dropbox on you iPad and select the document and option to transfer to iBooks. These methods do not require that you sync with iTunes. Using iTunes to sync books or pdf files is not always convenient.
There is a way to transfer PDFs via iTunes without having to sync
Connect your iPad to your PC or Mac via the cable and run iTunes app on your computer. In the left hand column you will see the name of your iPad under Devices. Select Apps tab at the top in the right hand window. Scroll down until you see the File Sharing section. Select either GoodReader of Dropbox from the list of apps that have file sharing capabilities on your iPad. Drag the PDFs into the list for that app on the right-hand side. They will appear on your iPad retrievable by the app.
Tweet
Wednesday, August 29, 2012
Alex Reads Me My PDFs
While on my treadmill, I try to do something productive to keep my mind occupied and less on the exercise. Lately I've been trying to read some pdfs of books or manuals while walking or cycling in the fitness center. I really like audio books as they are easier to manipulate, especially on the treadmill.
I have been pursuing the means to have my pdfs or books read to me. I have found that there are a couple of ways to accomplish this feat if you don't mind a robot reading to you.
First, I tried using the built in "voice over" option on my iPad. This entails enabling "voice over" in the Settings of your iPad. Under General, you will find "accessibility" option> triple click home button> which I set to "voice over." When you want something read to you on your ipad, you enable the voice over by hitting the home button rapidly in succession three times. When you do this, the other home gestures get really confusing. Selecting something then requires two clicks of home button instead of one. This can be frustrating at first. Usually I only turn this feature on after I have started iBooks.
Once I have iBooks running and have selected a pdf file to have read, I then triple click the home button turning on the voice over (which is a woman's voice). Then you have to select the first word or sentence (which can be tricky) and using two fingers swipe downward. The voice will start reading and continue through the article. It is pretty frustrating at times, but once it is engaged, works for the duration of my workout.
Today, I decided to try a different method. The Mac system allows you to select text in a pdf file that you load into Preview, and then to control click the selected text. You will see an option to send text to iTunes.

You have a choice of voices (I select Alex). You choose where to put the audio files in iTunes. I usually just put them in the Music section.

Generally, I select one chapter or a section of the pdf or book. I send each to iTunes. Using command I in iTunes you can enter the author's name, edit the chapter title, add a track number and any other information you wish like Genre: Books to each audio clip.

When I finish saving each track or chapter to iTunes, I then create a playlist, sorted by track to get them in order.

Next step is to move these files to a folder on your desktop. Using command-shift N, create a folder on your desktop. Now select all the files in the playlist and drag them to the new folder.
Note: I have set my iTunes preferences> devices> to NOT auto-synch my devices (ipods, ipads, and iphones).

Run iTunes. Connect your iPad to your Mac. Your iPad should show up under devices in the left-hand side of the iTunes window. Select Apps tab. YOU WILL NOT BE SYNCING.
To move the files to your iPad without having to sync your iPad is accomplished by using the File Sharing option available under the Apps tab. SCROLL DOWN to see this section.

I use the GoodReader app to read pdfs and also to access documents from Google Drive (Google Docs) and to also listen to audio files. When I scroll down in my Apps Tab, I see a list of apps that allow transfer of files from my Mac to my iPad/iPhone without having to sync my devices. It is especially nice to use this method to add files to your devices that are on your Mac laptops or other computer than the one you originally used to sync your device.
I select GoodReader from the left hand column and then see the files that are currently stored on my ipad in the right-hand section of the window. I then select all the files on my desktop in the newly created folder and drag them to this right-hand section. They are now quickly moved to my iPad. DO NOT click the SYNC button - it is not used to transfer these files!
I then eject my iPad using the small up arrow next to my iPad device name in the far left-hand column (under Devices) and disconnect my iPad. Whoala! I now have the audio files in GoodReader My Documents section and I merely click on the audio to listen to the book. Alex reads to me.
Tweet
I have been pursuing the means to have my pdfs or books read to me. I have found that there are a couple of ways to accomplish this feat if you don't mind a robot reading to you.
First Attempt - Using Voice Over with iBooks
First, I tried using the built in "voice over" option on my iPad. This entails enabling "voice over" in the Settings of your iPad. Under General, you will find "accessibility" option> triple click home button> which I set to "voice over." When you want something read to you on your ipad, you enable the voice over by hitting the home button rapidly in succession three times. When you do this, the other home gestures get really confusing. Selecting something then requires two clicks of home button instead of one. This can be frustrating at first. Usually I only turn this feature on after I have started iBooks.
Once I have iBooks running and have selected a pdf file to have read, I then triple click the home button turning on the voice over (which is a woman's voice). Then you have to select the first word or sentence (which can be tricky) and using two fingers swipe downward. The voice will start reading and continue through the article. It is pretty frustrating at times, but once it is engaged, works for the duration of my workout.
Second Attempt - Audio Created Using Cntl Clicking Selected Text
Today, I decided to try a different method. The Mac system allows you to select text in a pdf file that you load into Preview, and then to control click the selected text. You will see an option to send text to iTunes.

You have a choice of voices (I select Alex). You choose where to put the audio files in iTunes. I usually just put them in the Music section.

Generally, I select one chapter or a section of the pdf or book. I send each to iTunes. Using command I in iTunes you can enter the author's name, edit the chapter title, add a track number and any other information you wish like Genre: Books to each audio clip.

When I finish saving each track or chapter to iTunes, I then create a playlist, sorted by track to get them in order.

Moving Audio Files to My iPad without Syncing
Next step is to move these files to a folder on your desktop. Using command-shift N, create a folder on your desktop. Now select all the files in the playlist and drag them to the new folder.
Note: I have set my iTunes preferences> devices> to NOT auto-synch my devices (ipods, ipads, and iphones).
Run iTunes. Connect your iPad to your Mac. Your iPad should show up under devices in the left-hand side of the iTunes window. Select Apps tab. YOU WILL NOT BE SYNCING.
To move the files to your iPad without having to sync your iPad is accomplished by using the File Sharing option available under the Apps tab. SCROLL DOWN to see this section.
I use the GoodReader app to read pdfs and also to access documents from Google Drive (Google Docs) and to also listen to audio files. When I scroll down in my Apps Tab, I see a list of apps that allow transfer of files from my Mac to my iPad/iPhone without having to sync my devices. It is especially nice to use this method to add files to your devices that are on your Mac laptops or other computer than the one you originally used to sync your device.
I select GoodReader from the left hand column and then see the files that are currently stored on my ipad in the right-hand section of the window. I then select all the files on my desktop in the newly created folder and drag them to this right-hand section. They are now quickly moved to my iPad. DO NOT click the SYNC button - it is not used to transfer these files!
I then eject my iPad using the small up arrow next to my iPad device name in the far left-hand column (under Devices) and disconnect my iPad. Whoala! I now have the audio files in GoodReader My Documents section and I merely click on the audio to listen to the book. Alex reads to me.
Tweet
Saturday, August 25, 2012
Solution for Transfering Photos from iPad to Computer and Back
When transferring photos between your mobile devices like iPad and iPhone or to your MacBook Air and back, you need to consider the amount of time and bandwidth or data transferred via the cloud. As an alternate solution, one should consider one of the excellent apps available to do this efficiently and seamlessly.
How It Can Be Accomplished with PhotoSync
PhotoSynch is such an app available for the Mac and also the iPhone/iPad devices. PhotoSync allows synching photos in both directions without hassle, using an easy-to-use interface, which allows transfer of all photos or a selection of photos.
* This transfer from device to computer and computer to device can be accomplished via a wireless connection or 3G/LTE. The device to device transfer is available using bluetooth and wifi.
* The number of photos you plan to transfer can be limitless, but I haven't tried that yet.
* You can share photos to other sites such as Facebook, Dropbox, Picasa, and others like Google Drive (the new Google Docs).

* It also has Web Browser viewing capabilities where you can view your photos in a web page from a computer on your same network.
* Transfer is done in the background, allowing iPhone and iPad users to continue with phone calls or games.
* You can select the size to send, which computer to use as your default storage.

* You can setup defaults in the settings of the app for quick transfers and also choose to send to a certain folder or to iPhoto on your computer directly when receiving or sending photos.

Support for Mac and Windows Companion App
The iPad/iPhone app is relatively inexpensive for your iPad/iPhone and comes free for use on your desktop or Mac laptop (Mac OS X10.5 or higher Intel and PPC supported). There is also a Windows PhotoSynch companion app that works for those using a PC as their default computer (Windows XP SP 2 or higher, Windows Vista or higher, Windows 7). Location services needs to be enabled in order to use the app successfully.
For those who don't want to use a cloud server or have limited wifi capability or your internet connection is down this is a great solution as it offers a means to transfer photos and videos between devices and computers using a local network. I give PhotoSync a thumbsup rating of 5 stars for all my fellow travelers and photographers.
Tweet
Saturday, August 04, 2012
My iPad app purchases were missing
I tried viewing all my APP purchases on my iPad 2 tonite. There was only a blank screen showing under all, iPhone, and iPad sections when I ran the "apps" store app on my iPad.
When I tapped anywhere on the blank screen, one of my purchases would appear. I tried rebooting my iPad, checking various settings.
Finally, I realized that I had an iTunes U podcast that was stuck or not downloading on my Mac Air. There was a little number "1" in a red notification circle next to the iTunes U label in iTunes on my Mac Air. So I deleted this file that had not downloaded properly into my iTunes library.
Checked my iPad and all my apps purchased are now showing up fine.
So if you are experiencing this problem, make sure an app, podcast or download is not stuck in your iTunes library on your computer. This seems to have been the problem. Hope this helps someone else with this problem. :-) Tweet
Friday, August 03, 2012
Flagging My Mail Appropriately
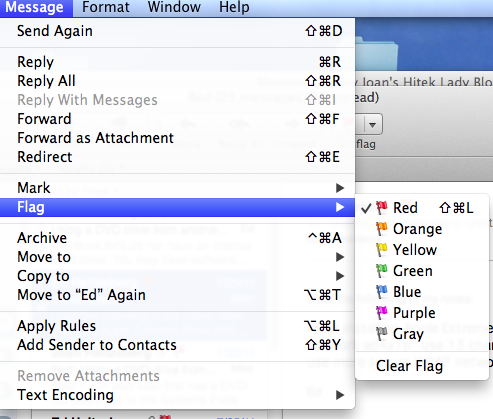
One of the features I like the most in Mac's Mail program is the ability to flag my important emails. This is done by selecting the email that I want to flag and then clicking on the Flag option from the Message menu bar option in Mail. From there it is easy to select one of the flags from the popdown menu selections (red, green, blue, ...).

This is a great feature and one can quickly pull up all their flagged email messages by selecting the Flagged mailbox on the left-hand side of the Mail window. However, the indicators using color seem to be rather obscure and hard to remember what color code is assigned to the priorities you might have for flagging a particular message.
To help with this, one can rename these flags given them appropriate names that will make it easier to categorize and retrieve the flagged messages. If you wish to rename the various flags to something more understandable, you can.
First you must have used each of the flags at least one time to mark an existing email. Once this has been done, you will see each of the flags you've utilized listed under the Flagged mailbox on the left-hand side of the Mail window. After clicking on the tiny arrow next to the Flagged mailbox, you will see the list of various flags designated with the names of various colors (red, orange, yellow, green, ...). To rename these, select each one of the flags, then select Mailbox from the menubar at the top and Rename Mailbox. From there you will see the name of the Flag highlighted and you can type in an appropriate flag name like "Important."


Tweet
Thursday, August 02, 2012
How to Get an ePub Book onto My Mac
Today's journey involves transferring a free ePub book that I found online at Google Books to my iPad. Searching online for a good book about the Northwest Passage, I found one published in 1860, by James Alex Browne, called "The Northwest Passage and the Fate of the John Franklin."
It was an easy step to download the ePub file to my Mac's hard drive. The next step was a bit challenging. It seemed logical to me that I might be able to email it to myself, retrieve it from the inbox on my iPad and save it directly to iBooks app on my iPad. That didn't seem to work for me. Possibly it was due to my lack of coherence and coffee this morning. I tried other apps like Free Books and GoodReader. Nothing seemed to work.
Finally, I pursued the use of my Dropbox app. I moved the ePub file into the cloud in my Dropbox by opening a finder window and physically dragging the ePub file to my Dropbox. Once the file was located conveniently in my Dropbox in the cloud, I was able to select the Dropbox app icon on my iPad, next select the ePub file, and a popup selection box appeared on my iPad.

It was easy from there to add it to my iBooks library collection or into Free Books or GoodReader.
Tweet
Wednesday, April 18, 2012
Time Zone Dilemma Revisited
Now that I am back in my own local, I find that a lot of my iCal appointments are incorrect. Scheduled appointments are now on wrong days and at wrong times. It even said that today was Thursday in my iCal calendar, when it is actually is Wednesday. This is not good when you have important engagements or appointments that you need to attend.
I checked out the System timezone settings and such on all my devices, MacBook Air, MacBook Pro, iPhones and iPads when I arrived home to the new time zone. Content that this would fix everything, I started getting reminder calls from my dentist and doctors for upcoming appointments. When I checked my iCal dates and times, they were all wrong. So it seemed that something else was wrong.
This morning I checked the iCal preferences under "Advanced" tab and unchecked the option to turn on time zone support. This helped with displaying the correct day of the week for my calendar.

So, I googled "iCal time zone support" and found a link to an excellent article posted online. I wanted to share this link: http://www.macobserver.com/tmo/article/Understanding_iCal_Time_Zones/
with everyone so that they can have a reference that addresses the time zone issues when traveling.
Enjoy! Thanks Jeff Gamet for a well-written article.
Update: You can benefit from setting up "Time Zone Support" as ON when traveling if you are setting up phone calls from another location for certain times specified in the other person's time zones (i.e. not the current location's time). The burden of having to specify "floating" for all of your other meetings (e.g meetings where you are currently located) shouldn't outweigh the benefits of being able to set up a meeting in another time zone.
If you are traveling a lot, then ...
(1) Make sure you have turned on Time Zone Support on all your devices and laptops and computers. On an iPad or iPhone, select Settings> Mail: Contacts, Calendars> Time Zone Support
(2) Whenever you create a new event in iCal, you will notice that there is a new pop-up menu to choose from where you can associate a time zone with your events. IMPORTANT: you will have to manually choose the appropriate time zone for every one of your appointments.
(3) Then, while you're traveling, in the upper right-hand corner of iCal, there is a global pop-up menu that lets you choose which time zone your entire calendar is currently based in. As long as you have manually edited all of your appointments with the appropriate time zone, you will have an accurate calendar. But if you did not manually choose the right time zone for even a single appointment (or if you forget to change the global pop-up menu while you're browsing your calendar), your appointments will jump around and be very confusing.
Tweet
Wednesday, February 08, 2012
Time Zone Dilemma
Found a great article that is important to read if you are traveling in different timezones. As I travel from timezone to timezone, I have found that my iCal or Mac Calendar app is messing with my appointment times. Somehow, an appointment I set for 9AM ends up at a different time when I switch timezones. For instance, if I set an appointment reminder for an event to attend at 9AM while on the East Coast and I fly a couple of timezones away, I might miss my appointment, as the time in the calendar gets changed.
If you have this problem, be sure to check out this well-written article to understand the settings and way to handle this problem. We don't want to miss any of our appointments! Tweet
If you have this problem, be sure to check out this well-written article to understand the settings and way to handle this problem. We don't want to miss any of our appointments! Tweet
Tuesday, January 31, 2012
Using Prospective to Capture the Moment

While visiting a sugar cane museum in Port Louis, on the island of Mauritius in the Indian Ocean, I learned a good photo tip. At the museum there was the Beau Plan's historical chimney-stack, constructed in 1895 by A. Felix, an architect that stood 33 meters (over 100 feet) tall.

I wanted to take a photo of this very tall tower or smoke stack. This presented a problem - how best to obtain this type of photo. Normally buildings are so tall that one can't really get the entire building in the photo by looking up and snapping the photo. Normally, one would step back to try and get an angle on the object that would work while photographing. The area by the smoke stack was not conducive to backing up, as we were inside an enclosure which surrounded the tower. So I attempted to just look up and snap the photo which did not work.
Then, I noticed that there was a mirror slanted along the wall of the enclosure that was tilted in such a way as to reflect the tower onto the mirror. Cleverly, I decided to take a photo of the tower using the mirror. My first attempt was not successful, as I failed to realize that I would be in the photo. I ended up with the photo shown below (a self-portrait):

Stepping further away from the mirror I was able to capture only the tower. The results below:

Still not satisfied, I stepped to the side and took the best shot by angling the camera from a completely different prospective. See best photo below:

A valuable lesson in photography is to look up, look down and change your position to get the prospective you need on the object you are photographing. You never know what you might see or capture.


Tuesday, November 22, 2011
iMessage Solution for Activation
iMessage suddenly quit working on my iPad 2 and iPhone 3GS, yesterday. I am traveling and was very frustrated with the fact that I was not able to iMessage from overseas. As it turns out, I tried everything. I updated my iPhone to OS5.0.1, but left the iPad at 5.0 (just in case). I tried reboot, repowering and even reset my apple id and password. All that did not work.
As I was forced to change my password to meet the new 8 character, capital, number format - this caused panic in accessing emails, mobile me and other things. Resolved those issues, but iMessage still would not verify or activate. I tried resetting Facetime settings, iMessage settings and numerous other settings.
Alas, the solution was to turn off location and set my time zone to automatic. I have had to adjust the timezone manually as I am traveling and do not have satellite access all the time.
This works, finally my iMessage and Facetime were activated.
Hope this helps someone else. Suggest making sure your time zone is correct before trying to verify or activate before changing a bunch of settings and passwords. Tweet
Tuesday, November 08, 2011
How to Remove Yourself from Lists on Twitter
Recently, I was receiving a lot of spam emails, that I suspect originated from Twitter. I am also assuming that some of the 'twitter' followers are robots of sorts and decided this morning to check out Lists.
Lists is a feature that allows others to create separate lists for various friends, business acquaintances or people they follow with like interests or such. Anyone can create a list and place you on their list. I decided to check who had included me on their list and for what type of list. I decided that one or two of the lists were not something that I wanted to be on, so I decided that there must be a way to remove myself from these lists.
Researching online, I found that you can remove yourself from a list by merely blocking the person and then unblocking the person (if you still want to allow that person to follow you). It worked. I got rid of my name from the unwanted list and now will see if the unwanted emails and spam soon disappear as well. Tweet
Tuesday, October 25, 2011
Whoops! I Deleted My Documents Folder from My Dock!
Today, I decided to back up my documents folder (which resides on my dock across the bottom) to an external hard drive. I thought that I could merely drag it to the external hard drive.
In the process of doing this drag, I dropped it on my desktop and Poof!, it was gone. So I decided the logical thing to do was to drag the documents folder from the left-side of my finder window to the dock to replace the one that I had deleted accidentally.
Alas, this all lead to panic, as I saw that the icon that appeared on my dock was not the nice folder that had once resided on my dock. In my frustration, I proceeded to perform numerous steps to recreate that folder called Documents on my desktop. I created a new folder, then dragged the contents from the finder to that new folder, but I forgot to hold down the option key so that it would just make a copy of the stuff, but instead it moved it. Wow. I noticed that my original Documents folder was now empty. Eek!
More panic as I thought that I had lost everything.
To make a long story short, here is what you do when you accidentally remove your documents folder from your dock. (Poof!):
Drag your documents folder from the left-side of your finder to the dock, it will be added to the dock. This is an alias and no files are physically copied. Now control-click the documents icon on the doc to select the view you want "Folder" and the option to Epand/Fan or Automatic view contents in folder when clicked.

Whew! I need to take a break from this before I truly do loose my stuff! Tweet
Sunday, October 16, 2011
Some Great New Features in iOS 5 - be sure to check them out
Here are some features worth checking out on your mobile devices using iOS 5:
• Creating albums and moving photos into albums
• Video formats that are now supported on the device
• Setting individual text tones for your family and friends
• Setting up iMessage to use for FREE texting to fellow iphone/ipad users
• Setting up special vibration tones for you iPhone
• Enhancing photos right in the Photos app: also rotate, crop and red-eye elimination
• New app for reminders tat can be synced across devices. Reminders can send alert when you are near a location.
• Accessing magazines on a newstand shelf.
• Tabs in Safari on your iPad devices
• Set up custom gestures and keyboard shortcuts
• New search features in Mail app
• New Reader in Safari to bookmark and read articles later.
• Use your volume button as a shutter button for your camera. Access camera from the lock home page.
• Swipe to view all your notifications and alerts and text messages and email subject titles from one central location. On iPhone also see stock and weather in this notification window.
• More gestures, wifi sync, pc free, icloud capable photo streaming, find your friends, airplay ....
• and text style like bold, underline, italic and suggestion for spelling in Mail app Tweet
Thursday, October 13, 2011
iOS 5 Tip: Don't Overlook the New Alert Sounds
The new iOS 5 for our mobile devices now includes the ability to set special sounds or tones for your alerts. Check out the Settings > General> Sounds> now available to customize.
 Tweet
Tweet

iOS 5 Tip: Create Your Own Gestures on Mobile Devices
For those who want to get creative with gestures they use on their iPad or iPhone, try selecting the Settings> General>Accessibility> Assistive Touch> Custom Gestures > Create New Gesture.


Your new gestures are recorded and accessed through a Favorites Menu. Tweet


Your new gestures are recorded and accessed through a Favorites Menu. Tweet
Subscribe to:
Posts (Atom)