If you want to remove someone from the auto-fill option in Mail app, you can delete them from your address book or contact list; however, there is another solution that might work that let's you keep the contact info just in case you need it later.
If you remove the email address of the person from your contacts or address book, then this eliminates them as an auto-fill in mail.
But you may want to keep their email in the notes section of the address book, just in case you need to have that email info at a later time. Use edit option to copy their email and paste in notes section on their card info in Address book and then select the - to remove it from emails.
You may also want to make sure their email is not also listed somewhere in the Previous Recipients' list in the Mail app.
To remove a name from the previous recipient's list,
Select "Window" from the menu bar.
Select "Previous Recipients" from the pull down options.
A list of names that you have typed in or chosen before will appear in a popup window.
You can remove any by selecting the name and then clicking on the "Remove from List" button in lower corner.
Tweet
Showing posts with label email. Show all posts
Showing posts with label email. Show all posts
Thursday, March 27, 2014
Wednesday, October 02, 2013
Mailboxes, On My Mac and iCloud Sections of Mac Mail App
A mailbox is like a folder. You create mailboxes to organize emails. For example, a mailbox named "Work" might contain all your emails that you receive that are related to work.
Mailboxes are created in the Mail app program on your computer. When they are created you give them a name and a location. Mailboxes can be located to a section on your computer: On My Mac section or iCloud section.
You can also create sub mailboxes that can be placed inside other mailboxes. For example, you might have a mailbox named "My Stuff" and inside that mailbox, you might want to create sub mailboxes named "Bills", "Orders", "Miscellaneous."
Mailboxes or folders created and stored in the On My Mac section of the computer's Mail app program are only seen from the computer's Mail app. i.e., You cannot see them on your iPad or iPhone.
Mailboxes or folders that are created for location in the iCloud section are saved on Apple's cloud server. If you have also selected (in Systems Preferences>iCloud) the option to sync mail with iCloud, then the email messages are sent to ALL your devices including your laptop, iPads, iPhones, etc. These messages can also be retrieved using a web browser like Safari, Firefox or Chrome. You type iCloud.com in your browser address box (url) and log into your personal iCloud account with your Apple ID name and password. You will be able to see your email on the web page.
If you move an email message inside a mailbox or the entire mailbox from the On My Mac section of the Mail app program on your computer to the iCloud section, it is "moved" to the iCloud, but is no longer located in the On My Mac section. Remember that in moving a mailbox from one section to another - the message or mailbox is deleted from the place it is moved from and added to the section moved to. In addition, the email message(s) or entire mailbox has to be literally sent to the iCloud again - which can use a considerable amount of bandwidth upload/download if there are a lot of messages and attachments. So this is best done when you are connected to wifi where you are not worried about using a lot of bandwidth or upload/download data transfer.
If you move an email message from iCloud section to the On My Mac section, the move is made to your local computer, but also removed from the iCloud.
There is also a copy option. The method for "moving" and "copying" messages from a mailbox the On My Mac section to a mailbox in the iCloud section can be done by holding down the control key and clicking on the email message(s) to be "moved" or "copied" to another mailbox that you have created in the iCloud section. Copying email message(s) rather than moving allows you to keep the messages in each section.
To move an entire mailbox from one to the other, you merely drag the mailbox from the On My Mac section or iCloud section of the Mail app to the other section.
Those who do not want their email messages stored in the cloud can create mailboxes or save messages only in the On My Mac section; however, they will not be able to find that email on their other devices like iPhones or iPads.
Apple allows a certain amount of storage in the iCloud, and one way to alleviate some of the storage in iCloud is to move the email messages (deleting them from iCloud section at the same time) to On My Mac section of your Mail app program on your computer.
If you store all your emails in the iCloud section of the mail app, you will need to be connected to wifi to retrieve those messages on your iPad or iPhone.
You should be able to see the email messages stored in the iCloud section mailboxes from your laptop even if you are not connected to wifi.
Tweet
Friday, August 03, 2012
Flagging My Mail Appropriately
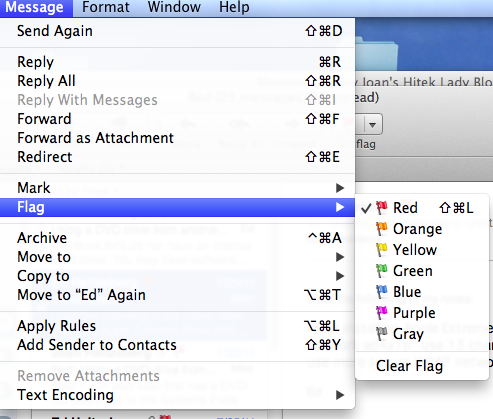
One of the features I like the most in Mac's Mail program is the ability to flag my important emails. This is done by selecting the email that I want to flag and then clicking on the Flag option from the Message menu bar option in Mail. From there it is easy to select one of the flags from the popdown menu selections (red, green, blue, ...).

This is a great feature and one can quickly pull up all their flagged email messages by selecting the Flagged mailbox on the left-hand side of the Mail window. However, the indicators using color seem to be rather obscure and hard to remember what color code is assigned to the priorities you might have for flagging a particular message.
To help with this, one can rename these flags given them appropriate names that will make it easier to categorize and retrieve the flagged messages. If you wish to rename the various flags to something more understandable, you can.
First you must have used each of the flags at least one time to mark an existing email. Once this has been done, you will see each of the flags you've utilized listed under the Flagged mailbox on the left-hand side of the Mail window. After clicking on the tiny arrow next to the Flagged mailbox, you will see the list of various flags designated with the names of various colors (red, orange, yellow, green, ...). To rename these, select each one of the flags, then select Mailbox from the menubar at the top and Rename Mailbox. From there you will see the name of the Flag highlighted and you can type in an appropriate flag name like "Important."


Tweet
Monday, July 25, 2011
International Charges on iPhone
I've decided to outline some of the things I learned today, about using your iPhone abroad.

If you wish to use your iPhone for voice, text messaging, email, surfing the web or using apps that access the internet, while you are in Edge or 3G mode, then you will be charged.

If you wish to use your iPhone for voice, text messaging, email, surfing the web or using apps that access the internet, while you are in Edge or 3G mode, then you will be charged.
- If you receive a VoiceMail, you will be billed per minute and if you listen to that voicemail, you will be billed per minute. Note: You can have this Voicemail disabled by calling AT&T. It is nice to have this feature, assuming you don't have a lot of friends calling and leaving you messages all the time. A good reason to consider leaving this option enabled would be if you need to hear from someone back home.
- Any calls you make overseas to overseas or the US will incur a charge per minute for each call based on the roaming fees associated with that country. To receive discounted per minute roaming rates, you can take out a World Traveler Plan costing $5.99 per month or you can be charged the standard rates for that country which a generally higher rate for the countries without taking out this plan. Therefore, if you just plan to make a few calls or only for emergency, it might not benefit you to also have the additional $5.99 monthly plan.
- Text messages are received and billed as well. Check the ATT site for international costs and plans. Usually text message options will offer a cheaper alternative to incurring costs for lengthy voice calls.
- When using email, surfing the web, streaming movies, or using apps that rely on data transmission you can rack up some pretty hefty charges. If you do not use these services on your iPhone while in the voice mode and only while using wifi, you can avoid these added costs. You should try to take advantage of free hotspots and inexpensive wifi services in cafes, hotels and restaurants during your trip. If you plan to access these services while under Edge or 3G, then it is advisable to get a plan offered for international usage which currently includes:
- 50 MB for $24.99 Monthly Charge
- 125 MB for $49.99 Monthly Charge
- 225 MB for $99.99 Monthly Charge
- 800 MB for 199.99 Monthly Charge.
- Once you exceed the data by 1MB, you will be billed $10 for an additional 10MB
- Note: The only way to keep your iPhone from automatically transmitting data is to keep both the "Data Roaming" and the "Fetch New Data" settings to OFF. Even if you change these settings to the OFF position, you will still be able to use your phone for voice and text. You also have the option of using wifi when available. To turn off data roaming please select Settings-General-Network-Data Roaming. To turn off data fetch Settings, Mail-Contacts-Calenders, Fetch New Data, Change push to off and select to Fetch Manually.
Note: The monthly plans for discounted rates per minute on voice calls and plans for data downloads can be added or removed at any time and do not involve a cancellation fee.
You are able to add and remove international features by accessing your online account or calling AT&T International Care at 1-800-335-4685. or if you are out of country you can dial 001-916-843-4685.
Note:
If you need to speak to an International Care Representative you can always chat with one online at the AT&T site. You can also send us an email by logging onto your online account at att.com/mywireless>contact us. Or you can reach a representative by dialing +1-916-843-4685 while you are outside of the country.
To reduce costs while overseas consider using wifi when available, using Skype or FaceTime type apps when wifi is available to make your calls, emailing or texting while using wifi. If you need navigation, see if your current handheld GPS devices are up-to-date with maps of the regions you plan to visit and use instead of incurring charges for downloading maps while using 3G or edge connection on your iPhone. Yes, Google Maps can be expensive to use while on data roaming charges are incurring for large data downloads of maps. I often download maps and use with GoodReader in the form of pdf file. That way, I can zoom in on city maps much like we did when we used paper maps. This can also be done by storing your pdf maps in your iBooks and can be accessed without using wifi or expensive data roaming plans.
Happy traveling. Remember with a little pre-planning you can enjoy your trip and avoid any unexpected expenses or surprises when you get home.
Wednesday, May 04, 2011
Sending Group Emails via iPhone Mail App - MailShot is the Answer
Have you ever wanted to email a group of people from your Contact Address Book to send a message via your iPhone? There doesn't seem to be a way to actually do this using the Mail app on the iPhone.
Normally these contact groups are created in the Mail application on your Mac computer. If you try to select this group in the Mail app, it merely brings up the list of all the members in that Group and you have to select them one at a time in order to add them to the To: field. This is not efficient, if you have a large group of contacts that are contained in that Group.
Today I found an app MailShot by Soluble Apps, that has a easy-to-use interface that allows the user to create Groups that will be added to your Contact Address Book in effect as a new contact which contains the emails needed to send all at once when using the Mail app.
It was easy for me to create a Family Group using MailShot using the following steps: (1) Created a new Group (2) Selected contacts for that Group (3) Updated to my Address Book automatically. It showed up in my regular iPhone Contact Address Book list and I could email all the members of the family without having to select them individually.

When I was ready to send an email to this new group, I opened my Mail app on iPhone and selected "Family Group" and was able to send an email to all the members of that group at once. You can also place the selected Group into a forward, cc or bc fields. You can send photos, documents and other attachments with this group email. You also have the ability to deselect/select to manage the groups using the MailShot app.

The MailShot FREE app on iTunes allows you to create 3 groups with 5 persons per group; while the updated paid version allows creation of 50 groups with 50 persons per group. There is also an iPad version.
This app is worth checking out for large email management. So if you have a large group of contacts like 250 members that you need to email from your iPhone, you could create 5 groups of 50 each and then select each group1, group2, group3, group4 and group5 and send the email in a very efficient manner. Tweet
Subscribe to:
Posts (Atom)