Showing posts with label Disklavier Piano. Show all posts

Wednesday, August 28, 2019

Playing Midis via Bluetooth from my Mac to my Disklavier Mark IV

 I connected the mi1v2 Bluetooth midi device to my Disklavier Mark IV this evening.


I purchased the Bluetooth midi device from Amazon at
https://www.amazon.com/Wireless-MIDI-Interface-mi-1-Rev-3/dp/B01D61QK6W/ref=asc_df_B01D61QK6W/?tag=hyprod-20&linkCode=df0&hvadid=312118595187&hvpos=1o1&hvnetw=g&hvrand=14263083875715554474&hvpone=&hvptwo=&hvqmt=&hvdev=c&hvdvcmdl=&hvlocint=&hvlocphy=9029598&hvtargid=pla-570048501731&psc=1

 Description of device:
Wireless technology    Bluetooth Low Energy
Bluetooth LE MIDI Profile    Apple Bluetooth LE MIDI (iOS 9)
Connectors    1 x MIDI IN (5pin-DIN)
1 x MIDI OUT (5pin-DIN)
Switch、Indicator    1 x Hall element Switch
1 x Magnet
1 x white LED
Power Supply    From MIDI Out 3.3V-5.0V
Compatible iOS devices    iPad (3rd, 4th), iPad Air2, iPad mini, iPad mini 2, iPad mini 3,
iPhone(4s,5,5s, 6, 6plus, 6s, 6splus) iPod touch (5th, 6th)
Compatible OS    iOS8, iOS9, OSX (Yosemite, El Captain)
Firmware Update    On the air by using Piano Jukebox
iOS Apps for mi.1    mi.1 connect : bridges mi.1 and Core MIDI music apps
Piano JukeBox : Simple SMF player, firmware updater
Power consumption    7 mW (when MIDI OUT is 3.3 V)
25 mW (when MIDI OUT is 5 V)
Steps:
  • Turn Piano off.
  • Connected mi1vi2 Bluetooth devices input/output pins to I/O center at front of piano when piano off.  There are arrows on the device to aid in connecting properly.
  • Then turned piano on and made sure piano still worked.
  • Used instructions from http://quicco.co.jp/products/
  • Updated the device using Piano Jukebox app on iPhone  (be sure to get this app for your iPhone to use for update…
Firmware update
Updating the firmware is recommended to ensure that the mi.1 can be used in the most optimal condition. To do this, please download the dedicated iPhone/iPad application "Piano Jukebox" (free) from the App Store.
1. Launch the Piano Jukebox app
2. Tap the wheel icon and select 'Firmware Update'
3. Turn on the MIDI instrument to which the mi.1 is plugged, then tap the 'OK' button
4. Tap the 'Upload' button when it becomes available (blue) †
5. Keep the MIDI instrument turned on while updating the firmware
6. When the firmware has uploaded successfully, a message will be shown .
How to connect to iPhone/iPad
The connection between mi.1 and the iOS is made by Bluetooth Low Energy MIDI. The connection is managed in the “Bluetooth Midi Devices” List which the Piano Jukebox or some other MIDI apps have.
Preparation: Turn on the device to which the mi.1 is connected
1. Launch the Piano Jukebox app
2. Tap the mi.1 icon in the menu bar
3. Tap the “Not Connected” next to the mi.1 in the list.
4. You can now use the Piano Jukebox and other MIDI apps, such as GarageBand, on your iPhone

How to connect to Mac
1.For the connection between Mac, go to Application/Utilities folder and open Audio MIDI Setup.
2. Launch the "Audio MIDI Setup" tool
3. From the titlebar menu, select Window > Show MIDI Studio
4. Double-Click the Bluetooth Icon
5. Click the "Connect" button
6. If the button changes to "Disconnect", the mi.1 has connected successfully
7. MIDI apps can now recognise the mi.1 Bluetooth as a MIDI device.

Next I needed to decide on the best option for playing midis on my Macbook Pro.  I decided to purchase MidiYodi which works with this Bluetooth device, set up using Audio Midi Setup on Mac laptop.  This is a pretty good midi player for my current Macbook Pro running High Sierra  10.13.6.  I decided on this midi player because of the reasonable cost, the extensive online manual and the ability to create and save playlists.  It also has some editing capabilities.  MidiYodi can be found at:  https://www.canato.se/midiyodi/


Other Midi software that I tried out that worked with this Bluetooth device connected to my Disklavier Mark IV included:
Midikit is trial only, would need to purchase the version for 11.99 - good for editing titles and channels. No playlist capability.  Make sure connected to device by: looking under Midikit menubar select Midi Settings. Click on Midi port.  And the mi 1 bluetooth device should show up
Midiswing worked and needed to make sure to select output: Bluetooth (Quicco Sound Corp.) 2
Sweet Midi which has playlist capability. $29.95 USD

Most of these played midis using the Bluetooth device  but lacked playlist capabilities. In order to get some of these to work, I had to go to preferences or audio setup or midi settings in the individual apps and make sure that Bluetooth was selected.


** Update:  After hooking up Bluetooth, I noticed the only channel that was playing was Channel 1.  Needed to access Setup>Midi on my Mark IV PRC remote to set the channels for piano playback.  
 

Tuesday, April 03, 2018

Transferring Midis to Disklavier using FromToPC folder

When the latest edition of DKVBrowser for Mac failed to function on my MacBook Pro, I was heartbroken. It still runs on an older Mac that I have kept around here for editing purposes.  One of the nice features of DKVBrowser was the ability to transfer new midi files I downloaded from the internet to my Mac to the piano using wifi connection.

Even though I can't use the DKVBrowser on my MacBook Pro running Sierra 10.13.4 — I have figured out the steps to still transfer midis from my Mac to my piano via wifi.

This will be a great help as most laptops and newer computers don't have floppy drives or  CD drives.  I tried using a thumb drive which failed -- I believe due to being formatted as a Mac thumb drive. Maybe if I had a PC formatted thumb drive my Mark IV Disklavier would have recognized it.  I was spoiled using DKVBrowser to easily move midis to my piano via wifi.  So here are the steps to do so without DKVBrowser application. 


UPDATE:  Make sure your piano is ON ... out of standby.  Just turn on piano and play a song. Then stop song. 


On MacBook Pro, use the Go menu in the menu bar of finder.  Select Connect to Server from pop down submenu  and then from the upper right hand side of window select the pop down arrow and click on DKV#####


Click on Connect.

A popup window requesting name and password to server appears.
Fill in and click on connect.  (Note:  you may not need a password.)
Select FromToPCYou can use Guest to sign in - that works too!


The FromToPC  icon should appear on the Mac desktop.
Drag and drop any midi files that you wish to transfer to your piano into the icon.

Next, you will need to refresh this FromToPC directory using the piano's PRC remote, before the files will show up in the FromToPC directory on your piano's PRC remote screen.

Select the  FromToPC directory from the PRC
Select the root directory which is  a "/"

Select the Function button below and use "Refresh" option.
Which should  reload all the new midi files that you transferred via wifi so that they appear in the directory of the PRC remote screen.
You can now play them on your piano using PRC remote.

You can also run the Disklavier Controller app on your iPhone and can see the midis in the FromToPC directory on the app and play them.


You should also eject the FromToPC icon from your Mac’s desktop when finished.

Additional Note: Today, I was able to upload midis using my iPhone and app called "GoodReader" to my Mark IV Disklavier.  I save midis I find using iPhone Browser to my GoodReader app using the share icon.  GoodReader has an option to connect to servers.  Then I setup my piano server in GoodReader.  I select add server using SMB type server and adding the dkv###### address and add to my GoodReader app.   I then upload the midis saved in GoodReader to my piano's hard drive FromToPC directory.   

Sunday, October 11, 2015

Replacement Battery Information for PRC that operates Mark IV Disklavier

Replacement Battery Information for PRC that operates Mark IV Disklavier

A couple of years ago (Oct 2013), my husband noticed our battery on the PRC for our Mark IV Disklavier was weak.  He had me order a replacement battery.  It is still working fine!  Here is the information for the replacement battery:

The original manufacturer of the battery (i.e. Sharp) has, apparently, stopped making the battery needed for the PRC.  However, there is a manufacturer in China (Hong Kong) that makes an equivalent available via EBay. Shipping is included in the $16.95 price.


Fit Sharp Zaurus SL-C1000, SL-C3000, SL-C3100 battery

Background:
The Sharp Zaurus was a personal digital assistant (which reportedly influenced the Newton) and was produced from 1993 until 2007. The picture of one below shows that it looks very similar to our Yamaha PRC.

Sharp Zaurus SL-5500 runningOpenZaurus and OPIE, with docking cradle and stylus was produced around 2001. We purchased our Yamaha DC7M42 31-Aug-2005.  You can easily see the PRC was just a custom version of this Zaurus line of personal digital assistants.
 

Friday, January 02, 2015

Getting Yamaha Disklavier Piano and DKVBrowser and Virtual PRC to work with Mac's Yosemite System

UPDATE 2/19/2021:  The DKVBrowser discussion groups are now being conducted at Google Groups.  You can search by "DKVBrowser" to find a place to join for current information. 

The DKVBrowser software written by Kevin Goroway has been revised to meet the needs of users for their Disklavier Mark IV pianos recently.  The software had not worked on my latest Mac laptops due to system updates that were not supported by DKVBrowser.  The software had recently not worked on the latest Windows computers due to changes in system and other updates.  At some point the underlying architecture of DKVBrowser (Eclipse RCP) became unsupported/incompatible.

A new version is currently being tested by members who are part of the Google Group who post info about DKVBrowser and Disklavier.   

I was successful in loading the new DKVBrowser 3.0.2 onto a Mac laptop running High Sierra and one running Catalina.  I have been testing the Mac version of this software and find that it is running successfully for most functions.  It is nice to have the DKVBrowser to run playlists, play tunes at scheduled times and to have all the easy editing techniques and features that Kevin has shared with us.  I certainly hope many will consider the Donate button to show appreciation for his generosity and talents in keeping a means to play our beloved Disklavier Mark IV.


Original Article for reference:  https://grannyjoans.blogspot.com/search?q=virtual+prc

 "The Many Avenues to Controlling My Mark IV Disklavier"


 Original Post from Jan 2015 below:

With every Mac system update, I have to test not only old programs or applications, but also some other devices and equipment to make sure they still function.

The DKVBrowser application I use to edit songs, create playlists, and control my disklavier from my laptop seemed to have a problem after installing Yosemite 10.10.  But, luckily someone posted a solution on the yahoo forum.  Basically, the application needed the Java SE 6.0 runtime module installed on my Mac.

Download of Java can be found here:

After downloading this version (which includes the correct SE 6.0 runtime module), I installed it on my Mac laptop.  The java module can be accessed from the Systems Preferences.  There are some settings that may need to be changed to have another desktop application called Virtual PRC to run properly on your Mac.
Figure 1

After installing the java runtime, DKVBrowser made an excellent attempt to connect to my piano.  Due to the fact that the IP address for my piano changes everytime I lose power or unplug it while away, the IP address had to be corrected in the DKVBrowser settings and tested for connection.   See DKVBrowser application preferences window  (figure 2).

Figure 2

In the past I have been able to type in the DKV##### number for the IP address and usually the IP address is determined automatically.  I then selected test.  The piano was still not found. This time I had to actually find the IP address to put in the edit field.  (It may also be possible that this problem happened due to the fact that my piano had also been disconnected from the airport express box near the piano.) Anyway, I was able to find the IP address eventually and DKVBrowser ran successfully -- my piano is functioning -- playing my favorite playlist.

Next on the schedule was a test of the Virtual PRC java script that puts a virtual remote controller on my Mac screen to use to control the piano - like the real one that comes with the piano.

Figure 3
If you are having problems getting Virtual PRC to run correctly after the Yosemite install:

1) Make sure your piano is connected to the internet.  My disklavier is physically connected to an Apple Express box that is near the piano.

2) Place any previous 'prcstart.php' or 'prcstart.php.jnlp' file you have used into your trash can on your Mac.

3) Click on the DKV##### icon under 'Shared' column on left of the Finder window.  Double click on the 'DNA' folder on the right-hand side of the Finder window. Double click on Virtualprc.html file or open in a browser like Firefox.  (Note: I use Firefox to run this file as I have previously had problems with Safari and Chrome working with this file.)
4) You will need to enter a username (root) and password (prcstart).  Follow the steps below for setting up and downloading a new prcstart.php file for your desktop:
Figure 4

5) After clicking on Save, a file should be downloaded to your Mac. The name of the file should be prcstart.php.jnlp -- if not -- then add the extension .jnlp to filename -- if you see only a file named 'prcstart.php'

 6) If you double click on that file, it should run the virtual PRC (see Figure 3 above).

7) If you get some error message about security blocking the app, then you will need to change the settings in the Java control panel.   This Java control panel can be accessed from Systems Preferences (under Apple icon in menu bar).  Open the Java control panel by clicking on the Java icon in the Systems Preferences panel.  See Figure 1 above.

8) Select “Security” tab from top of panel.   From here you will be able to allow for reduced security and run this java prcstart.php.jnlp file successfully.

Figure 5  

You can add in the IP address for your piano into the Exception Site List edit field.

Figure 6
 

Or, you can change the level of security to medium.  This will still display a security warning before any such files are run, but you can choose to ignore the security message and run anyway. 

Figure 7


 I chose to adjust the Security Level to medium as my IP address changes when I unplug from power or have an outage.  All works fine now with Yosemite System update.

Update notes for El Capitan are in the comments below (click on comments).  Please check second comment for info on correct Java 8 Version that is needed to get Virtual PRC to work with El Capitan System for Mac.  

Wednesday, July 20, 2011

DKVBrowser Hiccup with Lion System

I updated my Mac with the new Lion System today and have experienced a few problems with some of my applications.  My Office programs like Excel, Word and Adobe Acrobat Standard no longer work.  I also had a few hiccups with some of the other applications like FaceTime and Mail.  Both of these are working fine, after installing the latest updates and rebooting my computer after a few forced quits.

I decided that I needed to test out controlling my Yamaha Disklavier Pianos, using DKVBrowser application. I clicked on DKVBrowser and received a message to the effect that I needed to update my java script.  I clicked on the button to start the download and install.  That seemed to work fine, but the DKVBrowser screen came up saying the connection failed.  It could not locate the correct IP address which may have be reset not due to Lion, but to a power outage this morning.  Anyway, entering the DKV###### into the IP Address box was accepted and everything working fine as usual now.

Always great when I can turn on my piano and pick a great song and listen to the music all from my downstairs office.

I have tried twice to run the virtual remote software from Yamaha on my Mac, but am receiving a message and error log. I will check it out and it report on it later.  Need to check my notes to see the procedure.

Thursday, February 03, 2011

Establishing Internet Connection with Disklavier and Airport Express Device

I have decided to post some of my notes on how I established a network connection between my Macintosh and my Disklavier Piano using an Apple Express device with my existing Apple Airport Extreme Base Station that was running my home network.  The actual connection between the piano and the Apple Airport Express device is accomplished by an ethernet cable.  The Apple Airport Express device is setup to participate in my home network and is plugged into a socket near the piano.  The Apple Airport device can also be used to stream my iTunes library through the speakers on the piano, as an extra feature.

What is Needed:
(1)  An Apple Airport Extreme Base Station setup as WIFI Airport Network (WDS  Main Base Station) for your home network.
(2)  Macintosh computer running Mac OS X 10.4.10 or higher
(3)  Airport Utility Software V5.2.1 or higher)
(4)  Apple Airport Express device hooked to Mark IV Disklavier via ethernet cable connected from piano to Apple express device.   Apple Airport Express is then plugged into wall socket near Disklavier or into the AC adaptor underneath the piano.
(5)  Disklavier owners must upgrade their pianos to the most current operating system:  Version 4.0 for Mark IV models which is available through a local Disklavier dealer or by calling Yamaha Piano Service at (800) 854-1569 (ext. 22).

STEP 1:    If you ALREADY HAVE an Airport Extreme Base Station hooked to your computer for your home network, then  GO TO  STEP 2.

Otherwise, hook up Airport Extreme Base Station to your cable modem via ethernet cable and plug into wall socket.  Run Airport Utility  software.   The Airport Extreme icon should appear on the left hand-side of the Airport Utility window.  Select the icon representing the Airport Extreme Base Station.  Select the "continue" button and go thru the assist options to set it up or you can use the "manual  setup" button at left to set it up.  Note:  If device  icon does  not show  up, run  "Rescan" or  you  may  have to  select it under your Airport  icon in  menu bar for it to be recognized.

The  first screen that appears has four tabs across the top:  Summary, Base Station, Wireless, Access Control. 

Review info in  Summary Tab:  Base Station Name, Base Station Status, Version, Serial Number, Airport ID, Ethernet ID and Wireless Mode, Network Name, Wireless Security, Channel, Wireless Clients,  connect using, and IP Address

PLEASE take note of the Airport ID for this Main Base Station as it will be needed when setting up the Airport Express device.  This Airport ID can  also be found on the  Airport Extreme  base station as well.  You will also need the Airport ID for the Airport Express device as well and it can be found in the summary for that item as well or physically on the unit.

Select Base Station  Tab:
Enter a name for the Base Station or leave default name.
Enter a Base Station Password.
Select Remember this password in my keychain.
Left all other  options as default.


To sign up for the radio service, go online at

Select Wireless Tab:
Initially used
Wireless  Mode:  Create a Wireless Network
Network  Name:  Leave same or enter your own  network name
Radio Mode:  802.11n (802.11b/g compatible)
Channel:  Automatic
Wireless Security: None
Wireless Password:  blank
Verify  Password:  blank
Select Access Control Tab
I did NOT change any settings.

At this point I made sure that the main base station Airport Extreme still worked with  my other computers.

STEP 2:  
Plug the Airport Express into a nearby wall socket.
Do NOT attach to the Mark IV Disklavier.  
Run the Airport Utility program.
Select the icon that represents the Airport Express device.
Select Manual Setup button.  

Review the Summary Tab and note the Airport ID  for the Airport Express device as this will be needed  when modifying the settings for the  Apple Extreme  in  the next step (3).

Select Base Station Tab:
Enter a  Base Station  name or leave default if you wish. 
Leave password "public" that is assigned to  this Express device or enter a new one if you like.

Select Wireless Tab
Change the Wireless Mode to "Participate in WDS network". 
You should notice that a new tab labeled WDS then appears above in the row of tabs. 
Wireless Security should be NONE
Do NOT enter passwords
Channel  should be automatic

Select WDS Tab
WDS  Mode:  Select WDS remote.
Enter the Airport ID for the Main Airport Extreme.

Then  select "Update" button.
Your icon should have green indicator as well as the light on the actual physical base station should be green as well.


STEP 3:  Now MODIFY the setup of the Airport Extreme in the following manner to set the Airport Extreme up as a WDS Main by following the steps below.

Select "Manual Setup" button. 

Review the info in Summary Tab.


Select Wireless Tab:
Change the Wireless Mode to "Participate in WDS network". 
You should notice that a new tab labeled WDS then appears along the row of tabs.

Select WDS Tab:
Make sure the  WDS main is selected in the WDS Mode.
Allow wireless clients should be checked.
Select the + button  to add the Airport ID for the Airport Express  device that you  obtained in Step 2.  Enter the Airport ID and a description name.
Then select update.  
If all goes well, you will get a message that this change has been successful. 
Your icon should have green indicator as well as on the light on the actual physical base station should be green  as well.

STEP 4: 
Shutdown your Disklavier. 
Unplug the Express device and move it near your Mark IV disklavier plugging it in a wall  socket (the light should turn green).
Connect the ethernet cable from Mark IV Disklavier to the Airport Express. 
Now reboot or turn on your Mark Disklavier. 
Try connecting to the Disklavier Radio.


Note:   Suggest selecting NONE when  entering  a Wireless Security Password.  
REASON:  I first set this Airport Extreme up to work with  my computers and initially set it up with  recommended WPA password.  But one of my older Mac's could not access the internet or email  using the WPA password security, because it was running an older system software.  So I then changed to WEP password and all the other computers on my network  in house worked fine, but my  main Mac did NOT work correctly with this WEP password, nor did the Express hooked to Disklavier Mark IV.  This is key and when I got up this morning I decided to remove the password and changed that option to "NONE".   There are two passwords that are actually entered when setting up these devices one is password for network and the other is password to change the actual settings.  I still have a password setup for the change of settings options for the  Base Station.  In  other words, it is OK to put in a password for the BASE STATION tab options, but use NONE for the WIRELESS tab Security password.

Tuesday, February 01, 2011

How to Connect to Your Disklavier via Yamaha iPhone Controller App

In an effort to help others who might be having trouble using the new Yamaha iPhone Controller App with their Disklavier, I am posting another HOW TO here.  Hopefully, this will help some who might be having trouble connecting their iPhone app to control their Disklavier piano.

Last night when we returned from dinner, the lights on our Apple Express and Apple Extreme devices were flashing yellow. This was basically an indication that something was awry with the wifi home network and the bridge from this network to our Disklavier piano (possibly caused by a small power outage). After disconnecting these devices from the wall sockets and power, we recycled the modem and devices and eventually they all connected and the lights were green again. However, when this happens this seems to reset the IP Address for the Apple Express device and then our various devices that control the piano do not automatically connect again, unless we set them to the correct IP address so that the piano might be found. In the previous post, I discussed the means to connect to the Disklavier with the Virtual PRC.

Today,  I will discuss how to connect the Disklavier with the Yamaha iPhone Controller app. I was able to connect by the following steps without a problem:

Part I - Steps to connecting using PianoSearch on Yamaha iPhone Controller App.
Run the Yamaha Controller iPhone app from your iPhone.   If it does not connect you will see a spinning with the message 'Connecting'.

Below the spinning you will see the button 'PianoSearch'. Tap on the PianoSearch button. Another screen should appear as illustrated below:


The name and ID for your Disklavier should appear in the box in the middle of the app screen. Tap on this selecting your piano. This should bring up a screen of the last played song and a slider along the bottom that indicates the piano is in 'Standby' and that you need to slide this slider to turn on the piano and to be able to access the play and volume buttons, as well as to be able to change to another album, source and song or playlist.


After sliding the bar across, you can then select a new source, album, song or playlist.  Once the song is selected tap on the center of the screen and you will see the play, volume controls for that song.


You should now be connected to your piano and able to control the piano, as well as access the Yamaha Radio and store from your iPhone.

Part II:  Another Message Appears while trying to Connect your iPhone App to Disklavier
As sometimes happens in our household, my iPhone connects without a hitch and my husband has a problem.  This morning he tried connecting using the steps above with the Yamaha iPhone Controller app but in doing so, received the following messages:

45 seconds after starting the Controller app the following message appeared on his iPhone:
After a minute or so more the 'Message Box' disappeared and instantly reappeared.  After another minute or so, the 'Message Box' went away and everything worked correctly until it needed to reconnect.  It then hung up, when trying to reconnect (as shown below):

Possible Solution:
This morning he illustrated the sequence of events that had ocurred on his iPhone and to no avail he was not able to connect to the piano and the iPhone app seemed to be in an endless loop trying to continually 'Connect'.   He tried deleting the app, reinstalling the app, rebooting the iPhone, rebooting the Disklavier piano and nothing seemed to change the 'connecting' status of the Yamaha Controller app.

In an effort to find a solution, I went into the living room, where the Disklavier piano resides and noticed that the physical PRC (Piano Remote Control) did not have a light on the top of the controller indicating that it was linked to the piano.  Sometimes, this remote seems to unseat itself from the charging cradle.  So I unplugged it from the charging cradle, reseated it into its charging cradle and allowed it time to connect to the piano.   

At that point the Yamaha iPhone Controller app started to respond and a connection was made to the piano, and was working again to control the piano.   I am not sure why this was an important step in the process of connecting the iPhone app on his iPhone to the piano.  It didn't seem to be a problem with my iPhone or my Ipad connecting, but for some reason it seemed to be a factor for his iPhone app to work properly.

Note:  The message box that he was receiving on his iPhone app screen, was indicating that the PRC needs to be uptodate with the latest 4.0 system software.    If you have installed the system 4.0 to your Disklavier and have not also updated the PRC remote in the system update process, this may also be a reason that you cannot connect the Yamaha iPhone app to your piano.

Saturday, January 22, 2011

The Many Avenues to Controlling My Mark IV Disklavier

My Mark IV Disklavier,  a real, concert-quality piano that can also play itself is accessed by a physical Pocket Remote Controller (PRC-100), a wireless remote with dedicated buttons and a full-color LCD touch screen or by the Tablet Remote Controller.  Tablet Remote Controller (TRC-100), a 10.4-inch, portable, color, touch-screen control panel is the ultimate luxury item, the TRC provides song control features, play list management, and portable viewing of Karaoke song file lyrics, all with customizable visual environments and graphics.  Both remote controllers use the 802.11b wireless specification to communicate with the piano from anywhere in the home, whether or not there is any line of sight.

In addition to these physical devices, Yamaha introduced the Virtual PRC interface which allows total control from a networked computer.  The Virtual PRC interface was introduced in one of the latest versions of the system software for the Mark IV.   I use an Apple Airport Express connected via ethernet cable to the underside of the Mark IV to connect the Virtual PRC interface to my Mac home network.

I also use an excellent software package written by Kevin Goroway called dkvBrowser.    This software can be found at dkvBrowser Sourceforge.   DkvBrowser is an application that can be used instead of the PDA (PRC-100) or Tablet or Virtual PRC-100 that is normally supplied with a Yamaha Disklavier Mark IV.   It can be downloaded at sourceforge.net.  There are Mac and PC versions built and ready to run, but it can run on any platform that supports Java and can access the Disklavier either wired or wirelessly.  It is licensed under GNU General Public License and offered as donation ware.  DkvBrowser offers multiple features, too numerous to mention here, but outlined on the sourceforge site.   The biggest features are the ease of transferring midis to your piano via your computer, as well as ease of editing the names of albums and song titles.  


In addition to these physical and virtual devices to control my piano, there is also an app, Yamaha Disklavier Controller App, for iPhone, iPod Touch, iPad in the Apple App Store.


I have discussed many of the attributes of the Yamaha Disklavier Controller app and its operation on previous blogs.  I assisted Kevin Goroway in testing his software dkvBrowser with my Mac and Mark IV, as well as documenting his software and providing a downloadable manual in PDF form on the dkvBrowser Sourceforge site.   Yamaha has provided documentation for the Virtual PRC, PRC-100 and Tablet Controller on their site.   There are also two forums online that provide answers and discussions at the dkvBrowser Yahoo Group and Disklavier Yahoo Group forums.  If you own one of the Disklavier pianos, you will find it worthwhile to join these groups and participate with the members who add to discussions and help others with questions.  I will continue to post blogs on occasion, to offer detailed solutions or comments on the Disklavier and its many devices as related to Mac computers and apps.


UPDATE 2/19/2021:  The DKVBrowser discussion groups are now being conducted at Google Groups.  You can search by "DKVBrowser" to find a place to join for current information. 

The DKVBrowser software written by Kevin Goroway has been revised to meet the needs of users for their Disklavier Mark IV pianos recently.  The software had not worked on my latest Mac laptops due to system updates that were not supported by DKVBrowser.  The software had recently not worked on the latest Windows computers due to changes in system and other updates.  At some point the underlying architecture of DKVBrowser (Eclipse RCP) became unsupported/incompatible.

A new version is currently being tested by members who are part of the Google Group who post info about DKVBrowser and Disklavier.   

I was successful in loading the new DKVBrowser 3.0.2 onto a Mac laptop running High Sierra and one running Catalina.  I have been testing the Mac version of this software and find that it is running successfully for most functions.  It is nice to have the DKVBrowser to run playlists, play tunes at scheduled times and to have all the easy editing techniques and features that Kevin has shared with us.  I certainly hope many will consider the Donate button to show appreciation for his generosity and talents in keeping a means to play our beloved Disklavier Mark IV.


Sunday, January 16, 2011

Testing Stealth Mode for Wifi Network on Mac

Note: A solution for my vunerable wifi network connected to Disklavier piano without password protection.

Sometimes it is necessary to have an insecure wifi network to connect to other devices in your home. This leaves your network for your computers vunerable for others to use as a free wifi hotspot in your neighborhood. I have been testing the 'stealth mode' option available on my Mac as a means to run my wifi network, but make it 'invisible' to others nearby.

It seems to be working. My wifi network is NOT showing up as an option on my iPhone or iPad. However, I am able to connect to this so called invisible or stealth network as I know the exact name that I have assigned to that network. I merely go into the system preferences on my iPhone or iPad and select wifi network and 'Other' and type in the exact name of the network to connect.

Here are the steps to setting up or creating a closed network:

To set up your wifi network on your Mac to 'invisible' or stealth mode it is necessary to run the application called 'Airport Utility'.

Select the network from the left hand column that you wish to put into stealth mode or to make invisible to others. Select 'Manual Setup'.


Select the 'Wireless' tab and click on 'Wireless Network Options'


A dialog box will appear, click on 'Create a closed network' and 'Done'


Select 'Update' to save changes.

At this point I also rebooted my Mac to make sure that all the changes took effect, not sure if that was necessary. When I checked my iPhone and iPad the network was NOT visible. I selected Other and typed in the exact name and was able to connect without a problem.

Next notify the members of your family that you have made some changes to the network, so that they don't panic when they are unable to connect via wifi using their iphones, ipads and computers in your home.

Wednesday, November 24, 2010

musicalTouch - Airplay Connection from my iPad to Speakers in Disklavier


I've been exploring the Airplay feature in the iOS 4.2 update for Apple mobile devices. Yesterday I streamed music I played on the virtual keyboard in an app called musicalTouch.

musicalTouch provides 5 instrumental voices for the user to play on the virtual keyboard: piano, guitar, organ, syntheszer and electronic Bass. I must say the quality of the audio samples used for these 5 voices are amazing. There are also 10 unique drum loops of varying types: Pop, R&B, R&B2, Rap, Rap2, Dance, House, Techno, Rock, and Jazz, that allowed me to have a drum accompaniment as I played.

Some of the other features that are implemented in this app include the ability to overlay the key notes on the keys to facilitate learning and teaching tunes. But the best feature, was the newly implemented ability to be able to multitask and utilize Airplay. I was amazed at the ability to record and play my newly created tune remotely through the speakers on my Disklavier piano in the living room upstairs. The quality of the piano audio sample voice was so good, that it sounded like the piano was actually being played rather than just coming through the speakers.

Check this app out at: http://www.chriskhoury.com/home/applications/applications.html

Chris Khoury has an interesting app that might be of interest to some of you budding musicians out there. Now if only this app could somehow implement the midi functions and send those to my Disklavier and really play those keys.

Wednesday, March 10, 2010

Shortcut for Playing Happy Birthday on My Disklavier

The new Yamaha Disklavier System Software version 4.0 for the Mark IV, has a new feature called 'ShortCut'.  Being the techie lady that I am, and not able to find any documentation online on the Yamaha site for this new updated piano system software, I decided to use the exploration method of learning that my kids had experienced in school.  When I was in school, we had the 1, 2, 3 ... lists on how to do most tasks.  Exploration does add a bit of fun and probably spurs my curiosity more.

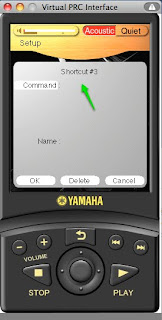
The 'Shortcut' option can be programmed using  your Virtual PRC (installed on your computer  using wifi connection) or on the hand-held PRC remote that came with your piano. To find this new feature, click on the main screen of your PRC (or virtual PRC) until you see the following screen, displaying the 'Setup' button.

Click on the 'Setup' button, and using the prev and next buttons, page through until you see the new 'Shortcut' button.
The Shortcut scrollable list will be displayed with 10 lines to add shortcuts.  If using the PRC (or Virtual PRC) you can tap the area next to the number 1 list item or use the center button to depress (enter) to make the selection to enter your first shortcut.
The 'Shortcut #1' screen will be displayed, and you can click on the area next each of the options displayed: Command.   The area appears to be empty, but you can select sub options by using the arrow keys on your keyboard or the small direction buttons around the center control button on the PRC (or Virtual PRC).   As you cycle through you will see various options such as Power, Play, Repeat, Random, Radio, Balance, Quiet.   Selecting some of these options will subsequently display other sub options that can be selected and cycled through such as Medium, Album, Song (for Play or Repeat Option),  Medium, Album (for Random Option), Channel (for Radio Option), Resource, Direction (for Balance).
I cycled through all the options and sub options using the arrow keys and enter key to select my 'User Library', 'Special Occasion Album' and  'Happy Birthday' song.


The PRC automatically fills in an appropriate Name for the Shortcut, but an editing box also appears allowing the user to edit the Shortcut Name.  Clicking OK places the name for the Shortcut Name. 

You can add in ten Shortcuts and then these Shortcuts, can be accessed from the iPhone app (i.e, Disklavier Controller app available free from iTunes App Store), under the 'More', 'Shortcut' buttons on your iPhone. 

So now if I have a friend that is over for their birthday, I can whip out my iPhone and go to the Shortcut screen in the Disklavier Controller App and click on my shortcut and the piano should play 'Happy Birthday'.