Thursday, December 15, 2011

Creating a Panoramic Photo from Multiple Photos using Photo Elements

While on my voyage I was fortunate to take five 2 hour workshops from Raul Touzon, a National Geographic photographer.  As I am new to photo taking, I found his workshops and explanations invaluable and easy to follow.

One of his suggestions was to create panoramic photos of the areas that you visit.  This gives you a more realistic photo of the actual place you visit.  Anyone can take a photo of a palm tree, and that palm tree could be from numerous places around the globe.  But if you take a series of frames of the landscape and then use 'stitching' software to automatically create the panorama of the area you are visiting you will truly have a unique picture of that place. 

I was not sure if I had the skills to try this while in Madagascar and Seychelles and since we have landed in Maputo, Mozambique just a short while ago, I decided to take a photo of the view of the harbor from my deck.   I took the center frame as I normally would do to get the harbor photo.  Then it occurred to me that I should take multiple frames and try out the technique that Raul had presented and encouraged us to try.   So I proceeded to take frames to the right of the first center frame and then to the left.  I secretly wondered if this stitching software would handle my non-sequenced photos.

I then opened up Photo Elements and tried to find the option for creating a panoramic.  This option is not so obvious, so I typed in "panorama" in the help box under the help menu and the help directed me to the option.   The option is under the File>New menu option:


Under that menu was the Option "Photomerge Panorama ...   I then selected the six or seven frames I had taken and used those to create the first panoramic type in the list of types of panoramas.  It worked!  My first panorama of the harbor and dock area of Maputo, Mozambique is certainly not as glamorous as the beautiful beaches and scenes we experienced in the Seychelles and Madagascar, but it provided a new incentive for me to give this option more consideration on my upcoming journey within Africa.  Thanks to Raul, I will be extending my horizons and exploring more options in photography.  


Wednesday, December 14, 2011

Duplicating Your Original Photos from iPhoto

Most people who have a Mac automatically drag and drop there photos into iPhoto or have chosen to auto import any photos from their SD cards and cameras directly into the iPhoto application. 

If you wish to keep a copy of the originals of your photos and import into other editing or photo management software, then it is best to just make a folder on your hard drive and copy the photos into that folder directly from your camera or photo memory card.   To disable the the auto-import option  in iPhoto,  select the Preferences under the iPhoto menubar.  Then select the General tab and click on "no application" in the pop-up options for camera connection opening.


In most cases when people decide later to use other software for editing and managing their photos, they wish to retrieve all their original photos from iPhoto in an efficient and easy manner.  iPhoto does store the originals in your iPhoto library which is located on your hard drive.  These photos are usually arranged in many folders nested in many other folders that are arranged by corresponding dates for these photos.  Trying to duplicate these files and organize them into another folder for using is often cumbersome and confusing and is not obvious to the user where these files are located in the numerous folders on their Mac.

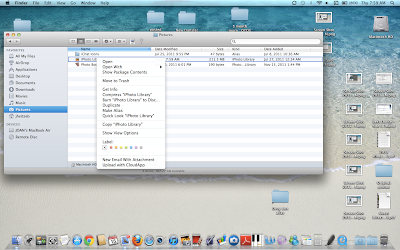
If using iPhoto 11 one can find these original folders located in a folder called Masters.  (Note: early versions of iPhoto have a similar folder, possibly named Originals).  You can select the Pictures folder in the finder for your username and then control click to reveal package contents.  Searching through this hierarchy of folders reveals multiples of folders and files within these folders.  Very confusing indeed!


For the latest iPhoto app it is probably easier to just run iPhoto, select all your photos and then use the export option to export all your folders to a new folder on your hard drive.  To insure that you will be getting the original photo, be sure to select Maximum quality, Full Size, and original names.  This will export all your photos to a new folder, thus duplicating your original photos.  This of course means that you will have to resort them into various folders.  Or you can select each album that is already sorted in some manner in iPhoto and export photos from each album into their own new folders on your hard drive desktop or where ever you have chosen to store them.


Remember it is best to keep an original folder of all your photos as an archive, working with a duplicate of your files is always wise.  That way if your photo editing goes awry, you will have an original file that you can use to edit again.