A few days ago, I needed to upload a pdf file to a Yahoo group forum which was over 5MB in size. I wasn't able to upload due to the size of the pdf file. So I split the file into two parts, posting each one separately on the site.
I received a kind email from forum member who had used Adobe Pro to reduce the size of the original file from 5 MB to 2.5MB. I had not realized that this was offered as a feature in the Adobe software. I have Adobe Standard Edition for the Mac and decided to try this clever tip. It worked ... in the 'File' menu was the 'Reduce File Size' option. I was then able to repost the pdf file in one part to the forum.
Tweet
I am a retired high tech lady, who loves her Macintosh computers, iPhone, iPad and gadgets. I have developed this blog to provide my experiences, tips and findings about these items.
Friday, November 20, 2009
Tuesday, November 17, 2009
Sending yourself a direct message using Twitter
You can send yourself a direct message using Twitter. Type the letter, d and then space and then your username and the message. (d + username + message). You can send direct message from your iPhone or computer or 3rd party apps.
Example: d Granny_Joan This is a direct message to myself.
If your message is longer than 140 characters and Twitter receives it intact, your message will be sent in two parts. But, beware: if your service provider breaks up long messages into two parts before sending the message to Twitter, Twitter will only see the d+username attached to the first message! The second part will post to the public time line as a regular update because it doesn't have the d+username preceding it.
People who have their direct message text and email notifications set to ON will receive direct messages on their phones and/or via email. Tweets sent using any of the methods described above are not public: only author and recipient can view direct messages.
Using the direct message to yourself, you can post the URL for me.com privately to yourself and access that URL from your direct messages to help locate your iPhone using the method described in previous blog post. Tweet
Categories:
Trick or Tip
Monday, November 16, 2009
Accessing MobileMe from iPhone
I was surfing the internet today and noticed a tweet referring to accessing MobileMe account via iPhone. Normally if one tries to do so, via Safari browser, this doesn't work.
Someone suggested using a link from a twitter app on your iPhone. So I tried it on two twitter applications: Tweetdeck and Tweetero and it worked with both apps.
First log onto your twitter account using an iPhone app and send yourself a tweet with the link to mobileme.com URL. (http://me.com/)
Click on the link in the twitter app.
Tweet
Someone suggested using a link from a twitter app on your iPhone. So I tried it on two twitter applications: Tweetdeck and Tweetero and it worked with both apps.
First log onto your twitter account using an iPhone app and send yourself a tweet with the link to mobileme.com URL. (http://me.com/)
Click on the link in the twitter app.
If your twitter app has a built in web browser, it should attempt to connect with the mobileme URL. Normally a warning page would appear, stating it best to use Safari or Firefox browser. Ignore this warning and click on 'Continue' button.
The MobileMe Login window should then appear and you should enter your username and password for your MobileMe account and click on 'Login' button.
Next you will be logged into your MobileMe account and able to access mail, calendar, etc.
You may find this a bit slower than using the apps already built into the iPhone, but the real key here is being able to use the 'FindMe' service via your friend's iPhone when you lose it out and about. You will be able to log into your MobileMe account to use the 'FindMe' service without having to be on a computer.
Tweet
Categories:
Trick or Tip
Thursday, November 12, 2009
Holiday Mailouts - Using Address Book to Print Labels
As Thanksgiving approaches, I am reminded of my cousin who methodically addresses Christmas cards and sends them out during this holiday. Every year without fail, I receive a card from my dear cousin first. I was thinking today, that for some of us, the printing of labels is a major task. So I decided to blog about the ability of the Address Book application on the Macintosh. Did you know that hidden within the print feature of Address Book is the ability to print labels?
If you have most of your contacts, family and friends in your address book, you can use the 'group' feature to put them into a 'Holiday List'. Once this has been done, which is fairly easy to accomplish by merely, selecting 'New Group' from the 'File' menubar options and giving it a name say, 'Holiday List'. Then select 'All Contacts' and drag and drop each that you wish to include in this Holiday List into the group icon in the left hand column.
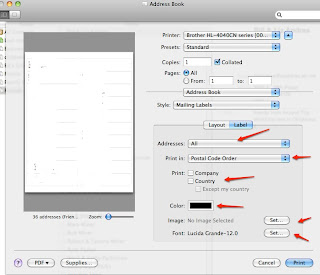
Once you have all your contacts listed within the 'Holiday List' group, then select this group and then using the 'Print' option from the 'File' menubar or the command P key shortcut, to bring up the print dialog box. The print dialog box may default to a window similar to the one below:
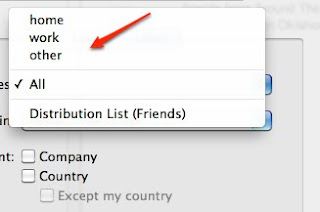
To the right of your printer name, you will see a down arrow, click on this arrow to bring up more options, similar to below and click on the pop-down 'address book' and select 'printer settings'. Then click on 'media type' options to select 'label'.

Tweet
If you have most of your contacts, family and friends in your address book, you can use the 'group' feature to put them into a 'Holiday List'. Once this has been done, which is fairly easy to accomplish by merely, selecting 'New Group' from the 'File' menubar options and giving it a name say, 'Holiday List'. Then select 'All Contacts' and drag and drop each that you wish to include in this Holiday List into the group icon in the left hand column.
Once you have all your contacts listed within the 'Holiday List' group, then select this group and then using the 'Print' option from the 'File' menubar or the command P key shortcut, to bring up the print dialog box. The print dialog box may default to a window similar to the one below:
To the right of your printer name, you will see a down arrow, click on this arrow to bring up more options, similar to below and click on the pop-down 'address book' and select 'printer settings'. Then click on 'media type' options to select 'label'.
As you explore the many options, you will see pop-down menus that allow you to select the order of printing the labels (postal code or alphabetical), whether to print home/work/or other address, whether to include an image, set a color or font.


Then click on the 'Layout' tab and choose a label type from the 'Page' pop down menu. To set the page margins and gutter space between labels, and how many labels to print on a page, choose 'Define Custom'.
You can then preview the page of addresses using the 'pdf' pop down option to view in preview first.
As the holidays approach I am wondering will I get the cards and well wishes out on time or will I be sending out Valentine wishes instead? Let me be the first to wish everyone a very Happy Holiday season and Happy New Year!
Note: Whitepages.com offers a new holiday list manager and label printer. If you wish to search for an address or cross-check current listings from whitepages.com online, this would be a great way to fill in the missing addresses and contact information. If you have not built a contact list in address book, using whitepages to find the info and create a list and print the list is another great solution!
Categories:
Holiday,
Trick or Tip
Wednesday, November 11, 2009
Editing Background for Twitter
Occasionally I like to change the background on my Twitter page. I decided today to change the photo to a picture we took in Southern Idaho during Fall 2003 of the lovely display of 'fall colors' along the side of the road.
It is best to use a jpeg file format of less than 800K in size. You may also use Gif or Png formats as well. Select 'Settings' from your profile or home page.
Next select, 'Design' from the menu options that appear along the Settings tab bar.
It is best to use a jpeg file format of less than 800K in size. You may also use Gif or Png formats as well. Select 'Settings' from your profile or home page.
Next select, 'Design' from the menu options that appear along the Settings tab bar.
Select 'Change Background Image' below the standard themes.
Then select from the window the option to 'Choose file', select the jpg file that you wish to use from the selection window. Make sure you also click on the 'Save' button.
A message sttating that your custom design has been saved should appear at the top of the browser window. The photo should appear as a background. I had a small amount of trouble having my selected photo appear and am not sure what the actual problem was. I suspected the Twitter server was bogged down at the time I was loading in the photo.
I had tried using Firefox Browser and then decided to use Safari. The problem persisted and I was not able to see the photo as a background. I decided to try one last thing. I went from my Twitter home page to the settings, selected design again and this time clicked on the blue background square and save changes button without reloading the photo and it appeared. Not sure which or if anything I did caused the photo to appear as a background or if Twitter servers became agreeable to display the image with the passage of time.
Tweet
Categories:
Trick or Tip
Tuesday, November 03, 2009
How to Convert Docs to Read with Stanza on iPhone
Often I store documents on Google Docs that I share with family and friends. These documents are often itineraries, maps, brochures or info on trips and countries that I visit. Google Docs is a great place to share info with others, even allowing them to edit a shared document such as a spreadsheet, but these documents are often only available via wifi connection and can be expensive to access using 3GS/Edge or WIFI from my iPhone while traveling in foreign countries.
Today I was reading a forum post that suggested a program Calibre eBook and conversion App for iPhone. Calibre is free, open source and cross-platform in design and works well on Linux, OS X and Windows e-library solution. It features library management, format conversion, news feeds to ebook conversion, as well as e-book reader sync features and an integrated e-book viewer.
Basically, one can take a pdf file and convert it to a epub format that Stanza (an ebook reader app ) can access on an iPhone. I selected a pdf file of maps of Cabo that I downloaded from my Google Docs to my hard drive. I ran the Calibre application from my Macintosh, and selected 'Add Books' from the upper left hand icon bar. I then selected the pdf file from the selection popup window.
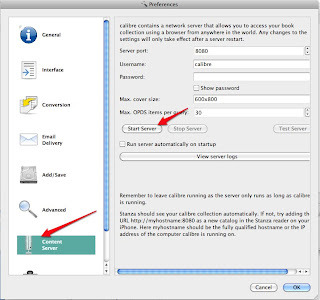
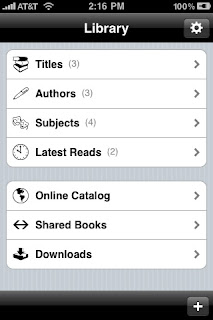
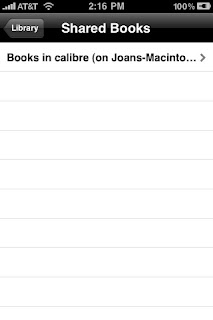
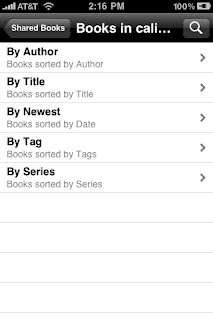
I then selected the 'Preferences' under the Calibre menubar. From the left handside I selected 'Content Server' and then from the right handside of window, I selected 'Start Server'. I also ran Stanza app on my iPhone and selected 'Share Books'. Under the 'Shared Books', I saw the label for my books located on my Macintosh. Selecting this revealed the options of selecting the books located in the folder on my Mac by either title, author, newest, tag or series.
I selected the newly converted document and then opted to download to my iPhone. This will allow me to have books stored on my iPhone to read during trips without having access to WIFI or Edge/3GS networks. Tweet
Today I was reading a forum post that suggested a program Calibre eBook and conversion App for iPhone. Calibre is free, open source and cross-platform in design and works well on Linux, OS X and Windows e-library solution. It features library management, format conversion, news feeds to ebook conversion, as well as e-book reader sync features and an integrated e-book viewer.
Basically, one can take a pdf file and convert it to a epub format that Stanza (an ebook reader app ) can access on an iPhone. I selected a pdf file of maps of Cabo that I downloaded from my Google Docs to my hard drive. I ran the Calibre application from my Macintosh, and selected 'Add Books' from the upper left hand icon bar. I then selected the pdf file from the selection popup window.
The pdf file then appeared listed in the lower window of Calibre. I then selected the uploaded document and then selected 'Convert E-Book'. I then saved it to disk in the userlibrary on my harddrive.
I then selected the 'Preferences' under the Calibre menubar. From the left handside I selected 'Content Server' and then from the right handside of window, I selected 'Start Server'. I also ran Stanza app on my iPhone and selected 'Share Books'. Under the 'Shared Books', I saw the label for my books located on my Macintosh. Selecting this revealed the options of selecting the books located in the folder on my Mac by either title, author, newest, tag or series.


I selected the newly converted document and then opted to download to my iPhone. This will allow me to have books stored on my iPhone to read during trips without having access to WIFI or Edge/3GS networks. Tweet
Categories:
Apps,
Trick or Tip
Monday, November 02, 2009
Back from Tahiti - Tips for Traveling with iPhone
I just returned from a two week cruise around French Polynesia. Basically it looks like paradise, colorful people, lovely scenery, and the bluest water in the world. In fact, it is probably one of the most beautiful places to visit, however, it is very HOT and HUMID. I found that it was amazing that I could sweat while walking in the rain. I would also say that it has some amazing snorkeling and diving opportunities around the lesser populated atolls. I even saw a shark!
I had the foresight to download some excellent podcasts to listen to in the cabin of the cruise ship (which does not have TV). My husband and I enjoyed listening to these podcasts from the iPhone and it was very much like having talk radio available to us. One of the great things about traveling with an iPhone is that you can preload 'podcasts' from your favorite RSS subscriptions or online bloggers.
Originally I was a little frightened by the acronym 'RSS' ... imagining a great technological knowledge was needed to subscribe to a podcast. But, it sounds complicated and tricky, but actually pretty seamless to use if you are capturing the podcast in iTunes. Apple has made that category in iTunes fairly easy to setup. Normally, one would click on a subscription link or RSS feed link for audio podcast using a browser and these podcasts would appear within the podcast category of iTunes. ITunes also keeps track of the different podcasts that you subscribe to, in an organized manner with episodes, time, release date, description and artist ... ITunes also uses an indicator (circle) to designate whether you have listened to a podcast in entirety or partially.
There are many interesting podcasts on the internet and also via the Apple iTunes store. Some popular ones might talk about technology, travel, or even be a course on learning languages. I find that downloading language podcasts to iTunes to use while traveling to foreign countries an excellent way to learn a few phrases for my trips.
Once the podcasts are located in iTunes, you can hook up your iPhone and use the 'Podcasts' tab to select podcasts to store on your iPhone. You can also selectively choose the number of episodes from a podcast or select only ones you wish to download to the iPhone. If you download these prior to arriving in a foreign country, you will have access to them from your iPhone while in 'Airplane Mode'. You will not need to download while on the trip and have WIFI connection.
One other tip, when you are in another part of the world, it is easy to use the clock on the iPhone to set the correct 'world time zone' (general setting ... date and time option). We found the ability to not only listen to music, play game apps and take video/photos with the camera, but also use the alarm clock app, a great asset ... all in one small and useful device.
Tweet
I had the foresight to download some excellent podcasts to listen to in the cabin of the cruise ship (which does not have TV). My husband and I enjoyed listening to these podcasts from the iPhone and it was very much like having talk radio available to us. One of the great things about traveling with an iPhone is that you can preload 'podcasts' from your favorite RSS subscriptions or online bloggers.
Originally I was a little frightened by the acronym 'RSS' ... imagining a great technological knowledge was needed to subscribe to a podcast. But, it sounds complicated and tricky, but actually pretty seamless to use if you are capturing the podcast in iTunes. Apple has made that category in iTunes fairly easy to setup. Normally, one would click on a subscription link or RSS feed link for audio podcast using a browser and these podcasts would appear within the podcast category of iTunes. ITunes also keeps track of the different podcasts that you subscribe to, in an organized manner with episodes, time, release date, description and artist ... ITunes also uses an indicator (circle) to designate whether you have listened to a podcast in entirety or partially.
There are many interesting podcasts on the internet and also via the Apple iTunes store. Some popular ones might talk about technology, travel, or even be a course on learning languages. I find that downloading language podcasts to iTunes to use while traveling to foreign countries an excellent way to learn a few phrases for my trips.
Once the podcasts are located in iTunes, you can hook up your iPhone and use the 'Podcasts' tab to select podcasts to store on your iPhone. You can also selectively choose the number of episodes from a podcast or select only ones you wish to download to the iPhone. If you download these prior to arriving in a foreign country, you will have access to them from your iPhone while in 'Airplane Mode'. You will not need to download while on the trip and have WIFI connection.
Categories:
Holiday,
Travel,
Trick or Tip
Subscribe to:
Comments (Atom)


