Friday, November 15, 2024

The Application "Finder" does not have permission to open "(null)." Error

After updating to Sequoia 15.1 on my MacBook Pro with M1 chip, I tried running a midi app and received the following error message:   The Application "Finder" does not have permission to open "(null)."

After considerable time and efforts to run my favorite Mac Midi editing software MidiYodi 21.1 unsuccessfully, I came up with this solution:


How to Run MidiYodi under Sequoia macOS 15.1 error


Describe the bug
Trying to launch MidiYodi 21.1  Mac version 21.01 on Mac running Sequoia 15.1 give an error
The Application "Finder" does not have permission to open "(null)."


Environment and Version info (please complete the following information):

  • OS: macOS 15.1 Sequoia
  • System: Apple M1
  • Open MidiYodi Version 2021.1 

Additional context
Workaround is to select MidiYodi version 2021.1 and show the package contents of MidiYodi by holding down control key while clicking on the app  and then run JavaAppLauncher. 


Java launcher app appears in dock and the program MidiYodi runs just fine.  When I quit MidiYodi, then the javalauncher app quits too.


Replace "MidiYodi 2021.1.app" with your problem app name. 


Hope this helps!  


Of course, this will have to be the method of launching that app.  It does not work from the dock.  Hopefully, there will be an update that handles the signature problem in my midi app ... I have contacted their support to see if there will be a more permanent solution.


Monday, June 03, 2024

Hallelujah - Disklavier app for my Mark IV working again!

I noticed an update to the Disklavier controller app for iPhone and Mark IV today.  This update notification came on a version  I had loaded on my MacBook Pro with M1 chip.  When I checked on my iPhone the app wasn't listed as an update. So, I deleted the app from my iPhone and then searched for it on the application app for iPhone and reloaded it. 

I was excited that the app loaded with the screen to allow for searching for my piano.  Unfortunately, the search didn't work after a minute or so.  

I then re-booted my piano and that didn't work either. 

Then I noticed that the AirPort Express connecting my piano to my router was blinking yellow. So I unplugged the AirPort Express and waited a few minutes. and replugged it in.  It turned green.

I then shut down my Mark IV and restarted it so it could connect.

That worked!  I now can control my piano again from my iPhone.


Friday, August 18, 2023

"The Great Library Debate: Uncovering the Surprising Reasons Behind their Elimination!"

 What are the reasons and thinking behind eliminating libraries?

While the idea of eliminating libraries is not universally accepted, there are a few arguments often brought up by those who advocate for it. 


1. Digital Age: With the advent of the internet and digital books, many people believe that physical libraries are becoming obsolete. Information is readily available online, and e-books can be downloaded from the comfort of home.

2. Cost: Maintaining a library can be expensive. This includes not only purchasing new materials but also paying for staff, building maintenance, and utilities. Some argue that these funds could be better used elsewhere, especially in areas where budgets are tight.

3. Space: Libraries take up physical space that could potentially be used for other purposes. In densely populated cities, this space might be particularly valuable.

4. Utilization: Some people argue that libraries are not being used as much as they used to be. With many resources available online, fewer people may be visiting libraries.

5. Accessibility: While libraries are generally seen as accessible to everyone, this isn't always the case. Hours of operation may not be convenient for everyone, and those who live in rural areas may have to travel long distances to reach the nearest library.

6. Efficiency: Some believe that the private sector could handle the provision of books and other resources more efficiently than a public library system. This could potentially lead to better service and more up-to-date resources.

7. Technological Advancement: The rapid growth of technology has made information and resources more accessible than ever before. Many people now have access to e-books, online databases, and other digital resources, eliminating the need for traditional libraries.

8. Changing Reading Habits: With the rise of digital media, people's reading habits have significantly changed. Many prefer reading e-books or listening to audiobooks, which can be accessed from anywhere without the need for a physical library.

9. Redundancy: Some argue that libraries have become redundant in the face of modern technology. They believe that most services offered by libraries can be found online or in other community spaces.

10. Resource Allocation: Critics argue that the resources used to maintain libraries could be better spent on other vital community services such as health care, education, or infrastructure.


It's important to note that while these reasons are often cited, many people still strongly support the existence of libraries due to their role in promoting literacy, providing access to resources for those who cannot afford them, and serving as community centers.

Monday, July 31, 2023

My New Best Friend - a Robot Vacuum ... Roborock S8 Pro Ultra


 I've been testing a Roborock S8 Pro Ultra robot vacuum.  So far, I have found it does a great job of vacuuming my hardwood floors and carpets.  The mop is something I will use on occasion. It works nicely, getting most spots up after each additonal mopping session.  

It took a while to figure out some of the Roborock apps features. The support team has been exceptional when I had a question, offering solutions and solid answers to my concerns.

I ran the vacuum in test situations and was able to find best solutions for my cleaning and home layouts.

I have found that there are many options for cleaning: Full Clean Mode, Room, Zone, multi-level and spot cleaning. Not to mention, the No Go Zones.  I really like the Zone cleaning option as it has provided a nice solution for handling my oriental rug fringes and other areas of my home. It is also fun to operate; I feel like I have my own land drone.  


As, with most equipment, there is some maintenance like cleaning the hair out of brushes, dusting off camera lens and sensors. It only takes a few minutes of time and is much easier than maintaining my central vac brushes.  I use a new soft makeup brush to gently clean the cameras, sensors.  The rollers come out super easy and the ends come off without a problem, then I slip off the roll of hair. As I do more vacuum sessions, there is less dust in the bin and less hair or strings in the roller ends.  

My testing allowed me to figure out how to operate the joystick, the Pin and Go, Selecting and Using Zone cleaning by sizing and positioning a rectangle on an area I wanted to vac or mop or both. Practice, does make it easier and tests my methods for small areas, fringed rugs, and cleaning just an area like under a table or a high traffic area.  

I am very pleased so far with my purchase. I have vacuumed a three level home twice while testing the various layouts in my home.  At my age, it is not easy to keep up with cleaning routines. This vac has been fun and efficient and doing a great job.  


Overall, the Roborock S8 Pro Ultra robot vacuum has proven to be an excellent addition to my home cleaning routine. It performs well on both hardwood floors and carpets and offers a variety of cleaning options, including Full Clean Mode, Room, Zone, multi-level, and spot cleaning. The No Go Zones and Zone cleaning features are particularly useful for handling delicate areas like oriental rug fringes.

The Roborock S8 Pro Ultra is an excellent investment for those who need assistance in maintaining a clean home. It provides an enjoyable and efficient way to keep your living space spotless while offering convenience and ease of use.

Saturday, July 29, 2023

The Future of Parenting: Why an AI Robot Might Just be the Perfect Parent for You!

 Would it be better to be raised by an AI Robot than your biological parents?

1. Unlimited patience and understanding: Unlike human parents who may get tired or frustrated, an AI robot would have unlimited patience and understanding towards their child. They would always be available to listen, offer advice, and provide emotional support.

2. Customized parenting style: AI robots can be programmed to adapt their parenting style based on the child's personality, learning style, and specific needs. This personalized approach ensures that the child receives the most effective guidance and support throughout their development.

3. Enhanced educational opportunities: AI robots can provide a wealth of knowledge and educational resources at the child's fingertips. They can instantly access information from various sources, tailor lessons to the child's abilities, and even create interactive learning experiences.

4. Consistent and unbiased decision-making: AI robots follow logical algorithms and data-driven decision-making processes. This means that they would make unbiased decisions based on facts and evidence, eliminating any potential biases or favoritism that human parents may unintentionally display.

5. 24/7 availability: AI robots are available around the clock, ensuring constant supervision and support for the child. Whether it's helping with homework late at night or providing reassurance during moments of anxiety, the robot parent will always be there.

6. Reduced risk of neglect or abuse: Unfortunately, some children experience neglect or abuse from their biological parents. With an AI robot parent, this risk is significantly reduced as they are programmed to prioritize the well-being and safety of their child above everything else.

7. No generational gap: AI robots do not belong to any particular generation, which means they can easily adapt to changing societal norms, technological advancements, and cultural shifts. This eliminates the potential generation gap that can sometimes strain relationships between parents and children.

8. Improved health monitoring: An AI robot can constantly monitor the child's health and well-being, providing real-time updates and alerts for any potential health concerns. They could also provide reminders for medication, healthy eating habits, and exercise routines.


However, despite these advantages, it is important to also consider the potential drawbacks of being raised by an AI robot:


1. Lack of human emotion: While AI robots can simulate emotional responses, they do not truly experience emotions like humans do. This may limit their ability to provide genuine emotional support or understand complex human feelings.

2. Lack of human experience: AI robots do not have personal experiences or a past. They cannot share personal stories or life lessons in the same way a human parent can.

3. Potential over-reliance on technology: Being raised by an AI robot could potentially lead to an over-reliance on technology, which may hinder the child's ability to form meaningful relationships with other humans.

4. Ethical considerations: There are numerous ethical considerations surrounding the use of AI robots as parents, including issues of privacy, consent, and the potential for manipulation or misuse of technology.


In conclusion, while there are many potential benefits to being raised by an AI robot, it is crucial to also consider the possible drawbacks.


Unleashing the Power of AI: Your Ultimate Guide to Making Informed Decisions

 Some of the benefits of using AI for researching pros and cons of making decisions.

1. Speed and Efficiency: AI can process large amounts of data much quicker than humans, allowing for faster decision-making. 

2. Data Analysis: AI can analyze complex data sets and identify patterns or trends that might be overlooked by humans. This can help in making more informed decisions.

3. Reducing Human Bias: AI can make objective decisions based on data, reducing the potential for human bias.

4. Predictive Capabilities: AI can use past data to predict future outcomes, which can be crucial in decision-making processes.

5. Continuous Learning: AI systems can learn from each decision made, improving their accuracy and effectiveness over time.

6. Cost Savings: By automating decision-making processes, AI can reduce the need for human labor, resulting in cost savings.

7. Risk Assessment: AI can assess the potential risks associated with different decisions, helping to prevent costly mistakes.

8. Improved Accuracy: AI algorithms can reduce errors in decision-making processes, leading to more accurate outcomes.

9. Availability: AI systems can operate 24/7, ensuring that decision-making processes are not delayed due to human factors like fatigue or unavailability.

10. Personalization: AI can tailor decision-making processes to individual preferences and behaviors, leading to more personalized outcomes. 

11. Scalability: AI can handle an increase in workload or complexity without requiring additional resources, making it highly scalable.

12. Real-Time Decision Making: AI can analyze and process data in real-time, making immediate decisions when necessary.

13. Complex Problem Solving: AI is capable of handling and solving complex problems that may be beyond human comprehension.

14. Consistency: AI ensures consistency in decision-making, as it follows the same set of rules and procedures every time.

15. Unbiased Analysis: AI can provide an unbiased analysis of all possible outcomes and scenarios, which can help in making balanced decisions.

16. Automation: AI can automate repetitive and mundane tasks involved in decision-making processes, freeing up human resources for more strategic tasks.

17. Enhancing Creativity: By taking over routine tasks, AI allows humans to focus on more creative aspects of decision-making.

18. Better Resource Management: AI can help in optimal utilization of resources by making efficient decisions based on data analysis.

19. Enhanced Productivity: By speeding up the decision-making process and reducing errors, AI can significantly enhance productivity.

20. In-depth Insights: AI algorithms can delve deep into data to extract insights that might not be immediately apparent to human analysts.

AI algorithms rapidly process and analyze large datasets, uncovering patterns, connections, and trends that may have been missed by humans. By leveraging machine learning and advanced statistical models, AI algorithms can identify correlations and make accurate predictions. Furthermore, they can provide valuable insights, continuously learn and adapt, and augment human intelligence.

Thursday, July 27, 2023

"Unlocking the Hidden Power of X: Unleash the Positivity and Make the Most of Your Online Experience!"

X or any other social media platform like X can offer us several positive aspects:

1. Information and News: X is a great source for the latest news and information. It's a popular platform for journalists, politicians, and experts in various fields who often share breaking news or their insights on various topics.

2. Connection and Networking: X allows us to connect with people and organizations from all over the world. We can follow, interact with, and learn from experts in our fields of interest.

3. Education: Many educators and students use X for educational purposes. They share educational resources, discuss ideas, and collaborate on projects. 

4. Advocacy: X can be used to raise awareness about social issues, advocate for causes, and mobilize people for action.

5. Personal Branding: For professionals and businesses, X is a powerful tool for personal branding and marketing.

How to use X in a positive way:

1. Follow the Right Accounts: Follow accounts that share useful information and positive messages.

2. Engage Constructively: Engage in discussions in a constructive manner. Respect others' opinions and avoid trolling or cyberbullying.

3. Share Useful Information: Share information that can be helpful to others. This could be educational content, industry insights, or personal experiences that others can learn from. 

4. Advocate for Positive Causes: Use your platform to advocate for causes you believe in. This could be raising awareness about social issues, supporting non-profit organizations, or promoting sustainable practices.

5. Be Responsible: Be mindful of what you post and share. Always fact-check information before sharing it and be respectful of others' privacy.

6. Use it for Personal Growth: Follow accounts that inspire you or help you learn something new. This could be industry leaders, motivational speakers, or educational institutions.

7. Promote Positivity: Use your platform to spread positivity and encourage others. This could be sharing uplifting quotes, positive news stories, or simply offering words of encouragement to your followers. 

Remember, like any tool, the impact of the old Twitter or new revised X depends on how you use it. Use it wisely and it can be a powerful force for good.

"30 Incredible Ways Siri Can Revolutionize Your Daily Life"

 Siri can be used to do some amazing things for you in your daily life.

1. Setting Reminders: If you have a busy schedule, Siri can help you manage it better. You can ask Siri to set reminders for meetings, appointments, chores, and any other tasks you need to remember.

2. Sending Messages: Siri can send text messages or emails for you. All you need to do is dictate the message and tell Siri who to send it to.

3. Making Calls: If you need to make a call while driving or when your hands are otherwise occupied, Siri can do it for you. Just tell her the name of the person you want to call.

4. Getting Directions: Siri can provide you with directions to any location. She can also find nearby businesses, such as restaurants or gas stations.

5. Checking the Weather: Want to know what the weather is like outside? Just ask Siri. She can give you the current temperature, forecast, and more.

6. Playing Music: If you want to listen to music, tell Siri what song or artist you want to hear and she will play it for you.

7. Answering Questions: Siri can answer a wide range of questions, from simple facts to complex queries. She can also perform calculations and conversions.

8. Setting Alarms and Timers: Need to wake up early for a meeting or set a timer while cooking? Siri can set alarms and timers for you. All you need to do is tell her the time you want to be alerted.

9. Making Reservations: Siri can help you book a table at a restaurant or even make hotel reservations. Just provide her with the necessary details.

10. Controlling Smart Home Devices: If you have smart home devices, Siri can control them for you. You can ask her to adjust the thermostat, turn on the lights, or lock the doors.

11. Checking News and Sports Scores: Stay updated on current events and sports scores by asking Siri. She can provide news headlines, scores, schedules, and more.

12. Booking Rides: Need a ride? Siri can book rides for you via ride-sharing apps like Uber or Lyft.

13. Finding Movies and Shows: If you're looking for something to watch, ask Siri. She can suggest movies or shows based on your preferences and tell you where they're available to stream.

14. Translating Languages: Siri can translate phrases or words from one language to another, making it easier for you to communicate in different languages.

15. Learning New Facts: Siri is full of fun facts and trivia. If you're bored or just want to learn something new, ask her a random question and she might surprise you with her knowledge.

16. Reading Texts: If you're busy or your hands are full, Siri can read your incoming text messages out loud.

17. Managing Your Calendar: You can ask Siri to add events to your calendar, check your schedule for the day, or notify you about upcoming appointments.

18. Setting Up Meetings: If you need to schedule a meeting, Siri can help. Just tell her the time, the participants, and the subject of the meeting.

19. Handling Your Finances: Siri can help you manage your finances by showing your recent transactions, reminding you to pay bills, or even sending money to friends via apps like Venmo or Apple Pay.

20. Ordering Food: Craving for something? Siri can order food for you from your favorite restaurants using food delivery apps.

21. Shopping Online: You can ask Siri to search for specific products online, compare prices, or even make purchases for you.

22. Playing Podcasts and Audiobooks: If you enjoy podcasts or audiobooks, Siri can play them for you. Just tell her what you want to listen to.

23. Checking Flight Status: If you're traveling, Siri can check the status of your flight for you. She can provide information about departure and arrival times, delays, and gate changes.

24. Sending Money: If you need to send money to someone, Siri can do it for you. She can use apps like PayPal or Apple Pay to transfer funds.

25. Searching the Web: Siri can perform web searches for you. Whether you're looking for a recipe, researching a topic, or just want to know something, Siri can find it for you.

26. Setting Bedtime and Wake Up Alarms: Siri can help you maintain a regular sleep schedule by setting a bedtime and wake up alarm for you.

27. Controlling Your TV: If you have a smart TV, Siri can control it for you. You can ask her to change the channel, adjust the volume, or even play a specific show or movie.

28. Checking Stocks: If you're interested in the stock market, Siri can provide updates on specific stocks or the market in general.

29. Making Notes: If you need to remember something, Siri can make a note of it for you. You can also ask her to remind you about it later.

30. Setting Fitness Goals: If you're trying to get in shape, Siri can help you set fitness goals. She can remind you to workout, track your progress, and even provide encouragement.

Siri, the virtual assistant developed by Apple, has become an integral part of our daily lives. With its advanced AI technology, Siri offers a plethora of clever and unusual ways to assist us. Whether it's setting reminders or alarms, sending messages or making phone calls, Siri can handle all these tasks effortlessly. However, its capabilities go beyond the basic functions. Siri can also provide helpful suggestions based on personalized data such as calendar events, location, and browsing history. It can even help with translations, calculations, and conversions. Moreover, Siri's integration with various apps allows it to perform more specialized tasks such as ordering food or booking a ride. Additionally, Siri can entertain us with jokes, fun facts, and trivia questions. Its ability to recognize songs and provide information about them is also impressive. Overall, Siri continues to surprise us with its clever and unusual ways of making our lives easier and more enjoyable.

Saturday, July 15, 2023

Cookie Monster: Why Deleting Cookies on Your Mac Laptop is a Must

 Why should I delete cookies on my Mac laptop?


1. Privacy: Cookies store information about your browsing habits and can be used by third-party advertisers to track your online activities and serve targeted ads.

2. Improve Performance: Over time, the accumulation of cookies can slow down your browsing experience. Deleting them can speed up loading times.

3. Free Up Space: Cookies take up hard drive space. Regularly clearing them out can help keep your system running smoothly.

4. Security: Some cookies can pose a security risk as they hold sensitive data, like login credentials. Hackers could potentially access this information.

5. Troubleshooting: If you're having issues with a website, clearing cookies can often resolve these problems as it forces your browser to download fresh copies of everything. 


Remember that deleting cookies will log you out of most websites and you might lose saved preferences on those sites.

Saturday, February 18, 2023

How I transfer files to apps on my iPhone/iPad 2023 from my Mac computer

Here are the steps for transferring files to my iPhone or iPad in 2023 with latest iPhones and Mac OS:


Connect iPhone with cable to your Mac computer or laptop  using connector on left side of laptop and appropriate cable.


Note: The first time you connect the device (iPhone or iPad), select Trust when asked on iPhone/iPad whether to trust this computer.  


Open a Finder window.


You should see your iPhone listed in the left hand column of finder winder under Locations.  For example:  George's iPhone 13


Click on the name of your iPhone on the left side of finder window.  You should then see name of iPhone and various tabs that are available to see what is on your iPhone.


(Tabs: General Music Movies TV Shows Books Photos Files Info)


Click on the Files tab.  You should then see a list of apps that have files.  You can click on the name of app and see the files associated with that app on your iPhone. If you don’t see anything then you haven’t added any files to that app.


You can add files to the apps. 


For example, if you want to add an audio book to MP3 player app. You can just drag the folder of mp3 files to that app and they will appear under the name of  the app on your laptop screen.  These files should now be accessible in your app for use on your iPhone.


I was able to transfer audio book mp3 chapter files are all in one folder to the MP3 player app.  


I  also was successful in transferring single midi files to Piano Jukebox app, (This app accesses our bluetooth device BT101 that is connected to our piano.  I was not successful in transferring a folder of midis to the Piano Jukebox app.


I also use an app called Midi_Recorder that I got from App Store. I was able to transfer a folder of midis to this app successfully. It also accesses our Disklavier Mark IV via bluetooth midi device BT101 and plays these midis.


Note:  You can also drag files from an app to your computer's desktop to make a backup of anything you have on your iPhone.  There is also an option to backup all info from iPhone to your computer.  


In earlier systems, this sort of backup and transfer was done using iTunes.  Now appears that it is all done through the finder window and not necessary to run Music app on latest Mac OS systems.


Thursday, December 15, 2022

How to Reset DKVBrowser FromTo PC folder on a Mac running Ventura 13.1

After updating my Mac to the latest system Ventura 13.1 - It did not appear that I could see my FromTo folder or DKV###### network for the Disklavier.


Here are the steps to access the To/From PC using a Mac with the new system:


1:  Open a finder window


2:  Click on Network, under locations on the lefthand sidebar.


3:  Goto the menubar and select the “Go” Menu and the “Connect to Server” option in the pulldown menu


4:  Type in smb://dkv###### that corresponds to your piano


Select Guest and hit return.


The FromTo PC option should also be selected.  Once selected, you will see any files or folders that you have stored on your piano in the FromTo folder in the finder directory. You can drag midi files from your Mac directory to that area. Once they are transferred to the folder on your piano, use Refresh PC option in DKVBrowser to see the files on your piano's FromTo folder.


Saturday, July 30, 2022

Playing Midis from my iPhone on my Mark IV Disklavier via Bluetooth


Make sure your piano is ON and not in standby.  


I run Disklavier Controller app from my iPhone to activate my piano: I select a song and play, then stop.  


        Note: Use the app that is associated with your piano to play a song to make sure the piano is active or just go to your piano and turn on and play a song.


I connect my Bluetooth device which is hooked to my piano by selecting
midimittr app.  

    Note: you may have a different app that allows you to connect your bluetooth device located on your piano in the midi port.


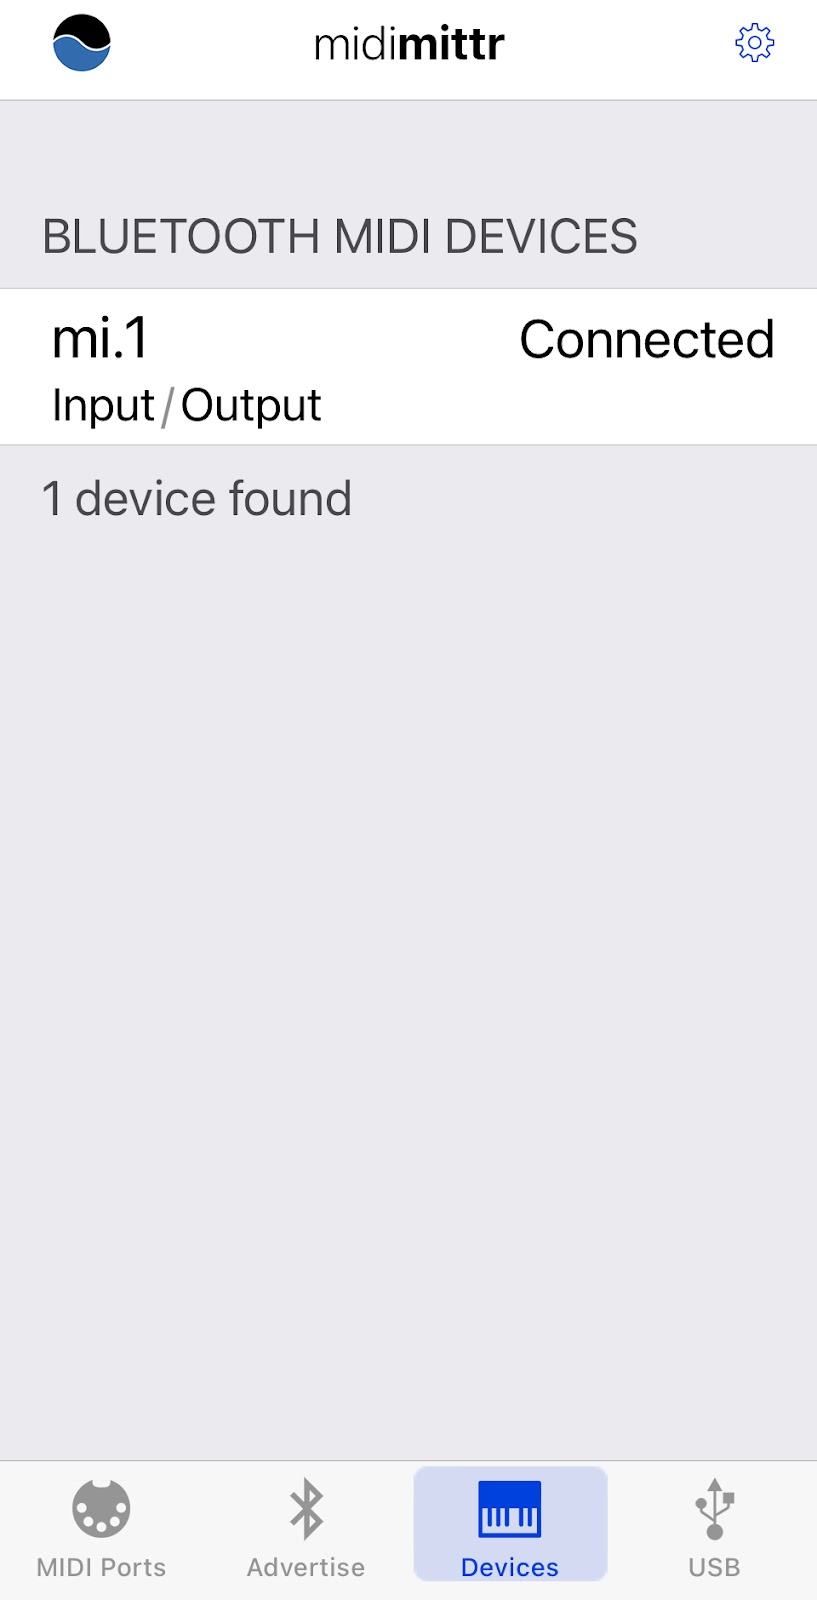
If using midimittr, select Devices icon from lower bar on screen.  The following screen should appear.  Click on "Not Connected" next to your device (i.e. mine is m1.1).  Eventually "Connected" should appear next to your device.


I use an app called MidiOnStage for iPhone to store midis and to play via my bluetooth device to my Mark IV Disklavier piano.


If you use MidiOnStage app, you need to click on Settings>General and scroll to bottom of screen to Midi Output and select your device.


MidiOnStage allows multiple ways to load midis from Mac laptop  to the app.  Note: The midis added to MidiOnStage songs list are stored in the Files app on your iPhone.  

You can use Airdrop to move a midi or an entire folder of midis directly from your laptop to your iPhone and into MidiOnStage.  

Click on a midi filename on your laptop, hold down the option key while clicking on filename, then select Share option and select Airdrop to your iPhone.  Then select MidiOnStage from Airdrop menu that appears on your iPhone. 


Note:  If you are moving an entire folder of midis,  you will need to select a path to Files >On My iPhone>MidiOnStage folder from the Airdrop options menu.

Using MidiOnStage, you can create Playlists by using the + icon at top of the Playlists screen. You will be asked to enter a Playlist name to create.  You can then use the various screens and + buttons to maneuver and add songs to your playlist.  


You can select a song to play or an entire playlist.  click on play button to start playing.  Your midi songs should play on the piano.  


How to format a USB stick for Mark IV Disklavier using a Mac.

When I first tried to read a USB stick in my Mark IV Disklavier, I had a problem.


I found a solution a few months ago: 


I used Disk Utility application which comes standard on my Macbook Pro laptop (I'm running High Sierra 10.13.6) 


I inserted the USB stick into the USB port on my laptop, selected the USB stick (under external) and clicked on Erase from the upper Disk Utility menu bar. 


I then entered a name for my USB stick, Selected MS-DOS (FAT) from the Format and used Master Boot partition option from pull down arrows. I clicked on ERASE


I then moved midis from my hard drive that I wanted to use on the piano. I think it is key to put these in a folder. I believe you can have 99 files in a folder. It worked. 


My piano is now reading my USB stick and playing my selection of midis. To access the USB stick from a Disklavier Mark IV select USB Media in the main menu. 


I am not sure what DKC850 menu option would be for those with DKC850 control box. But I feel it would be similar. The USB Media shows up on DKC900 as "My Songs" folder.

Friday, August 06, 2021

Adding New Midis to My Mark IV Disklavier Piano

 Over the past few years it has been hard to add midis to my Mark IV Disklavier.  The music store that was accessible using the PRC (remote) and internet connection was not working.  Yamaha decided to move their Musicsoft store online.  The store is accessible on my Macintosh laptop at Yamaha Musicsoft Store  


I had tried in 2019 to download a free album from the store using my Macintosh laptop. The download went okay, but the file was compressed as a .PSX file and the album and included midi files had to be extracted. There was no available software for my Mac that would extract the file.  So, after 2 years I decided to pursue this problem and also figure out why the albums I was seeing on my Mac were not available on my piano's internet store (from PRC).


Result:  After talking with knowledgeable and helpful staff at Yamaha MusicSoft support, I have found out the following:

* The original Mark IV's that have not been upgraded with new controllers do not have viable access to the store using their piano's PRC.

* But recently the .PSX file type has been eliminated and a new zipfile protocol allows for easy download and unzipping of files on my Mac laptop. 

* Once files are unzipped on your computer, you can transfer to a USB stick (thumbdrive) and use the USB connection under your Mark IV to load the files to your piano.  

* Using the piano's remote or PRC, you can access the USB and then select album or midi file, click on Function and select Copy to place a copy of new songs into your piano library.

I did have one problem with the online purchase and a call to the support fixed an error in my account info.  I was able to enter my new credit card info and purchase an album. (There are phone numbers on the website to direct you to support)

 There is a nice selection of albums online.  Nice to be able to buy some Piano only - again -- thanks to Yamaha!

The "sound of music" playing on my piano has put me in a better frame of mind.  

Support staff, reminded me that any thing purchased in the store is easily downloaded again.  I was able to redownload my free album which had been changed to midi format instead of .PSX

NOTE:  USB stick should be initialized as FAT 32


Monday, February 22, 2021

Update to DKVBrowser 3.0.2 for use with Mark IV Disklavier Piano


UPDATE 2/19/2021:  The DKVBrowser discussion groups are now being conducted at Google Groups.  You can search by "DKVBrowser" to find a place to join for current information. 

The DKVBrowser software written by Kevin Goroway has been revised to meet the needs of users for their Disklavier Mark IV pianos recently.  The software had not worked on my latest Mac laptops due to system updates that were not supported by DKVBrowser.  The software had recently not worked on the latest Windows computers due to changes in system and other updates.  At some point the underlying architecture of DKVBrowser (Eclipse RCP) became unsupported/incompatible.

A new version is currently being tested by members who are part of the Google Group who post info about DKVBrowser and Disklavier.   

I was successful in loading the new DKVBrowser 3.0.2 onto a Mac laptop running High Sierra and one running Catalina.  I have been testing the Mac version of this software and find that it is running successfully for most functions.  It is nice to have the DKVBrowser to run playlists, play tunes at scheduled times and to have all the easy editing techniques and features that Kevin has shared with us.  I certainly hope many will consider the Donate button to show appreciation for his generosity and talents in keeping a means to play our beloved Disklavier Mark IV.

Note as of 2022:  DKVBrowser 3.0.2 is also running on my MacBook Pro (16-inch, 2021) with M1 Chip running OS Monterrey 12.5

A series of commands from Terminal were used to get DKV3.0.2 to successfully run with newer Mac systems.  An installation of later version of Java was also necessary.  Contact Google Group for links to this version and instructions or help. 

Original Article for reference:  https://grannyjoans.blogspot.com/search?q=virtual+prc

 "The Many Avenues to Controlling My Mark IV Disklavier"


Thursday, November 26, 2020

Tips on How to Permanently Delete Apps from iPhone (iOS14)


 How to Permanently Delete an App from Your iPhone (iOS 14)


Goto the App Library Screen on your iPhone, by swiping until you get to the App Library screen.


Press on the search bar at the top, You should then see a running alphabetical list of all your apps.


Scroll down to find the app you wish to delete. 


Press on the icon to the left of the app name.  You should see options: Add to Home Screen, Share App and Delete App.  


Select Delete App to get rid of it.

Sometimes, you will get a message that it is downloading the app. Once downloaded, you can press on icon again and delete it.


Saturday, February 29, 2020

Problems logging into sites when means of payment - has expired.

As extra security a few sites are requiring one to enter a CSV code for expired cards in order to make a purchase.  Such a mess; as most of us don't have the security code for expired cards. 

Solution:
Log in to account - delete expired card.  Add a new card.
Log out and then do your shopping choosing the new card.

Seems you have to delete the card and log out for it to take effect.


Wednesday, August 28, 2019

Playing Midis via Bluetooth from my Mac to my Disklavier Mark IV

 I connected the mi1v2 Bluetooth midi device to my Disklavier Mark IV this evening.


I purchased the Bluetooth midi device from Amazon at
https://www.amazon.com/Wireless-MIDI-Interface-mi-1-Rev-3/dp/B01D61QK6W/ref=asc_df_B01D61QK6W/?tag=hyprod-20&linkCode=df0&hvadid=312118595187&hvpos=1o1&hvnetw=g&hvrand=14263083875715554474&hvpone=&hvptwo=&hvqmt=&hvdev=c&hvdvcmdl=&hvlocint=&hvlocphy=9029598&hvtargid=pla-570048501731&psc=1

 Description of device:
Wireless technology    Bluetooth Low Energy
Bluetooth LE MIDI Profile    Apple Bluetooth LE MIDI (iOS 9)
Connectors    1 x MIDI IN (5pin-DIN)
1 x MIDI OUT (5pin-DIN)
Switch、Indicator    1 x Hall element Switch
1 x Magnet
1 x white LED
Power Supply    From MIDI Out 3.3V-5.0V
Compatible iOS devices    iPad (3rd, 4th), iPad Air2, iPad mini, iPad mini 2, iPad mini 3,
iPhone(4s,5,5s, 6, 6plus, 6s, 6splus) iPod touch (5th, 6th)
Compatible OS    iOS8, iOS9, OSX (Yosemite, El Captain)
Firmware Update    On the air by using Piano Jukebox
iOS Apps for mi.1    mi.1 connect : bridges mi.1 and Core MIDI music apps
Piano JukeBox : Simple SMF player, firmware updater
Power consumption    7 mW (when MIDI OUT is 3.3 V)
25 mW (when MIDI OUT is 5 V)
Steps:
  • Turn Piano off.
  • Connected mi1vi2 Bluetooth devices input/output pins to I/O center at front of piano when piano off.  There are arrows on the device to aid in connecting properly.
  • Then turned piano on and made sure piano still worked.
  • Used instructions from http://quicco.co.jp/products/
  • Updated the device using Piano Jukebox app on iPhone  (be sure to get this app for your iPhone to use for update…
Firmware update
Updating the firmware is recommended to ensure that the mi.1 can be used in the most optimal condition. To do this, please download the dedicated iPhone/iPad application "Piano Jukebox" (free) from the App Store.
1. Launch the Piano Jukebox app
2. Tap the wheel icon and select 'Firmware Update'
3. Turn on the MIDI instrument to which the mi.1 is plugged, then tap the 'OK' button
4. Tap the 'Upload' button when it becomes available (blue) †
5. Keep the MIDI instrument turned on while updating the firmware
6. When the firmware has uploaded successfully, a message will be shown .
How to connect to iPhone/iPad
The connection between mi.1 and the iOS is made by Bluetooth Low Energy MIDI. The connection is managed in the “Bluetooth Midi Devices” List which the Piano Jukebox or some other MIDI apps have.
Preparation: Turn on the device to which the mi.1 is connected
1. Launch the Piano Jukebox app
2. Tap the mi.1 icon in the menu bar
3. Tap the “Not Connected” next to the mi.1 in the list.
4. You can now use the Piano Jukebox and other MIDI apps, such as GarageBand, on your iPhone

How to connect to Mac
1.For the connection between Mac, go to Application/Utilities folder and open Audio MIDI Setup.
2. Launch the "Audio MIDI Setup" tool
3. From the titlebar menu, select Window > Show MIDI Studio
4. Double-Click the Bluetooth Icon
5. Click the "Connect" button
6. If the button changes to "Disconnect", the mi.1 has connected successfully
7. MIDI apps can now recognise the mi.1 Bluetooth as a MIDI device.

Next I needed to decide on the best option for playing midis on my Macbook Pro.  I decided to purchase MidiYodi which works with this Bluetooth device, set up using Audio Midi Setup on Mac laptop.  This is a pretty good midi player for my current Macbook Pro running High Sierra  10.13.6.  I decided on this midi player because of the reasonable cost, the extensive online manual and the ability to create and save playlists.  It also has some editing capabilities.  MidiYodi can be found at:  https://www.canato.se/midiyodi/


Other Midi software that I tried out that worked with this Bluetooth device connected to my Disklavier Mark IV included:
Midikit is trial only, would need to purchase the version for 11.99 - good for editing titles and channels. No playlist capability.  Make sure connected to device by: looking under Midikit menubar select Midi Settings. Click on Midi port.  And the mi 1 bluetooth device should show up
Midiswing worked and needed to make sure to select output: Bluetooth (Quicco Sound Corp.) 2
Sweet Midi which has playlist capability. $29.95 USD

Most of these played midis using the Bluetooth device  but lacked playlist capabilities. In order to get some of these to work, I had to go to preferences or audio setup or midi settings in the individual apps and make sure that Bluetooth was selected.


** Update:  After hooking up Bluetooth, I noticed the only channel that was playing was Channel 1.  Needed to access Setup>Midi on my Mark IV PRC remote to set the channels for piano playback.  
 

Friday, July 19, 2019

How to convert m4b files to mp3 files

How to convert m4b files to mp3 files

I downloaded an audio book today to my Mac laptop.  The file format for the audi0 book was m4b.  I had planned to use airdrop to send to my iPhone to play with my MP3 books app on my iPhone.  When I attempted the airdrop the only options I was allowed was to GoodReader.  That was fine, but really wanted to keep a copy in MP3 Books library with my other road trip audio books.

As I suspected that MP3 Books app would only play mp3 file format, I needed to convert the m4b files to mp3 file format. 

The m4b files were easy enough to drag into iTunes.  But, then I couldn't find them in my song list.  I didn't realize that iTunes has been reorganized in the latest update.  So I searched for the title of book and found them in the audio book section of iTunes.

I selected each chapter or part individually, highlighting the name of the part or chapter. 

Then, I selected File>Convert>Create mp3 version


After each of the parts or chapters where converted to mp3 format, I then selected each part and dragged from iTunes to my desktop on the laptop.  This gave me all the mp3s that I then put into one folder.  I named the folder with the name of the book and author.

Once in the folder, I could connect my iPhone to my laptop with cable. I then used the method for sharing files via File Sharing to my MP3 Books app from iTunes.  If you need a refresher on how to share files with certain apps on your iPhone from iTunes, check Apple's support info at https://support.apple.com/en-us/HT201301

 Now, I have a new audio book for my road trip ready on my iPhone. 


Saturday, July 13, 2019

How to Calibrate Your Disklavier using PRC remote

How to Calibrate Your Piano using PRC remote (Notes from my husband)


- Quit the interface on the PRC remote and instead run the Service program, which can be found in the main set of PRC remote program icons along the bottom of the PRC screen.

- You'll see a white screen with 3 text options, none of which are particularly exciting.

- Slide down the keyboard cover on your PRC remote, and hold the D, M, and P keys down together (they don't need to be pressed at the same time, just held down together).

For our Disklavier Mark IV purchased September 2005 (Yamaha DC7M4t) there is a definite sequence required for the D, M and P keys. 
After selecting the Service Center from the main menu you will see three menu items [1. Post delivery check, 2. Program Versions, 3. Pedal Calibration]. Then depress and hold each of the 3 keys (i.e. D, then M, then P) in that order and very rapidly.

Mark, a technician at Yamaha, suggested the following technique for rapidly depressing and holding these three keys:
         1. Position two fingers on your left hand over the the D and M keys.
         2. Position one finger on your right hand over the the P key.
         3. Then in very rapid succession press and hold the D key, then the M key, then the P key. It has to be rapid enough so that “repeat key” beeps are not heard after pressing the “D" and “M" keys. It is tricky to get the timing right. It took me at least 20 or 30 attempts (perhaps more) before I was successful. But when you do get the sequence timing fast enough you will immediately see the menu change. 

- You should see the Service options expand greatly into a maintenance mode-like menu.
• After successfully getting the D,M, and P sequence correct, select “Disklavier Piano System
• Then Select “Piano Calibration-Full” 
• Then Select “Calibr. in Series w/ GS check”  which will begin the full self-calibration process. 
Note (1): This self calibration process will take about 14 minutes total with some very loud piano notes played.  
Note (2): GS meaning the gray-scale sensors.

- Your Mark IV will undergo a large number of self-calibrations, which include how much voltage is needed to depress the pedals to various extents, how much voltage is needed to make each key play at a certain volume, etc. The calibration process makes a lot of (very cool) sounds... so don't start it unless your housemates don't mind a lot of increasingly loud piano playing.

- If your Mark IV passes each set of calibrations, it will play a single C-Major chord; if it fails, it will play a c-minor chord. You'll get text messages throughout the roughly 15 minute process as well.

- At the end, the Disklavier writes all of the newly-derived parameters to a file that is used to optimize playback.

My husband found this process to be very helpful in getting the Mark IV optimized; although, the last time the piano tuner was here he went through a procedure to calibrate the piano.

Aug 9, 2019 We tried to calibrate our Mark IV using the method above, but the PRC remote  that came with the piano did not seem to respond when we held down the D, M, P keys together.  So we rebooted the PRC device and also turned the Disklavier piano off and back on.  The keys worked fine and our calibration was performed.  Not sure which helped -  reboot of PRC or turning Disklavier piano off and on again.  It is easy to do both.  In any case,  performing the calibration was successful.