In the current version of the free Acrobat Reader (i.e. Version 9.1) you can search all PDF documents inside a folder.
This search feature eliminates the need to combine monthly documents to search a year's worth of data files with a single search. This feature may have been available before the current version ... I just never noticed it. PDF documents that are protected (i.e. 'Secured') are no problem.
But I would also suggest, a program similar to Adobe Acrobat Standard v6.0, to combine pdf documents, if needed. My tests revealed that Adobe Acrobat Standard v6.0 was able to combine pdf files efficiently and also search within all the combined pdf files. Tests also revealed that 'Preview' app needs to be corrected to handle proper searching of a combined document. Searching was limited to only the first document when the "Preview" app was used to combine several PDF documents).
Tweet
I am a retired high tech lady, who loves her Macintosh computers, iPhone, iPad and gadgets. I have developed this blog to provide my experiences, tips and findings about these items.
Tuesday, September 29, 2009
Searching Multiple Documents with Adobe Reader
Categories:
Trick or Tip
Monday, September 28, 2009
Preview is Not Satisfactory
I took time tonite to combine twelve monthly financial statements of 16 pages per each month. Both Methods were used: creating a combined pdf using drag and drop technique in sidebar and the print selected save as pdf method. One pdf file was created with 192 pages with both methods. The problem that we experienced with 'Preview' is that the 'Search' routine would not work across all 192 pages. The search results, returned were not inclusive of all 192 pages, but only found results in the first 16 pages of the first section of the document (January statement).
Since my husband was wanting the files, combined into one pdf file for the purpose of using a search in all the pages, this was NOT a solution for us, as Preview Search is not working correctly with the file created in Preview by either method.
So we used Adobe Acrobat Standard v6.0 to combine the pdf files into one file. Search performed using Adobe Acrobat Standard worked over all 192 pages. The document created with Adobe Acrobat Standard also was searchable over all 192 pages when opened in Preview. Tweet
Categories:
Trick or Tip
Combining PDF Files Part 2 - Drag & Drop
After trying to come up with a way to combine pdf files last nite in the previous post, I woke up to a tweet that referenced an article in MacWorld by Christopher Breen at:
http://www.macworld.com/article/143023/2009/09/combine_pdf_snow_leopard.html
So I decided to try the technique outlined in the article. I decided that it might be easier to see the flow of steps by using 3 jpeg files which I individually resaved in pdf format.
I have 3 simple one page pdf’s now that are merely photos which have been saved as a pdf document. This will be easier to illustrate how the combining efforts take place.
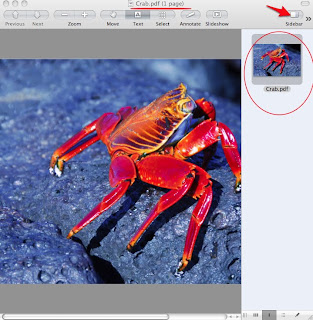
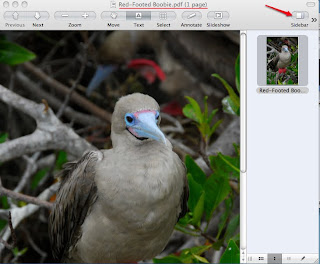
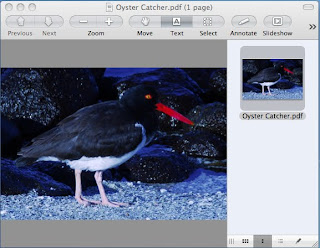
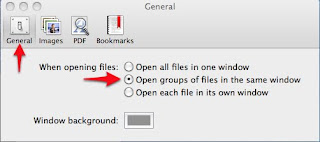
I have set the ‘Preferences’, in ‘Preview’ to ‘Open groups of files in the same window’ . So I select all three of the pdf files and double click to open them up in one Preview window. As you can see in the heading at the top of the window, it says that I have one page highlighted from the crab.pdf and 3 documents for a total of 3 pages. Each of the icons in the sidebar represent a separate pdf document at this time.
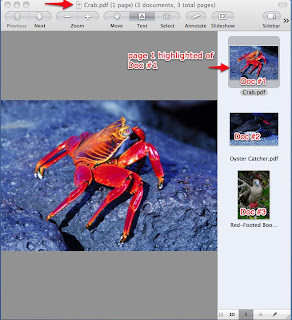
Now I am going to put all 3 Docs in the same pdf file, by dragging the last two pdf documents 2 and 3 into the icon of the 1st pdf document icon.
I highlight the Oyster Catcher.pdf (Doc #2) and drag it over the icon of Crab.pdf. As I do this a green circle with a plus sign appears as I add this document to the first document. If I hover the cursor over the 1st Document after the addition of 2nd pdf file to the first pdf file, a circular arrow appears which indicates that this first document now is expandable.
Note also the heading at the top of the window, now reads that I have the Oyster.pdf one page highlighted and there are still three documents with 4 total pages.
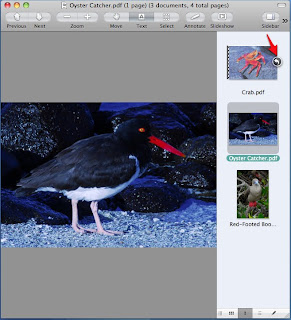
When I click on the circular arrow and expand the 1st document, you can now see that the first pdf document now has an additional page, which is the oyster catcher photo page that I added to that document.
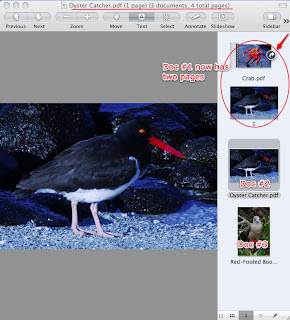
Now I drag the third document into the 1st document icon to add the last document to the first document. Again the green circle with plus sign indicating that I am adding a page to the first document appears.
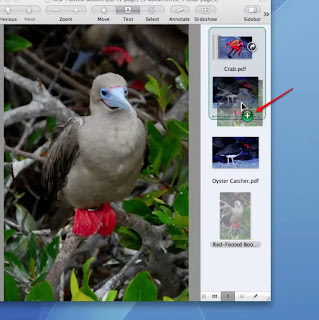
In the screen shot below, you can see the 3 pages now in document #1.
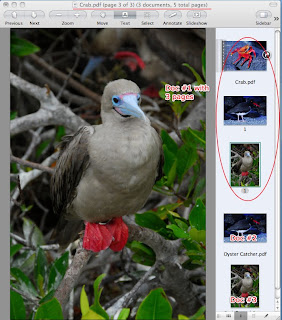
This is a screen shot of document #1 with the pages collapsed, showing all 3 documents are still present in the Preview window.

The Macworld article recommended selecting "Save All" option from the 'File' menu in Preview to save all the pages in the first document. Make sure that you have selected the first document for this save.
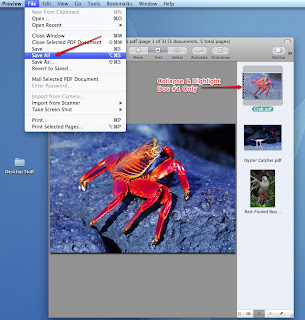
The 'Save All' method did not allow me to give this document a new name, but automatically saved it as crab.pdf. I find this a problem if I did want to preserve the individual pdf doc and I suggest using the 'Save As' option in the 'File' menu instead. This will offer you the opportunity to rename the file.
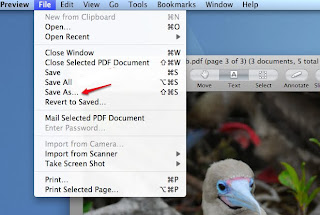
I would suggest trying this new method with some test pdf files that you can experiment with the results to familiarize yourself with the new methods in Preview that allow for combining pdf files. Tweet
http://www.macworld.com/article/143023/2009/09/combine_pdf_snow_leopard.html
So I decided to try the technique outlined in the article. I decided that it might be easier to see the flow of steps by using 3 jpeg files which I individually resaved in pdf format.
I have 3 simple one page pdf’s now that are merely photos which have been saved as a pdf document. This will be easier to illustrate how the combining efforts take place.


I have set the ‘Preferences’, in ‘Preview’ to ‘Open groups of files in the same window’ . So I select all three of the pdf files and double click to open them up in one Preview window. As you can see in the heading at the top of the window, it says that I have one page highlighted from the crab.pdf and 3 documents for a total of 3 pages. Each of the icons in the sidebar represent a separate pdf document at this time.


Now I am going to put all 3 Docs in the same pdf file, by dragging the last two pdf documents 2 and 3 into the icon of the 1st pdf document icon.
I highlight the Oyster Catcher.pdf (Doc #2) and drag it over the icon of Crab.pdf. As I do this a green circle with a plus sign appears as I add this document to the first document. If I hover the cursor over the 1st Document after the addition of 2nd pdf file to the first pdf file, a circular arrow appears which indicates that this first document now is expandable.
Note also the heading at the top of the window, now reads that I have the Oyster.pdf one page highlighted and there are still three documents with 4 total pages.

When I click on the circular arrow and expand the 1st document, you can now see that the first pdf document now has an additional page, which is the oyster catcher photo page that I added to that document.

Now I drag the third document into the 1st document icon to add the last document to the first document. Again the green circle with plus sign indicating that I am adding a page to the first document appears.

In the screen shot below, you can see the 3 pages now in document #1.

This is a screen shot of document #1 with the pages collapsed, showing all 3 documents are still present in the Preview window.

The Macworld article recommended selecting "Save All" option from the 'File' menu in Preview to save all the pages in the first document. Make sure that you have selected the first document for this save.

The 'Save All' method did not allow me to give this document a new name, but automatically saved it as crab.pdf. I find this a problem if I did want to preserve the individual pdf doc and I suggest using the 'Save As' option in the 'File' menu instead. This will offer you the opportunity to rename the file.

I would suggest trying this new method with some test pdf files that you can experiment with the results to familiarize yourself with the new methods in Preview that allow for combining pdf files. Tweet
Categories:
Trick or Tip
Sunday, September 27, 2009
Combining PDF files using Preview App
The way to combine pdf files in Preview doesn’t seem to be working as consistently as it should. I always seem to have to resort to other means to accomplish what I think should be obviously simple.
If you have multiple pdf files that you wish to combine into one pdf file, you should open these files in separate windows and then drag and drop the pages of one pdf file into the window of the pdf file where you wish to combine the pages. This is easiest done by showing the sidebar of each pdf file. Select ‘View’ from the menubar and click on ‘Sidebar’ and select ‘Show Sidebar’ or click on the ’Sidebar’ icon in the ‘Toolbar’.
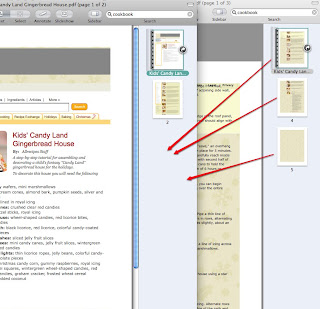
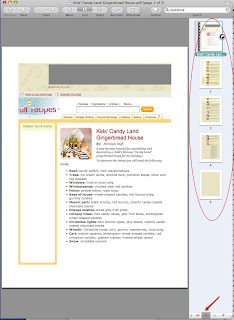
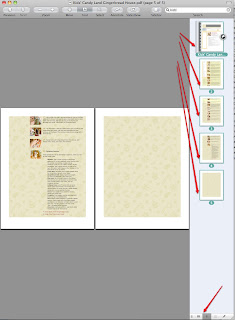
Once you have arranged the pages in the order and removed any pages you do not need, then ’Select ALL’ (cmd A from the thumbnail view in sidebar) pages that you wish to save in the one pdf file.
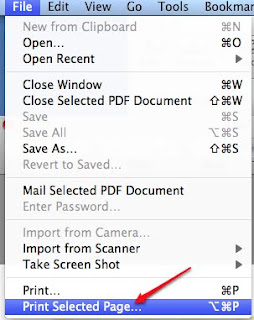
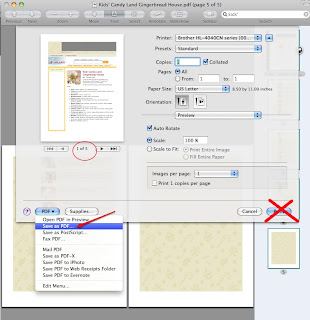
Select ‘Print Selected Page’ from the ‘File’ menubar, but DONT print. Select ‘PDF’ pop-down menu option of ‘SAVE AS PDF’ and give the newly created pdf file a new name.
This works great when you want to send one pdf file of a group of jpegs as well. Just drag the jpegs into preview, combine in the way you wish and follow steps to save as pdf file using print selected page method. Tweet
If you have multiple pdf files that you wish to combine into one pdf file, you should open these files in separate windows and then drag and drop the pages of one pdf file into the window of the pdf file where you wish to combine the pages. This is easiest done by showing the sidebar of each pdf file. Select ‘View’ from the menubar and click on ‘Sidebar’ and select ‘Show Sidebar’ or click on the ’Sidebar’ icon in the ‘Toolbar’.


Once you have arranged the pages in the order and removed any pages you do not need, then ’Select ALL’ (cmd A from the thumbnail view in sidebar) pages that you wish to save in the one pdf file.

Select ‘Print Selected Page’ from the ‘File’ menubar, but DONT print. Select ‘PDF’ pop-down menu option of ‘SAVE AS PDF’ and give the newly created pdf file a new name.


This works great when you want to send one pdf file of a group of jpegs as well. Just drag the jpegs into preview, combine in the way you wish and follow steps to save as pdf file using print selected page method. Tweet
Categories:
Trick or Tip
Note: Using Apps from two Apple Store ID's
I recently set up homesharing on all my computers on my local network. This allowed me to share music, podcasts, and even apps for iphone on all the machines. I explained how this could be achieved in a previous blog, using two different Apple store accounts and three different computers running different Mac OS X and iTunes 9.
In the process of homesharing, I decided to copy an app that my husband purchased on his iphone using his Apple store account, to my iTunes library and applications tab. This was successful.
We both upgraded our iPhones to the new 3GS versions over the past few days. I activated my iPhone 3GS loading all my current info from my first generation iPhone backup.
Once, I had set up my new iPhone with the information from the previous iPhone, I decided to download a new app. I noticed that I had an update notice for a current app on my iPhone. That app was the one that I had copied from my husband's iTunes application tab to my applications tab that I use to update and sync with my iPhone. When I selected to update this app on the new 3GS iPhone, it requested the password for my husband's account. Once I entered the password the application became updated and available for me to use on my iPhone.
I can now share the applications that my husband purchased on my iPhone. Interesting ... Tweet
Categories:
iTunes,
Trick or Tip
Tuesday, September 22, 2009
Making My Applications Handy
How to: Accessing All My Applications from My Dock
I decided today to put my Applications Folder in my dock. I located it to the right of the dashed divider in the dock where applications reside on the left and folders on the right.
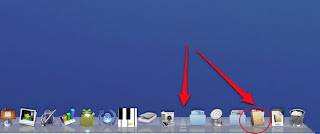
When I click on the newly added ‘Applications Folder’ residing in my dock (which is actually an alias of the actual folder that still resides on my hard drive), it reveals all my applications and folders in one easy to find and click ‘Stacks’ window.
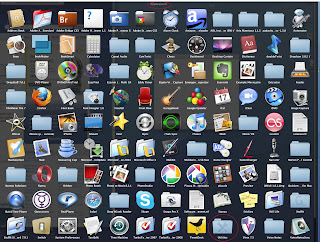
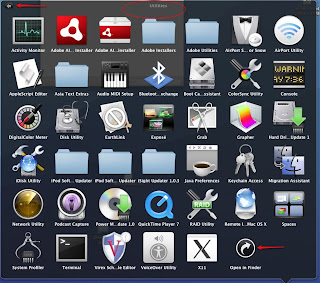
If I wish to click on a folder in this window, say my ‘Utilities’ folder, it will open a ‘Stacks’ type window revealing all the Utilities applications and sub-folders, where I can readily click on one. Note, also the arrow in the upper left-hand corner of this sub-stack window. This arrow will take you back to the applications stack window. The ‘Open in Finder’ arrow still exists in this stack window that also allows me to access files physically from their location in the finder. Clicking anywhere on the desktop closes the stack window.
 Tweet
Tweet
I decided today to put my Applications Folder in my dock. I located it to the right of the dashed divider in the dock where applications reside on the left and folders on the right.

When I click on the newly added ‘Applications Folder’ residing in my dock (which is actually an alias of the actual folder that still resides on my hard drive), it reveals all my applications and folders in one easy to find and click ‘Stacks’ window.

If I wish to click on a folder in this window, say my ‘Utilities’ folder, it will open a ‘Stacks’ type window revealing all the Utilities applications and sub-folders, where I can readily click on one. Note, also the arrow in the upper left-hand corner of this sub-stack window. This arrow will take you back to the applications stack window. The ‘Open in Finder’ arrow still exists in this stack window that also allows me to access files physically from their location in the finder. Clicking anywhere on the desktop closes the stack window.
 Tweet
Tweet
Categories:
Trick or Tip
Monday, September 21, 2009
iPhone Users Control Party Mix
How to: Use iTunes DJ and Remote App on iPhone
iTunes has a feature called ‘iTunes DJ’, which allows a user to create and run a playlist on a computer on a local network. Other network users can connect to the network, choose songs to be played and to vote on selections to be played. I have my network setup using an Airport Express, so that I can play my iTunes through speakers in my living room and on my outside deck. We can use iTunes DJ, to pre-select a party playlist and allow our guests with iPhones and Remote app to control the playlist.
To use the iTunes DJ, make sure that you have checked ‘iTunes DJ’, in the iTunes Preferences, General Tab options.
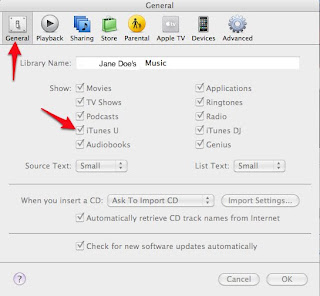
Select ‘iTunes DJ’ to randomly generate list from Music library or playlists in your library. ‘iTunes DJ’ is located under ‘Playlists’ on the left-hand side of the iTunes Window.
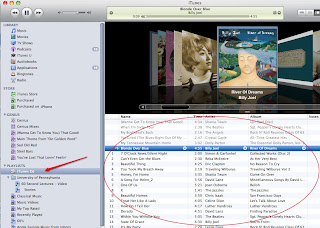
Select ’Source’ pop-down menu in the lower left-side of the playlist window to select to generate the iTunes DJ playlist from the entire Music library or from the playlists or Genius Mixes or Playlists.
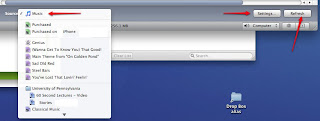
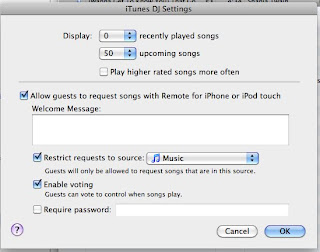
Then select ‘Settings’ in the lower right hand corner of the list window. Options to display can be selected for ‘number of songs recently played’ and ‘upcoming songs’, as well as option ‘play higher rated songs more often’. Guest can be allowed to ‘request songs with Remote for iPhone or iPod Touch’ , a greeting message can be entered and voting can be enabled to give guests control over when songs play. Password can be entered.
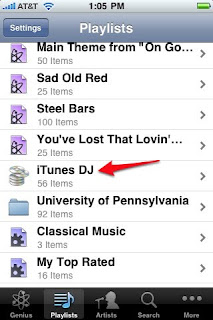
Guests can access voting and requesting of songs from their iPhone or iPod Touch, ‘Remote’ app. First they launch the ‘Remote’ app, then select the ‘iTunes DJ’ option from the remote app settings menu. The name of the playlist and description should appear and this is selected.
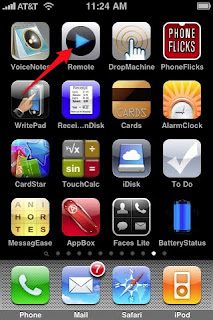
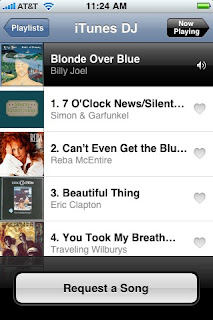
The current playing song will appear on the device. A dialog button on the remote, will allow the user to ‘Request a Song’.
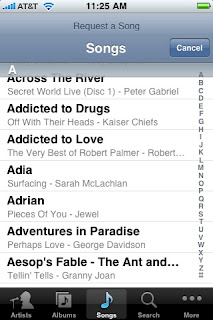
The user can then select a song that he wishes to add to the playlist, from the list of the songs given.
The upper left-most arrow will allow the user to view the current playlist and may tap on the ‘heart’ next to the song to vote for, as the votes increase the songs with more votes move up the playlist.
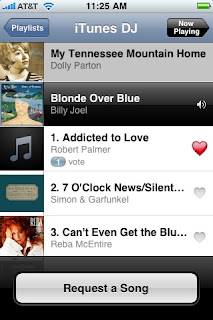
If voting is not enabled, the songs that are requested are added to the list as requested. Tweet
iTunes
To use the iTunes DJ, make sure that you have checked ‘iTunes DJ’, in the iTunes Preferences, General Tab options.

Select ‘iTunes DJ’ to randomly generate list from Music library or playlists in your library. ‘iTunes DJ’ is located under ‘Playlists’ on the left-hand side of the iTunes Window.

Select ’Source’ pop-down menu in the lower left-side of the playlist window to select to generate the iTunes DJ playlist from the entire Music library or from the playlists or Genius Mixes or Playlists.

Then select ‘Settings’ in the lower right hand corner of the list window. Options to display can be selected for ‘number of songs recently played’ and ‘upcoming songs’, as well as option ‘play higher rated songs more often’. Guest can be allowed to ‘request songs with Remote for iPhone or iPod Touch’ , a greeting message can be entered and voting can be enabled to give guests control over when songs play. Password can be entered.

Guests can access voting and requesting of songs from their iPhone or iPod Touch, ‘Remote’ app. First they launch the ‘Remote’ app, then select the ‘iTunes DJ’ option from the remote app settings menu. The name of the playlist and description should appear and this is selected.


The current playing song will appear on the device. A dialog button on the remote, will allow the user to ‘Request a Song’.

The user can then select a song that he wishes to add to the playlist, from the list of the songs given.

The upper left-most arrow will allow the user to view the current playlist and may tap on the ‘heart’ next to the song to vote for, as the votes increase the songs with more votes move up the playlist.

If voting is not enabled, the songs that are requested are added to the list as requested. Tweet
Categories:
Audio,
iTunes,
Trick or Tip
Renaming Photo Mail Attachments
How to: Renaming and Saving Photos from Email using Mail app, using Name Mangler Droplet.
Often times I receive multiples of photos from my kids via email. These photos come into my Mail app and I can view them and Save them from mail app.
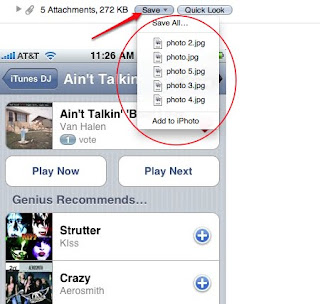
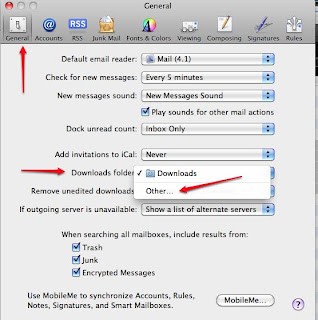
The Save option in Mail app allows me to save each photo individually automatically to a Folder that I designate in the Mail Preferences, To designate a folder or place to always download your attachment click on General Tab and Select Downloads Folder, pop-down menu and select the Default of ‘Downloads’ Folder in your dock or ‘Other’ to pick a folder or location you wish to use.
These downloads or attachments from Mail app are given the name Photo, Photo 1, Photo 2, … and this is kind of annoying. I use another application called Name Mangler Droplet to actually rename these files with a more descriptive name.
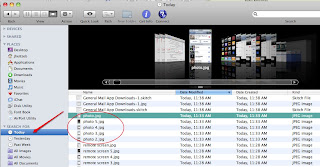
I don’t know about most, but sometimes I download a file from the internet or mail and can’t seem to locate it on my hard drive. There is a way to find current files quickly on your Mac. Open a new Finder window and click on the ‘Today’ option under ‘Search For’ category on the left-hand side of your finder window. You will be able to scroll the files that you have downloaded for that day and can also arrange them by clicking on the view option ‘Date Created’ column.
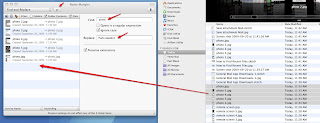
I run Name Mangler Droplet, then drag and drop the files that I wish to rename into the Name Mangler Droplet window. I fill in the word ‘Photo’ in the Find dialog box and then add a word to describe the photos in the Replace dialog box. Then clicking on the checkmark in the top bar of the window, presto magico the files are all changed to the replacement name.
It is a fast, efficient way to rename those email image attachments that come into Mail app.
Tweet
Often times I receive multiples of photos from my kids via email. These photos come into my Mail app and I can view them and Save them from mail app.

The Save option in Mail app allows me to save each photo individually automatically to a Folder that I designate in the Mail Preferences, To designate a folder or place to always download your attachment click on General Tab and Select Downloads Folder, pop-down menu and select the Default of ‘Downloads’ Folder in your dock or ‘Other’ to pick a folder or location you wish to use.

These downloads or attachments from Mail app are given the name Photo, Photo 1, Photo 2, … and this is kind of annoying. I use another application called Name Mangler Droplet to actually rename these files with a more descriptive name.
I don’t know about most, but sometimes I download a file from the internet or mail and can’t seem to locate it on my hard drive. There is a way to find current files quickly on your Mac. Open a new Finder window and click on the ‘Today’ option under ‘Search For’ category on the left-hand side of your finder window. You will be able to scroll the files that you have downloaded for that day and can also arrange them by clicking on the view option ‘Date Created’ column.

I run Name Mangler Droplet, then drag and drop the files that I wish to rename into the Name Mangler Droplet window. I fill in the word ‘Photo’ in the Find dialog box and then add a word to describe the photos in the Replace dialog box. Then clicking on the checkmark in the top bar of the window, presto magico the files are all changed to the replacement name.

It is a fast, efficient way to rename those email image attachments that come into Mail app.
Tweet
Categories:
Trick or Tip
Sunday, September 20, 2009
The Forgiving Trash Can
How to Utilize the Trash Can or Delete Option in iPhoto
You can delete a folder, album, book, calendar, card, slideshow, and photo from iPhoto library. Merely select the item you wish to delete and press the Delete key. Or, you can select Photo menubar option 'Move to Trash' or simply drag and drop the item into the iPhoto Trash can icon on the left-hand side of the iPhoto Window.
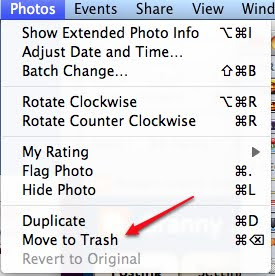
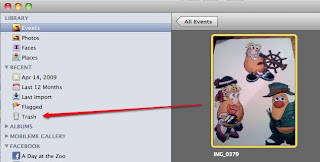
If you wish to delete an event, you will need to press the command-delete keys or drag the Event to the iPhoto Trash which is located on the left-hand side of the iPhoto window. Or, you can select the Photos menubar and select 'Move to Trash' option.
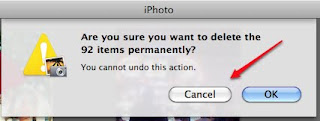
Note: If you delete an Event that includes photos you have used in a slideshow, book, calendar, card, or published album, the photos will be removed from those projects. You can retrieve your photos from iPhoto Trash until you empty the Trash, which deletes your photos permanently.
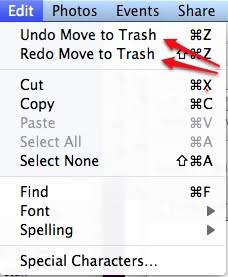
To undo the delete, click the Edit menubar option 'Undo Move to Trash'.
Or, you can view the items in the iPhoto Trash, by clicking on the 'Trash' icon on the left-hand side and drag the photos or items you wish to undelete from the trash to the iPhoto library.
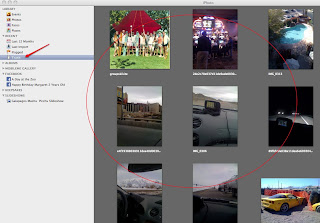
To empty iPhoto Trash, select it in the Source list, and then choose iPhoto > Empty Trash.
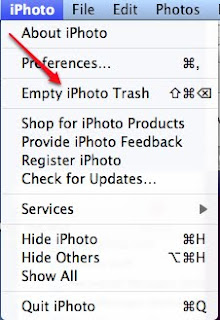
An alert dialog box, that you are about to delete items in the iPhoto Trash, will be presented and you will be given an opportunity to select OK or 'Cancel'.
Note: If you use Time Machine to back up your photo library, you can recover a photo, Event, folder, album, book, calendar, card, or slideshow even if you deleted it from the library and emptied it from the Trash. To do so, open iPhoto and choose File > Browse Backups. For more information on using Time Machine, see the topics in Mac Help. Tweet
Categories:
Trick or Tip
Friday, September 18, 2009
Resurrection of Old iPod
I was a little concerned that my old first generation iPod might be obsolete and not able to connect with iTunes 9 and Snow Leopard.
To test my theory, I first ran iTunes 9 and under the 'Preferences, Devices', I made sure that I checked ‘Prevent iPods and iPhones from syncing automatically’. So that if for some strange reason, iTunes decided to wipe out my iPod, I would retain a playable amount of music, currently on the device.
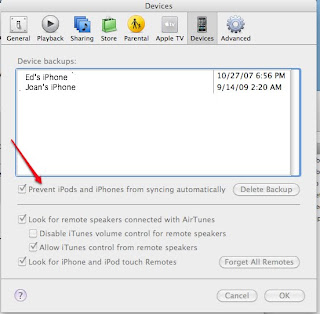
I connected the iPod to my computer running Snow Leopard and iTunes 9, using the firewire connection cable that came with the iPod, the same cable that attaches to the charging plug. I was elated to see the iPod show up in the left-hand column of the screen. During the time that it was seeking to recognize the iPod, I noticed a ‘Don’t disconnect’ icon and message to not disconnect on the ipod screen.
Eventually, a dialog box appeared in iTunes alerting me to the fact that I needed to update my iPod to 1.5. I gave my consent and allowed iTunes to download and update. Another message appeared saying that I must disconnect and replug in my device to be recognized and it was!
The iPod device showed up under DEVICES, on the left-hand side of the iTunes window, just as my iPhone has done. And to my surprise, a new interface similar to my iPhone’s appeared on the right-hand side, when I highlighted the ipod under DEVICES on left. All the information about my iPod: Name, capacity, software version, serial number, format was there, as well as, the tabs for selecting music, podcasts, iTunes U, and my Contacts. A button for restoring and checking for updates for iPod software was available as well as Options for syncing manually, enabling disk use (for storing files), syncing only checked songs and open iTunes when the iPod was connected.
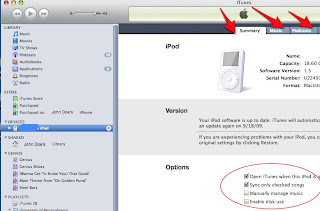
There was a convenient capacity bar along the bottom that also showed how much audio, other and free space was available on my iPod. I held down the ‘option’ key while clicking on the GB of Audio (graphically represented in blue) and presto magic, the number of songs, the number of days of music was revealed.
So I proceeded to view the options in each of the tabs across the top. Under the Music tab, I was given options to sync entire music library, or selected playlists, artists and genres or automatically feel free space with songs (allowing iTunes to choose from my music library).
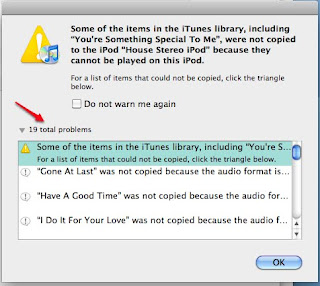
I proceeded to select new music choices for my iPod, as we had listened to this same music on road trips for nearly 5+ years or more. It was also time to update the old contacts. In syncing, I received 19 total problems. I suspect these were related to purchases and now I will have to figure out how to authorize these songs to my iPod. Well, that is another day’s project.
I am seeing that the syncing is going fast and that I am now able to sync much in the same manner as my iphone, and I like that! As Martha would say, it’s a good thing.
Knowing that I couldn’t sleep not knowing why these files did not copy, I had to research this and add to this post. Looks like the songs that were not copied were a group that were using the Apple Lossless Audio Format. There wasn’t any protection, so if I convert these to mp3, these can be added to the iPod. Case solved. Tweet
To test my theory, I first ran iTunes 9 and under the 'Preferences, Devices', I made sure that I checked ‘Prevent iPods and iPhones from syncing automatically’. So that if for some strange reason, iTunes decided to wipe out my iPod, I would retain a playable amount of music, currently on the device.

I connected the iPod to my computer running Snow Leopard and iTunes 9, using the firewire connection cable that came with the iPod, the same cable that attaches to the charging plug. I was elated to see the iPod show up in the left-hand column of the screen. During the time that it was seeking to recognize the iPod, I noticed a ‘Don’t disconnect’ icon and message to not disconnect on the ipod screen.
Eventually, a dialog box appeared in iTunes alerting me to the fact that I needed to update my iPod to 1.5. I gave my consent and allowed iTunes to download and update. Another message appeared saying that I must disconnect and replug in my device to be recognized and it was!
The iPod device showed up under DEVICES, on the left-hand side of the iTunes window, just as my iPhone has done. And to my surprise, a new interface similar to my iPhone’s appeared on the right-hand side, when I highlighted the ipod under DEVICES on left. All the information about my iPod: Name, capacity, software version, serial number, format was there, as well as, the tabs for selecting music, podcasts, iTunes U, and my Contacts. A button for restoring and checking for updates for iPod software was available as well as Options for syncing manually, enabling disk use (for storing files), syncing only checked songs and open iTunes when the iPod was connected.

There was a convenient capacity bar along the bottom that also showed how much audio, other and free space was available on my iPod. I held down the ‘option’ key while clicking on the GB of Audio (graphically represented in blue) and presto magic, the number of songs, the number of days of music was revealed.
So I proceeded to view the options in each of the tabs across the top. Under the Music tab, I was given options to sync entire music library, or selected playlists, artists and genres or automatically feel free space with songs (allowing iTunes to choose from my music library).
I proceeded to select new music choices for my iPod, as we had listened to this same music on road trips for nearly 5+ years or more. It was also time to update the old contacts. In syncing, I received 19 total problems. I suspect these were related to purchases and now I will have to figure out how to authorize these songs to my iPod. Well, that is another day’s project.

I am seeing that the syncing is going fast and that I am now able to sync much in the same manner as my iphone, and I like that! As Martha would say, it’s a good thing.
Knowing that I couldn’t sleep not knowing why these files did not copy, I had to research this and add to this post. Looks like the songs that were not copied were a group that were using the Apple Lossless Audio Format. There wasn’t any protection, so if I convert these to mp3, these can be added to the iPod. Case solved. Tweet
Categories:
iTunes
Wednesday, September 16, 2009
Home Sharing - the Missing Playlist Copy Debate
The Missing Playlist Copy Debate
After setting up Home Sharing on my network, I was able to copy songs, podcasts, movies, TV programs, audiobooks, iPhone apps, etc from my husbands computer to my computer and vice versa.
One of the things that you can’t copy is playlists. This is understandable as a playlist, is a file that contains the location of the songs in that list, not the actual songs. So a reference to a location on his machine would not be workable, unless his machine was on and running when I wished to play that list.
If you wish to transfer a playlist to your computer, there is a round about way to do so. With home sharing on, you can double-click the name of the playlist from home shared computer B, so that a new window opens, showing the songs that are in that playlist.
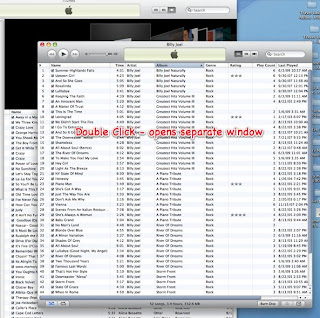
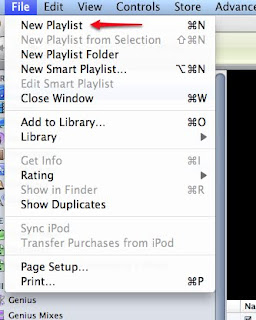
Create a new playlist on your computer A, giving it a similar playlist name. Use 'File', 'New Playlist' or cmd N.
Select All the songs in the playlist located on the Computer B and drag and drop them into the newly created playlist on Computer A.
This will create the same playlist essentially on your Computer A and also add the songs into your Computer A library, needed to play that playlist.
The one thing that is a problem is that if you already have those songs on your computer A or some of them, the process of dragging and dropping the same songs from Computer B may result in duplicates in your Computer A music library.
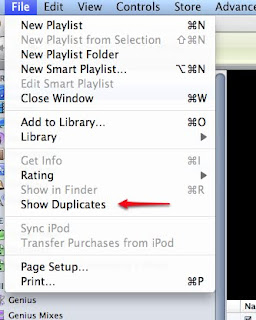
If you decide to run the ‘Show Duplicates’ from the ‘File’ menu in iTunes and then delete a duplicate file, you may run the risk of deleting the actually song file that correlates with the playlist. I suppose you could make sure you delete the song file that wasn’t added last or on the day you created the playlist. But then the file that you delete might also be used in one of your own playlists.

There is another option that allows you to export a playlist from a library and import it into another. Would this also have the same problem with finding the corresponding song file and location?
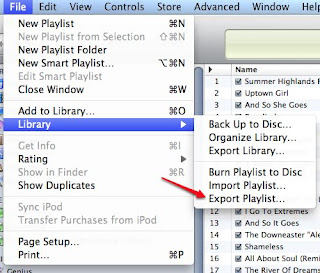
I can see why the option to import playlists might be unwieldy and why Apple did NOT include this as an option in the Home Sharing that they have provided us.
The playlist option was used extensively when the first iphone software came on the scene, to give us the option to sync partial music versus our entire music library. Now that Version 3.1 for the iPhone and iTunes 9 allow us so many more options for syncing by artist, genre … the need for a playlist to sync to our iphone isn’t necessarily bothersome for me. I have really enjoyed the option of using Genius to create some playlists for me. Tweet
After setting up Home Sharing on my network, I was able to copy songs, podcasts, movies, TV programs, audiobooks, iPhone apps, etc from my husbands computer to my computer and vice versa.
One of the things that you can’t copy is playlists. This is understandable as a playlist, is a file that contains the location of the songs in that list, not the actual songs. So a reference to a location on his machine would not be workable, unless his machine was on and running when I wished to play that list.
If you wish to transfer a playlist to your computer, there is a round about way to do so. With home sharing on, you can double-click the name of the playlist from home shared computer B, so that a new window opens, showing the songs that are in that playlist.

Create a new playlist on your computer A, giving it a similar playlist name. Use 'File', 'New Playlist' or cmd N.

Select All the songs in the playlist located on the Computer B and drag and drop them into the newly created playlist on Computer A.
This will create the same playlist essentially on your Computer A and also add the songs into your Computer A library, needed to play that playlist.
The one thing that is a problem is that if you already have those songs on your computer A or some of them, the process of dragging and dropping the same songs from Computer B may result in duplicates in your Computer A music library.
If you decide to run the ‘Show Duplicates’ from the ‘File’ menu in iTunes and then delete a duplicate file, you may run the risk of deleting the actually song file that correlates with the playlist. I suppose you could make sure you delete the song file that wasn’t added last or on the day you created the playlist. But then the file that you delete might also be used in one of your own playlists.


There is another option that allows you to export a playlist from a library and import it into another. Would this also have the same problem with finding the corresponding song file and location?

I can see why the option to import playlists might be unwieldy and why Apple did NOT include this as an option in the Home Sharing that they have provided us.
The playlist option was used extensively when the first iphone software came on the scene, to give us the option to sync partial music versus our entire music library. Now that Version 3.1 for the iPhone and iTunes 9 allow us so many more options for syncing by artist, genre … the need for a playlist to sync to our iphone isn’t necessarily bothersome for me. I have really enjoyed the option of using Genius to create some playlists for me. Tweet
Categories:
Audio,
iTunes,
Trick or Tip
Subscribe to:
Comments (Atom)

